
November 19th, 2018
Crochet Turkey Free Pattern — Thanksgiving Amigurumi with Rainbow Feathers
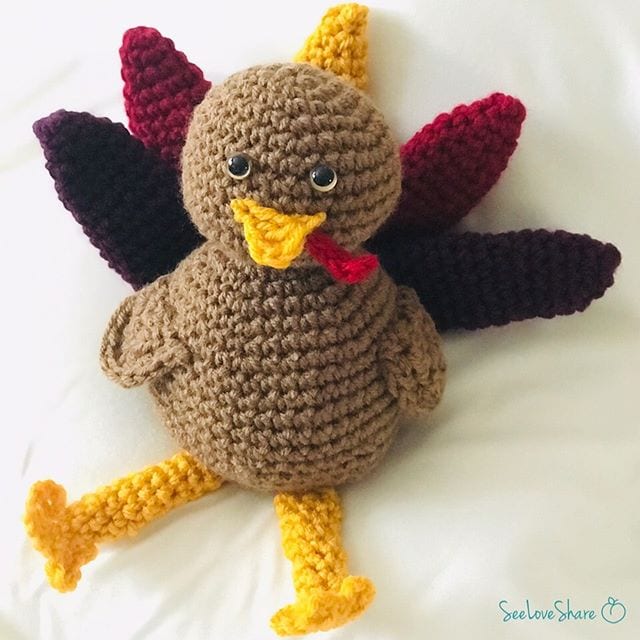
This crochet turkey free pattern is the cutest little Thanksgiving amigurumi you’ll make all season — a weighted turkey with rainbow tail feathers, sweet safety eyes, beak, wattle, wings, and legs. Set him on your Thanksgiving table as a centerpiece, gift him to grandparents, or make a whole flock for your mantel. Gobble gobble!
The weighted base means he stands upright on his own without tipping, and the rainbow feathers (one each in blue, orange, red, green, and gold) make him a real showstopper. This is an intermediate amigurumi project — perfect for crocheters comfortable with magic rings, increases, decreases, and sewing pieces together.
Why You’ll Love This Crochet Turkey Free Pattern
This little guy is the highlight of the Thanksgiving crafting season:
✔ Adorable handmade Thanksgiving decor that lasts year after year
✔ Weighted base keeps him standing upright on his own
✔ Rainbow tail feathers — fun color play with 5 different colors
✔ Sweet safety-eye amigurumi face
✔ Perfect handmade hostess gift or table centerpiece
✔ Makes a darling kids’ Thanksgiving toy
✔ Great stash-busting project — uses small amounts of yarn
✔ Pattern includes every piece: body, head, wings, beak, wattle, feet, feathers
Crochet Turkey Free Pattern Details
Skill Level
Intermediate. Requires comfort with magic ring, working in continuous rounds, increases (2 sc in stitch), decreases (sc2tog), and sewing pieces together.
Finished Size
Approximately 5-6 inches tall (including feathers), perfect for a tabletop centerpiece.
Materials You’ll Need
- Red Heart Super Saver in brown, gold, red, green, blue, and orange (small amounts of each)
- G (4.0mm) crochet hook from this complete hook set
- 6-inch scrap of fabric for the weighted pouch
- 2 x 9mm black safety eyes
- Sewing needle and thread
- Yarn needle for sewing pieces together and weaving in ends
- Scissors
- Stuffing beads (for weighted base)
- Poly-Fil fiber fill for stuffing the body, head, and feathers
Shop the materials


Red Heart Super Saver is my go-to for this project because it comes in so many colors at an affordable price — perfect when you need 6 different shades. Lion Brand Wool-Ease also works beautifully if you want a slightly softer finish.
Abbreviations (US Terms)
- mr — magic ring
- ch — chain
- sc — single crochet
- hdc — half double crochet
- dc — double crochet
- dc3tog — double crochet 3 stitches together
- sc2tog — single crochet 2 stitches together (decrease)
- sl st — slip stitch
- st(s) — stitch(es)
Step 1: Make the Weighted Pouch
This pouch sits inside the base of the turkey to keep him standing upright.
- Cut a 6-inch diameter circle from fabric.
- Knot one end of the thread and stitch a running stitch around the outside of the circle.
- Pull the thread to cinch up partway, fill with stuffing beads.
- Cinch up the rest of the way and stitch through the top a few times to secure.
Set aside — you’ll add this to the body in Round 17.
Step 2: Crochet the Body
With brown yarn, begin with a magic ring and work in continuous rounds.
Round 1: In mr, ch 1, 6 sc — (6 sc)
Round 2: 2 sc in each st — (12 sc)
Round 3: [1 sc in first st, 2 sc in next], repeat around — (18 sc)
Round 4: [1 sc in first 2 sts, 2 sc in next], repeat around — (24 sc)
Round 5: [1 sc in first 3 sts, 2 sc in next], repeat around — (30 sc)
Round 6: [1 sc in first 4 sts, 2 sc in next], repeat around — (36 sc)
Round 7: 1 sc in each st — (36 sc)
Round 8: [1 sc in first 5 sts, 2 sc in next], repeat around — (42 sc)
Rounds 9-13: 1 sc in each st
Round 14: [1 sc in first 5 sts, sc2tog], repeat around — (36 sc)
Round 15: 1 sc in each st — (36 sc)
Round 16: [1 sc in first 4 sts, sc2tog], repeat around — (30 sc)
Round 17: 1 sc in each st — (30 sc) → Add the weighted pouch to the bottom of the body now.
Round 18: [1 sc in first 3 sts, sc2tog], repeat around — (24 sc)
Round 19: 1 sc in each st — (24 sc) → Begin stuffing the body with Poly-Fil and continue stuffing as you work the last few rounds.
Round 20: [1 sc in first 2 sts, sc2tog], repeat around — (18 sc)
Round 21: [1 sc in first st, sc2tog], repeat around — (12 sc)
Round 22: sc2tog around — (6 sc)
Finish off. Tuck yarn end inside the body.
Step 3: Crochet the Head
With brown yarn, begin with a magic ring.
Round 1: In mr, ch 1, 6 sc — (6 sc)
Round 2: 2 sc in each st — (12 sc)
Round 3: [1 sc in first st, 2 sc in next], repeat around — (18 sc)
Round 4: [1 sc in first 2 sts, 2 sc in next], repeat around — (24 sc)
Round 5: [1 sc in first 3 sts, 2 sc in next], repeat around — (30 sc)
Rounds 6-10: 1 sc in each st — (30 sc)
Round 11: [1 sc in first 3 sts, sc2tog], repeat around — (24 sc)
Round 12: [1 sc in first 2 sts, sc2tog], repeat around — (18 sc)
Round 13: 1 sc in each st — (18 sc)
Finish off, cut yarn leaving a long end for sewing.
Attach the safety eyes between Rounds 7 and 8, about 3 stitches apart. Stuff the head firmly with Poly-Fil and sew it onto the top of the body. (Note: the body is worked from the bottom up and the head is worked from the top down.)
Step 4: Crochet the Wings (Make 2)
With brown yarn, begin with a magic ring.
Row 1: In mr, ch 1, 5 sc — (5 sc)
Row 2: Ch 1, turn. Sc, 2 hdc, 2 dc, 2 hdc, sc — (2 sc, 4 hdc, 2 dc)
Row 3: Ch 1, turn. Sc, sc, 2 hdc, 2 dc, 2 dc, 2 hdc, sc, sc — (4 sc, 4 hdc, 4 dc)
Finish off, cut yarn leaving a long end for sewing. Sew the wings to the sides of the body.
Step 5: Crochet the Beak and Wattle
Beak (with gold yarn)
Ch 4. Starting in the 2nd ch from hook, dc3tog. Finish off, cut yarn leaving a long end for sewing.
Wattle (with red yarn)
Ch 5. Hdc in 2nd ch from hook, sc in next ch, sl st in last 2. Finish off, cut yarn leaving end for sewing.
Sew the beak and wattle to the head just below the eyes.
Step 6: Crochet the Feet (Make 2)
With gold yarn, starting from the toes and working up the legs:
Ch 3.
Row 1: [Ch 3, dc in first ch, ch 1, sl st in first ch] repeat 2 more times to create 3 toes.
Row 2: Ch 1, turn. Sc in the top of each toe, ch 3. From this row you’ll begin working in the round (sc across the front and the ch across the back).
Row 3: 1 sc in each of the 3 sc across the front of the foot, 3 sc in ch — (6 sc)
Rows 4-9: 1 sc in each st — (6 sc)
Finish off, cut yarn leaving ends for sewing. Sew the legs to the bottom front of the body.
Step 7: Crochet the Feathers (Make 5 — one each in blue, orange, red, green, gold)
Begin with a magic ring.
Round 1: In mr, ch 1, 4 sc — (4 sc)
Round 2: [2 sc in first st, 1 sc in next] repeat — (6 sc)
Round 3: [2 sc in first st, 1 sc in next 2] repeat — (8 sc)
Round 4: [2 sc in first st, 1 sc in next 3] repeat — (10 sc)
Round 5: [2 sc in first st, 1 sc in next 4] repeat — (12 sc)
Rounds 6-8: 1 sc in each st — (12 sc)
Round 9: [2 sc in first st, 1 sc in next 5] repeat — (14 sc)
Rounds 10-14: 1 sc in each st — (14 sc)
Round 15: [sc2tog, sc in next 5] repeat — (12 sc)
Round 16: 1 sc in each st — (12 sc)
Round 17: [sc2tog, sc in next 4] — (10 sc)
Finish off, cut yarn leaving a long end for sewing. Lightly stuff each feather (don’t overstuff — they should stay relatively flat).
Sew the feathers to the back of the turkey in a semicircle shape, with the gold or red one as the centerpiece and the others fanning out around it.

Enjoy! Gobble gobble!
Tips for a Picture-Perfect Turkey
- Don’t skip the weighted pouch: it’s what keeps the turkey standing upright without tipping. Stuffing beads, rice (in a tied plastic bag), or poly pellets all work.
- Stuff firmly: the body and head should be packed enough to hold shape but not stretched to the point of showing through the stitches.
- Place eyes carefully: safety eyes can’t be moved once secured. Pin them in place with stitch markers and double-check before locking them in.
- Feathers should fan in a semicircle: sew them on the back of the body, arranged with the highest one in the center and slightly shorter ones on each side.
- Use one color for the largest feathers: if rainbow feels too busy, try 5 feathers in graduating shades of one color family (warm autumnal browns and rusts work beautifully).
- Add a name tag: tie a small kraft tag around his neck with twine for a Thanksgiving table place setting.
Frequently Asked Questions
How long does this crochet turkey take to make? Plan for 6-10 hours of crochet time, depending on your speed. The body is the longest piece; the feathers and small parts go quickly.
Is this a beginner pattern? No — this is intermediate. You should be comfortable with magic ring, working in continuous rounds, increases, decreases, and sewing pieces together with a tapestry needle.
Can I skip the weighted pouch? You can, but the turkey won’t stand upright as well. The weight keeps him from tipping forward when his feathers are sewn on the back.
What can I use instead of stuffing beads? Rice in a tied plastic bag, dried beans, poly pellets, or aquarium gravel all work as weight alternatives.
Is this kid-safe? Safety eyes have small parts and aren’t recommended for children under 3. For a baby-safe version, embroider eyes with black yarn or use felt circles instead.
Can I sell finished turkeys? Yes — small batch sales are allowed for personal income. Please credit SeeLoveShare as the designer.
Can I customize the feather colors? Absolutely! Try autumnal tones (burgundy, rust, mustard, deep green, cream) for a more sophisticated look, or stick to traditional rainbow for a kid-friendly version.
More Fall & Thanksgiving Patterns You’ll Love
- Mini Crochet Pumpkin Embellishments — Free Pattern
- Farmhouse Stackable Crochet Pumpkins
- Autumn Maple Leaf Garland — Free Crochet Pattern
- Rustic Crochet Cable Table Runner
- Bobble Pumpkin Pillow — Crochet Pattern
Save This Crochet Turkey Pattern
Want to come back to this crochet turkey free pattern later? Save it to Pinterest so you can find it when Thanksgiving crafting season hits — and share it with your crocheting friends!