

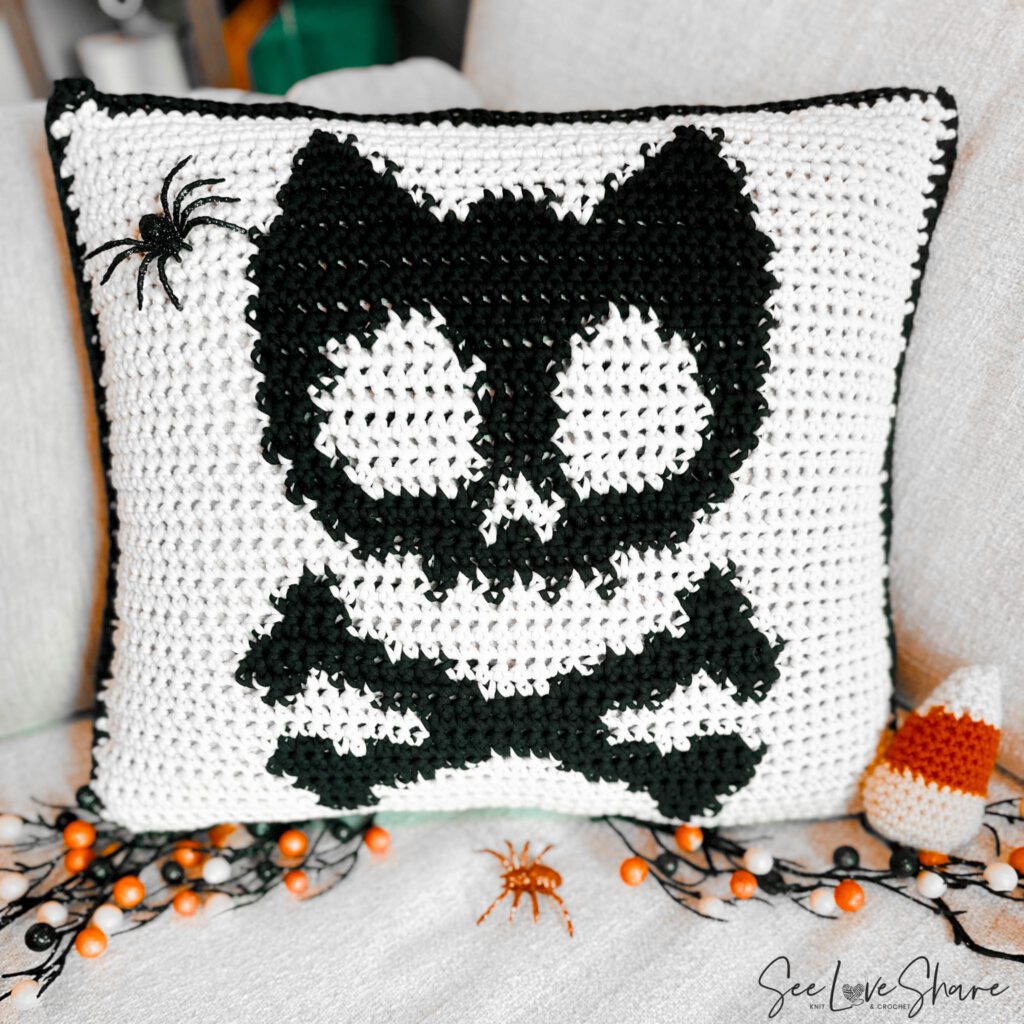
Dive into spooky season with this Halloween cat skull crochet pillow pattern — a quirky, intermediate-friendly intarsia design that brings a touch of dark whimsy to your home decor. Perfect for Halloween parties, October mantels, gothic-inspired living rooms, or as a treasured handmade gift for the spooky-aesthetic lover in your life. The cat skull motif is striking, modern, and surprisingly approachable thanks to clear row-by-row instructions and a colour chart.
This Halloween cat skull crochet pillow pattern is available as a clean, printable PDF on Etsy. It includes the full row-by-row pattern, intarsia colourwork notes, a colour chart, and finishing instructions for an 18×20 pillow. There’s also a coordinating skull-only pattern available with a bundle discount — make the pair for an instant Halloween statement set.
Get the printable PDF
Halloween Cat Skull Pillow Pattern PDF
Instant download with the full row-by-row pattern in a clean, ad-free, print-friendly layout — including the intarsia colour chart and finishing notes. Use code SEELOVE15 for 15% off.
Why You’ll Love This Halloween Cat Skull Crochet Pillow
This pillow has become a fan favourite for spooky-season decor:
✔ Bold cat skull motif works for Halloween AND year-round goth/dark academia decor
✔ Intarsia colourwork uses simple stitches with high visual impact
✔ Quick weekend project for intermediate crocheters
✔ Resizable via additional rounds of edging
✔ Coordinates with the matching skull pillow pattern for a set
✔ Stunning Halloween hostess gift or party decor centerpiece
✔ Customize colours to match your decor (try cream/black, blush/charcoal, or burgundy/cream)
✔ Stores flat between seasons — pull out fresh every October
The Halloween cat skull crochet pillow pattern is the kind of decor that gets noticed — equal parts spooky, stylish, and statement-making. It transitions beautifully from October Halloween parties to year-round eclectic home decor.
Pattern Details
Skill Level
Intermediate — perfect for crocheters with some experience. The pattern uses intarsia colourwork (changing colours in the middle of rows) plus basic shaping and finishing.
Finished Size
The pattern is written for an 18×20 inch pillow and is easily resized for larger pillow forms by adding rounds of edging.
Gauge
4″ x 4″ (10cm x 10cm) = 10 sc x 11 rows with 8 mm (US L/11) crochet hook
Materials You’ll Need
Yarn (#5 Bulky)
The pattern is shown in Bernat Maker Home Dec in these colours:
- Cream (Main Colour): 1 ball — 250g / 8.8oz, 317yd / 290m (background of the pillow)
- Black (Contrast Colour): 1 ball — 250g / 8.8oz, 317yd / 290m (the cat skull silhouette)

You can absolutely customize the colour palette — try burgundy and cream for a vampire-inspired vibe, charcoal and blush for soft goth, or cream-on-cream for a textural monochrome version. Any #5 bulky weight yarn will work.
Tools and Supplies
- 8.0 mm (US L/11) crochet hook
- Tapestry needle for weaving in ends
- Scissors
- 18×20 pillow insert OR polyfil stuffing
The Intarsia Crochet Technique
This Halloween cat skull crochet pillow pattern uses intarsia crochet — a technique that involves using multiple colours in a single row or round to create a specific design. Don’t be intimidated by the name: it’s essentially just single crochet with strategic colour changes, all worked from a clear chart.
Each square on the colour chart represents one single crochet stitch. At the end of each row, you chain 1 and turn. Beginning chain-1s don’t count as stitches throughout the entire pattern. The pattern is written out row-by-row, but you can also follow the graph for the colour work.
Once both panels are complete, edge each panel with single crochet to ensure clean, even seams. You can scale up by adding more rounds of edging.
Tips for Clean Colour Changes
- Finish the last stitch with the old colour: Work until there are two loops on your hook with the old colour.
- Yarn over with the new colour: Before completing the last stitch with the old colour, yarn over with the new colour.
- Pull through loops: Finish the last stitch by pulling through the last two loops with the new colour.
- Secure the old colour: Once you’ve changed colours, secure the yarn of the old colour by either crocheting over the tail or by weaving it in later.
Clean colour transitions are what separate an amateur-looking pillow from a designer-quality one. Worth the extra few seconds at each colour change to keep the cat skull motif sharp.
Get the Matching Skull Pillow Pattern
The cat skull has a coordinating big sister — a classic Halloween skull pillow pattern that pairs beautifully on a couch, bench, or Halloween-themed display. Grab both for an instant matching set.
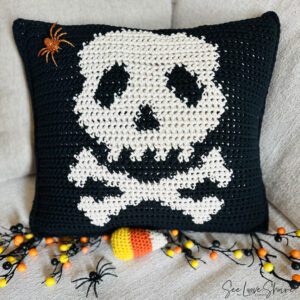
👉 View the matching Skull Pillow Pattern →
Bundle discount: Already grabbed the cat skull pattern? Use coupon code HALLOWEENREPEAT25 for 25% off the matching skull pillow pattern on Etsy.
Want the polished PDF version?
Grab the Ad-Free Printable Pattern
Same pattern, beautifully formatted for printing and bringing to your crochet chair — with the full colour chart, intarsia notes, and finishing instructions. Use code SEELOVE15 for 15% off.
Frequently Asked Questions
How long does the Halloween cat skull crochet pillow take to make? Most intermediate crocheters finish in 15-25 hours depending on speed. A great long weekend or week-of-evenings project.
What pillow size does this fit? The pattern is written for an 18×20 inch pillow form, but is easily resized for larger forms by adding rounds of edging.
Can I make this in different colours? Absolutely. The cat skull looks gorgeous in any high-contrast colour combo — try cream/black (shown), burgundy/cream, charcoal/blush, or all-black-on-cream.
Is intarsia crochet hard? If you can change colours mid-row and follow a chart, you can do intarsia. The PDF includes detailed colour change technique notes that walk through every step.
Can I make matching pillows in the set? Yes! The companion Halloween skull pillow uses the same technique. Use coupon HALLOWEENREPEAT25 for 25% off the matching pattern.
Is the pattern available for free? The full pattern is available on Etsy for a small fee. Your purchase supports the work that goes into designing, testing, and sharing patterns. Thank you!
More Halloween Crochet Patterns You’ll Love
 Halloween Skull Pillow — Matching Companion Pattern
- Crochet Witch Hat Mini Halloween Ornament — Free Pattern
- Spooky Boo Halloween Ghost Garland — Free Pattern
- Halloween Skull Garland — Free Pattern & Beginner Guide
- Browse the Full Halloween Crochet Patterns Hub →


Save This Halloween Cat Skull Pillow Pattern
Want to come back to this Halloween cat skull crochet pillow pattern later? Save it to Pinterest so you can find it when spooky season arrives — and share it with your crocheting friends!