All Baby/Toddler/Kids All Home Decor Crochet
July 27th, 2018
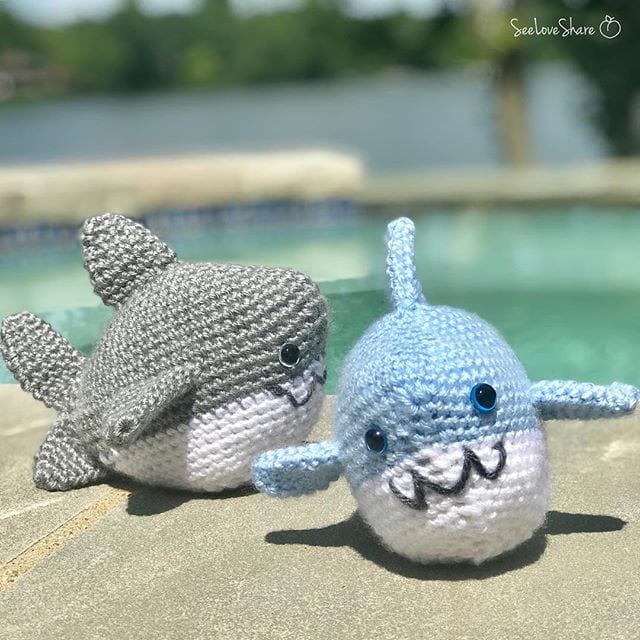
Crochet Sharky the Shark!
I know… original name :). Look, I’m creative in most areas!! Naming things just isn’t one of those areas! As a child I named by pet budgie – Budgie. Seriously, that happened ????. Anyhoo, this guy is super cute. Make him and name him whatever you want!!

Notes:
This pattern is worked from the top of Sharky down. We work the body first then attach the fins at the end.
Abbreviations:
beg = beginning;
ch = chain;
dc (sc) = double crochet (single crochet);
dc2tog (sc2tog) = (insert hook as indicated, yoh and draw loop through) twice, yoh and draw through all 3 loops on hook;
rep = repeat;
rs = right side;
sp(s) = space(s);
ss = slip stitch;
st(s) = stitch(es);
dc = double crochet;
yoh = yarn over hook.
Materials:
- Redheart Baby Hugs in Dolphin (Grey), Frosting (White) and Sky (Blue).
- 5.0mm crochet hook
- Polyfill Stuffing / toy stuffing
- Embroidery needle
- Toy eyes (of you can embroider these in)
Pattern:
Body:
With Grey (or blue) Ch 12
Rnd 1: Sc in 2nd ch from hook, sc in next 10 ch, 4sc in last st, 10 sc across the back of the foundation ch, 4 sc in last st (28 sts)
Rnd 2: Sc in next 11 sc, 2 sc in next 2 st, sc in next 12 st, 2 sc in next 2 st (31 sts)
Rnd 3: Sc in next 13 sc, 2 sc in next 2 sc, 14 sc, 2 sc in next 2 sc (35)
Rnd 4: Sc in next 15 sc, 2 sc in next 2 sc, 16 sc, 2 sc in next 2 sc (39)
Rnd 5: Sc in next 17 sc, 2 sc in next 2 sc, 18 sc, 2 sc in next 2 sc (43)
Rnd 6: Sc in next 19 sc, 2 sc in next 2 sc, 19 sc, 2 sc in next 3 sc (48)
Rnd 6: Sc in next 20 sc, 2 sc in next 3 sc, 22 sc, 2 sc in next 3 sc (54)
Rnd 7: Sc in next 23 sc, 2 sc in next 3 sc, 25 sc, 2 sc in next 3 sc (60)
Rnd 8-9: Sc around (60)
Rnd 10: Sc 27, sc2tog twice, sc in next 29, sc2tog twice (56)
Rnd 11: Sc 25, sc2tog twice, sc in next 27, sc2tog twice (54)
Rnd 12: Sc 23, sc2tog twice, sc in next 25, sc2tog twice (50)
Rnd 13: Sc 21, sc2tog twice, sc in next 23, sc2tog twice (48)
Switch to white–
Rnd 14: Sc 19, sc2tog , sc in next 21, sc2tog (46)
Rnd 15: Sc 18, sc2tog , sc in next 20, sc2tog (44)
Rnd 16: Sc 17, sc2tog , sc in next 19, sc2tog (42)
From here, attach the eyes about 5 stitches from the centre between rows 11 & 12. Begin to stuff the body as much as you can before proceeding on to finish the body.
Rnd 17: Sc 16, sc2tog , sc in next 18, sc2tog (40)
Rnd 18: Sc 15, sc2tog , sc in next 17, sc2tog (38)
Rnd 19: Sc 14, sc2tog , sc in next 16, sc2tog (36)
Rnd 20: Sc 13, sc2tog , sc in next 15, sc2tog (34)
Stuff the body with filling one more time before you get ready to close it all up.
Rnd 21-24: Sc2tog all the way around until only 3 sc remain. Bind off and tuck in end
Fins:
Top and Sides: Make 3
With Grey (or Blue) Ch3 join with ss to first sc to make round
Rnd 1: 6 sc in loop, join with ss to first sc, ch 1 (6)
Rnd 2: *2 sc in next st, sc* around, join with ss to first sc, ch 1 (9)
Rnd 3: sc around
Rnd 4: *2 sc in next st, 2 sc* around, join with ss to first sc, ch 1 (12)
Rnd 5: sc around
Rnd 6: *2 sc in next st, 3 sc* around, join with ss to first sc, ch 1 (15)
Rnd 7: sc around
Rnd 8: sc around, bind off, leaving a long tail to attach to body
Back fin: Made in 2 pieces
With Grey (or Blue) Ch3 join with ss to first sc to make round
Piece 1:
Rnd 1: 6 sc in loop, join with ss to first sc, ch 1 (6)
Rnd 2: *2 sc in next st, sc* around, join with ss to first sc, ch 1 (9)
Rnd 3: sc around
Rnd 4: *2 sc in next st, 2 sc* around, join with ss to first sc, ch 1 (12)
Rnd 5-6: sc around
Bind off, leaving a long tail to attach to body
Piece 2:
Rnd 1: 6 sc in loop, join with ss to first sc, ch 1 (6)
Rnd 2: *2 sc in next st, sc* around, join with ss to first sc, ch 1 (9)
Rnd 3: sc around
Rnd 4: *2 sc in next st, 2 sc* around, join with ss to first sc, ch 1 (12)
Rnd 5-12: sc around
Bind off, leaving a long tail to attach to body
Assembly:
Attach the top fin in the centre of the top of the body, over the foundation row. Weave in ends.
Attach the side fins between rows 11&12 (so 2 rows of grey/blue are below the fin) and centred from front to back and in line with the top fin. Weave in ends.

Attach the two back fins, the longer one on the top of the tail and the shorter one on the bottom. Again, it should line up with the top fin and the bottom little piece should start where the white begins and the longer fin above that – as shown in the picture here:
Enjoy!

