

February 12th, 2026
Faux Crochet Cable Pillow Pattern — 18×18 with Video Tutorial
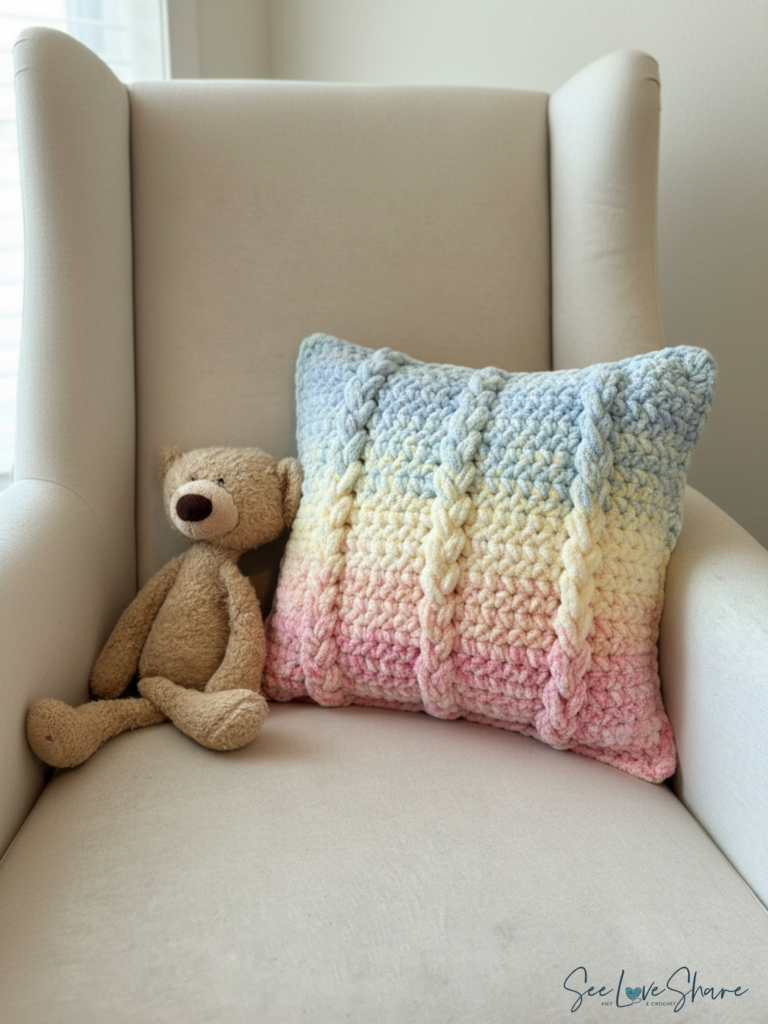
If you’re searching for a faux crochet cable pillow pattern with step-by-step video tutorials, this 18×18 cover is the perfect project. Designed with super bulky yarn and a braided crochet texture, this modern farmhouse pillow adds bold dimension to any space — without a single traditional crochet cable stitch.
This design uses my signature Twist & Pull technique to create dramatic faux cable texture with nothing but chains, single crochets, and slip stitches. No front post stitches. No complicated shaping. Just simple stitches transformed into a statement pillow — and yes, I walk you through every step on video.
Get the printable PDF
18×18 Faux Crochet Cable Pillow Pattern PDF
Instant download with the full row-by-row pattern in a clean, ad-free, print-friendly layout — including all 4 video tutorial links embedded, photo references, and lifetime access in your Etsy account. Use code SEELOVE15 for 15% off.
Why You’ll Love This Faux Crochet Cable Pillow
This pillow is one of the most satisfying make-it-in-a-weekend projects in the SeeLoveShare collection:
✔ Stunning faux cable texture with NO traditional cable stitches
✔ Uses only chains, single crochet, and slip stitches — beginner-friendly
✔ Super bulky yarn + 8mm hook works up FAST (weekend project)
✔ 4 step-by-step video tutorials walk you through every stage
✔ Modern farmhouse aesthetic that fits any decor
✔ Generous 18×18 size makes a real statement
✔ Signature Twist & Pull braid technique is mesmerizing to make
✔ Stunning handmade gift, housewarming present, or self-care project
The faux crochet cable pillow pattern is the kind of project that delivers serious visual impact with surprisingly approachable techniques. Once you understand the Twist & Pull moment, you’ll want to make these in every colour.

Pattern Details
Skill Level
Beginner-friendly with video tutorials. If you can chain, single crochet, and slip stitch, the videos make this very manageable.
Finished Size
18 x 18 inches — perfect for a couch accent pillow, bed throw pillow, or chair cushion.
Gauge
7 sc x 8 rows = 4″ square using 8.0 mm hook. Gauge isn’t overly critical for pillows, but consistent tension helps maintain a clean braid structure.
Materials You’ll Need
- 1 skein of Bernat Blanket Ethereal Stripes (shown in Springtime) — 300g / 10.5oz, 201m / 220yds
- 8.00mm (US L) crochet hook from this complete hook set
- 18″ x 18″ pillow insert
- Yarn needle for weaving in ends
- Scissors
The Ethereal Stripes Springtime colourway gives this pillow its dreamy, multi-tonal look — but any solid super bulky yarn will work beautifully if you’d prefer a monochrome version. Try Bernat Blanket in any neutral for a modern farmhouse vibe.
Abbreviations (US Terms)
ch – chain
sc – single crochet
sl st – slip stitch
RS – right side
st(s) – stitch(es)
Turning chain does not count as a stitch.
The Crochet Pillow Pattern
Make 2 panels (front + back).
Foundation
Ch 55
💡 Tip: Keep your foundation chain relaxed so your braid loops stay soft.
Row 1 – Solid Band
Sc in 2nd ch from hook.
Sc in next 5 ch. (6 sc total)
(Sl st in next 10 ch, sc in next 6 ch) × 3.
Ch 1, turn.
Stitch count: 54
This establishes the alternating sections that form your braid base.
Row 2 – Chain Loop Band
Sc in first 6 sts.
(Ch 10, skip next 10 sl sts, sc in next 6 sts) × 3.
Ch 1, turn.
Stitch count: 54 (chain spaces included)
🎥 Watch Row 2 (Creating the Chain Loops):
Make sure your chains are not too tight — these become your braid loops.
Row 3 – Close Loop Band
Sc in first 6 sts.
(Sl st in each of next 10 ch, sc in next 6 sts) × 3.
Ch 1, turn.
Stitch count: 54
🎥 Watch Row 3 (Closing the Loops):
Keep your slip stitches relaxed to avoid shrinking the band.
Repeat
Repeat Rows 2 and 3 eleven more times.
You will have:
• 1 solid band
• 12 chain loop bands
• 26 total rows
• 13 horizontal bands
Fasten off. Make a second identical panel.
Twist & Pull Braid Assembly
This is where the magic happens. With right side facing:
- Twist the first horizontal chain bar to form a loop.
- Twist the second bar and pull it through the first loop.
- Continue pulling each twisted loop through the previous one.
- Sew the final loop down to secure.
🎥 Watch the Twist & Pull Assembly Tutorial Here:
This step transforms the piece completely — take your time on the first braid.
Pillow Assembly
- Place panels together with right sides facing outward.
- Single crochet around edges, working through both panels.
- Work 3 sc in each corner.
- Insert pillow form before closing final edge.
- Fasten off and weave in ends.
Optional: Secure the Braids
To prevent movement during use, anchor each braid loop down with a single crochet stitch.
🎥 Watch How to Assemble and Secure the Braids Here:
Prefer a clean printable version?
Grab the Ad-Free Printable Pattern
Same pattern, beautifully formatted for printing and bringing to your crochet chair — with all 4 video tutorial links embedded, photo references, and lifetime access in your Etsy account. Use code SEELOVE15 for 15% off.
Frequently Asked Questions
Is this faux crochet cable pillow pattern beginner-friendly?
Yes! If you can chain and single crochet, the 4 video tutorials make the rest very manageable. No traditional cable stitches required.
How long does it take to crochet?
Most crocheters finish in 6-10 hours of crochet time. The super bulky yarn and large hook really speed things up compared to standard worsted projects.
Is this a physical pillow?
No — this is a digital crochet pattern. You’ll make the pillow yourself following the instructions and videos.
Can I sell finished items?
Yes, small batch sales are allowed. Please credit SeeLoveShare as the designer.
Can I use a different yarn?
Any super bulky weight yarn will work. Just check your gauge — and remember that solid colours will give a different look than the multi-tonal Ethereal Stripes Springtime shown here.
What’s the Twist & Pull technique?
It’s my signature method for creating faux cable texture without front post stitches. You make rows of chain loops, then twist and pull them through each other to form a braid effect during assembly.
More Crochet Pillow Patterns You’ll Love
- Honeycomb Knit Throw — Chunky Cable Pattern
- Snowflake Bobble Stitch Holiday Pillow Cover
- Christmas Wreath Bobble Stitch Pillow
- Crochet Bobble Stitch Fall Pillow Pattern Bundle
- Halloween Skull Pillow — Free Pattern
- Rustic Crochet Cable Table Runner (Matching Cable Vibes)
Share Your Make
If you create this faux crochet cable pillow, tag me on Instagram @seeloveshare so I can feature your work. I truly love seeing your creations come to life!
Save This Faux Crochet Cable Pillow Pattern
Want to come back to this faux crochet cable pillow pattern later? Save it to Pinterest so you can find it when you’re ready to make it — and share it with your crocheting friends!