
March 27th, 2018
Crochet Polka Dot Pillow – Free Modern Pattern
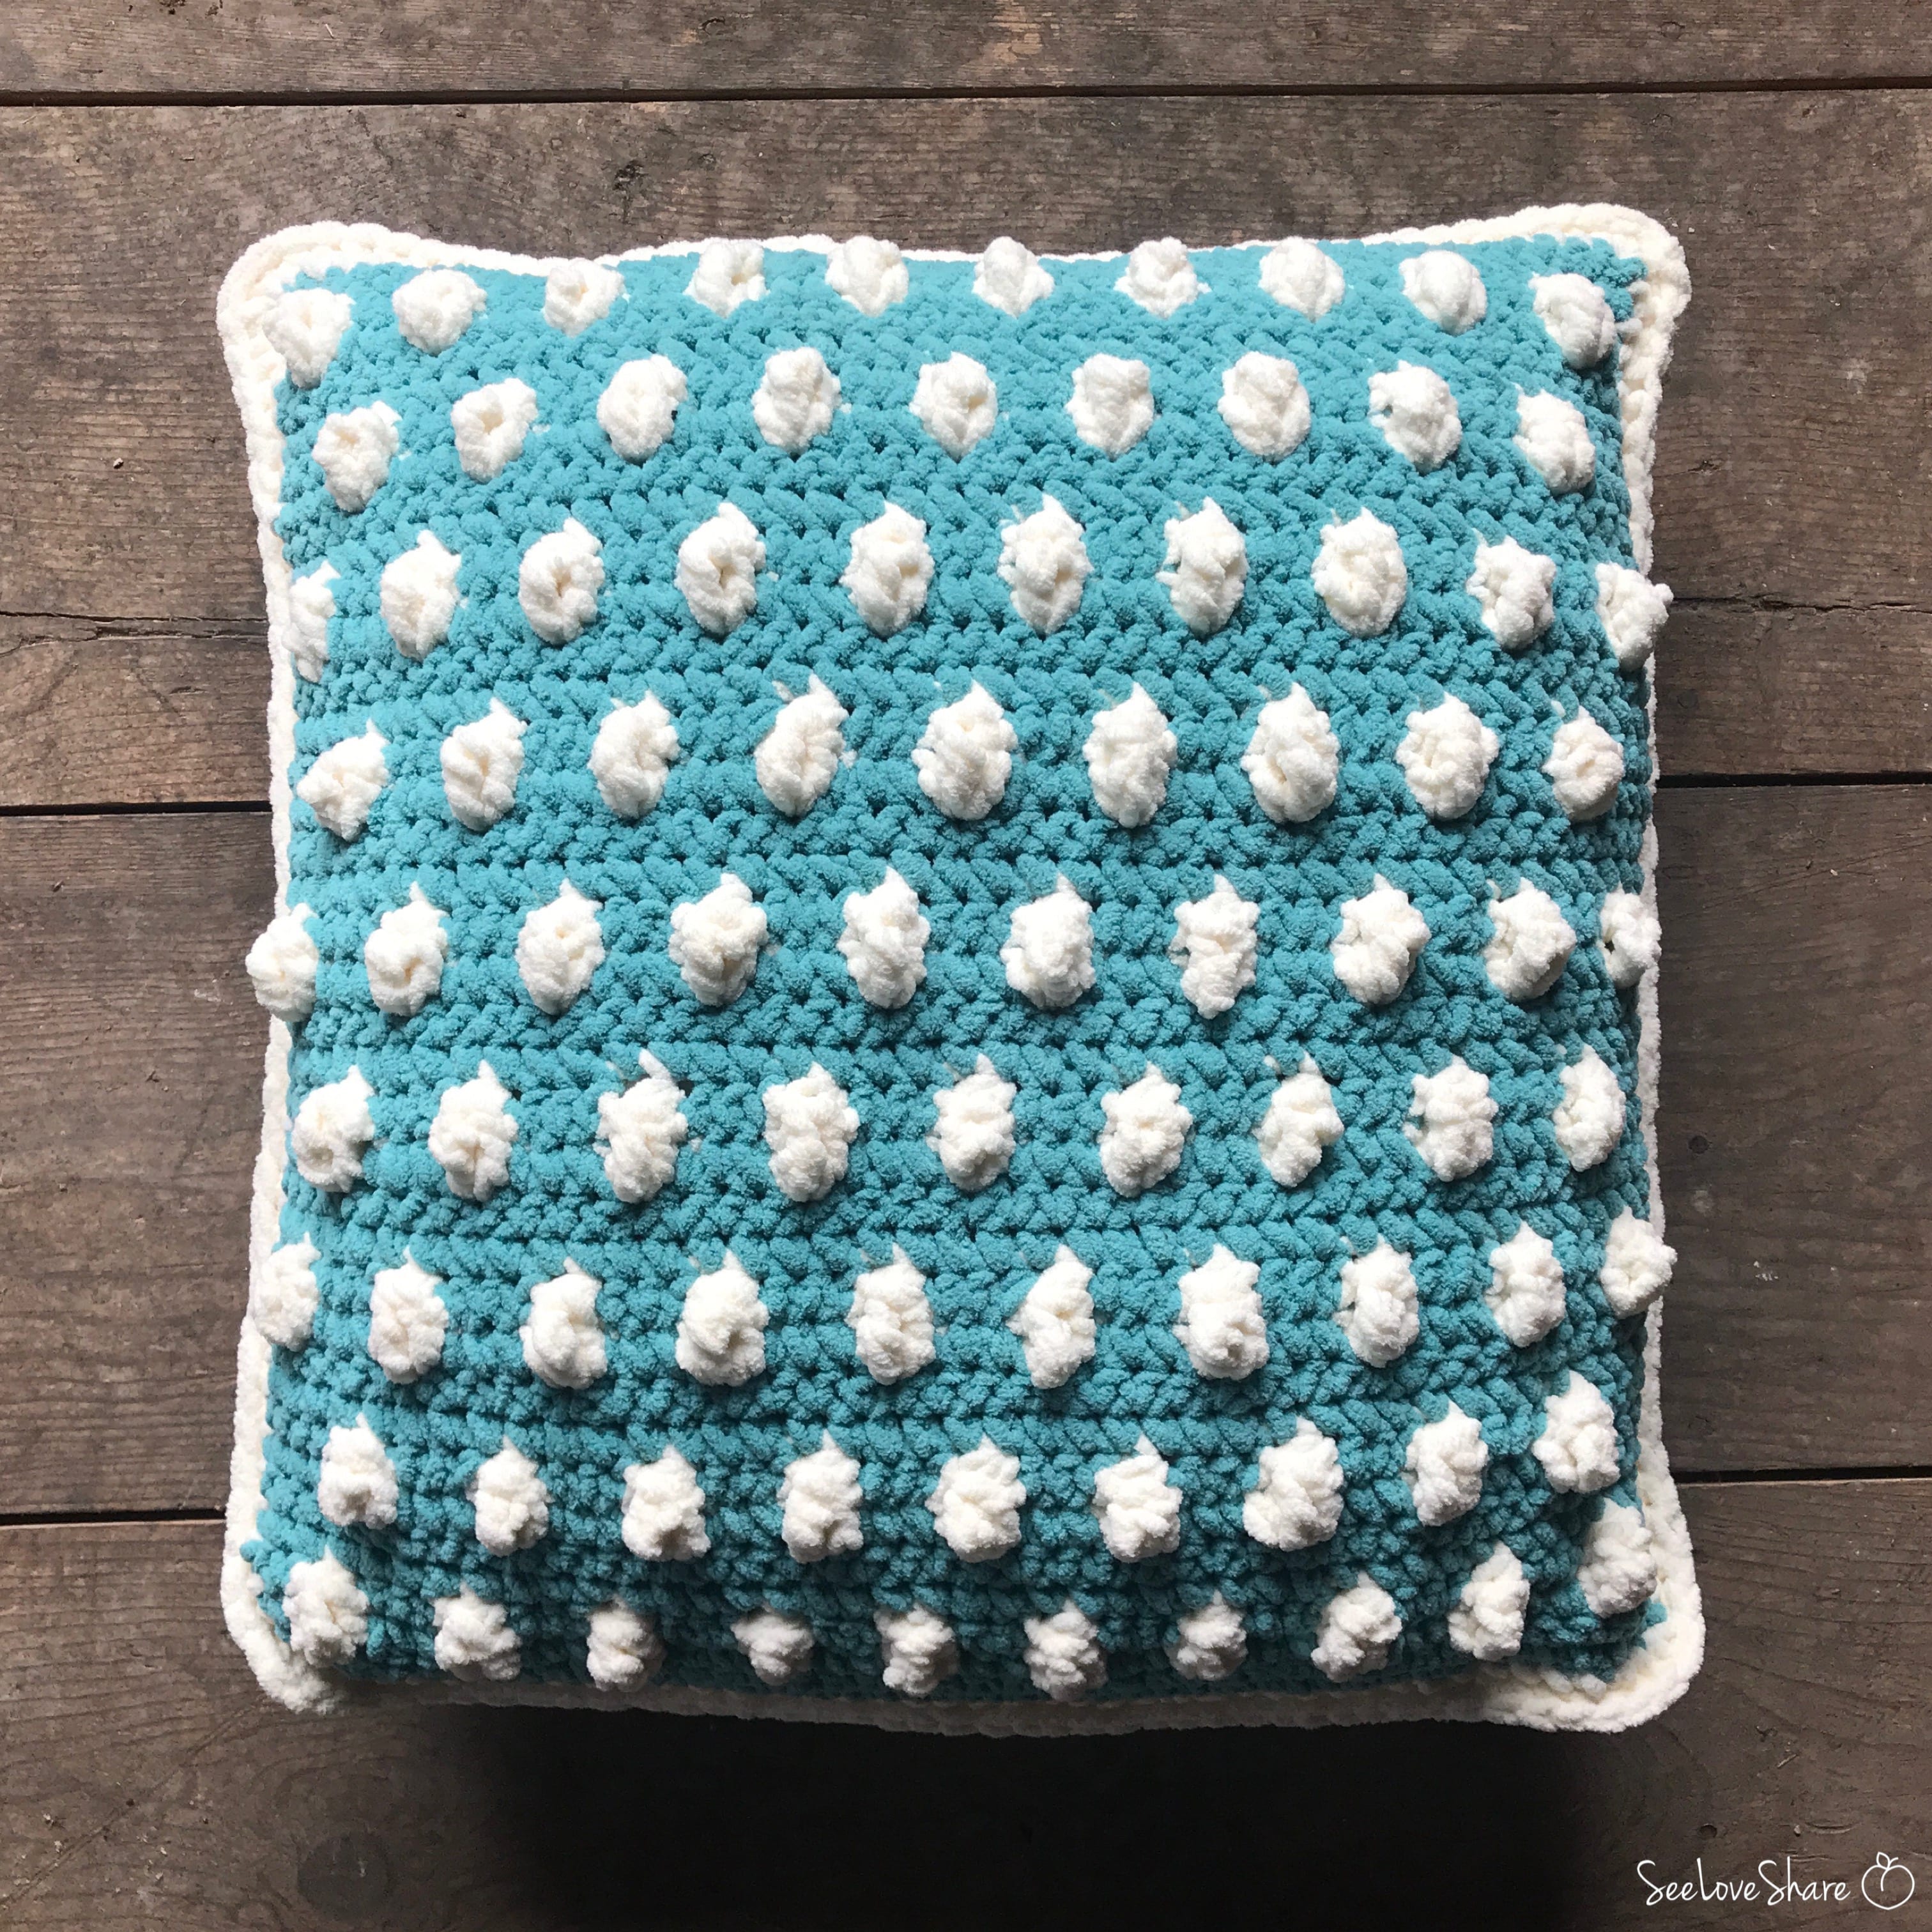
This crochet polka dot pillow pattern is a playful, modern accent piece — soft chunky yarn worked in a two-color bobble pattern that creates clean, textured polka dots across the front panel. Worked flat in two simple panels and seamed around a 24″ pillow form, it comes together in a satisfying afternoon and looks beautifully tactile in any modern living room or nursery. The full free pattern is below.
It’s part of my growing collection of crochet home decor projects — the kind of make that earns daily compliments and finishes fast enough to feel like a quick win. Let’s get into what makes this polka dot pillow special and exactly what you’ll need to make it.
Why You’ll Love This Crochet Polka Dot Pillow
- Modern and playful — clean two-color polka dots look fresh in any contemporary space
- Tactile bobble texture — the polka dots pop dimensionally off the surface, not just visually
- Works up fast — chunky yarn on an 8 mm hook means the panels grow quickly
- Beginner-friendly with one new technique — if you can single crochet, you can make this pattern; the bobble polka dot is the one new move to learn
- Carry-yarn color changes — both colors travel through the work, so there’s minimal weaving in at the end
- Endlessly customizable — swap colors to match any room, nursery, or seasonal palette
Materials for the Crochet Polka Dot Pillow
- Yarn: Bernat Blanket yarn — 1 skein in your main color, 1 skein in your contrast color for the polka dots
- Hook: 8 mm (US L/11) crochet hook
- Pillow form: 24″ pillow insert
- Tapestry needle for seaming and weaving in ends
- Scissors
Bernat Blanket is a soft, plush chenille yarn that gives the pillow its substantial, cozy feel. Any super bulky weight yarn will work — just check your gauge so the finished panel matches the pillow form. If you’d like to understand yarn weights so you can substitute confidently, the Craft Yarn Council yarn weight system is a helpful reference.
Crochet Polka Dot Pillow Pattern Details
- Skill level: Beginner / Intermediate — single crochet plus one special “polka dot” stitch
- Finished size: 24″ x 24″ (sized to a standard 24″ pillow form)
- Construction: Two flat panels (textured front + plain back), seamed around the pillow form
- Stitches used: Chain, single crochet, sc3tog, and the polka dot bobble stitch (dc, tr, dc)
Pattern Notes
This pattern uses two colors — one main color (MC) and a contrast color (CC) for the polka dots. Start with MC and switch to CC on the very last stitch of the single crochet before each polka dot. Work the polka dot bobble in CC, then switch back to MC as you pull through the last loop of the final dc.
You can hold the unused color behind your work while you crochet with the other — no need to fasten off between color changes. Both colors will travel through the pattern, making it easy to switch back and forth as you go. Just keep the carried yarn on the wrong side. If you notice the strands starting to tangle, detangle at the end of each row before it gets out of hand.
Abbreviations
- MC — Main color
- CC — Contrast color
- Sc — Single crochet
- Ch — Chain
- Sc3tog — Single crochet 3 together
- Dc — Double crochet
- Tr — Treble crochet
- Polka Dot St — Dc, tr, dc all worked into the same stitch (see below)
Special Stitch: Polka Dot Bobble
The polka dot stitch is a small bobble worked in CC into a single stitch: dc, tr, dc, all into the same st. This creates three taller stitches that pop forward from the surface, forming the dimensional polka dot. The bobble is decreased back down on the next row using sc3tog, which keeps the panel flat overall while leaving the bobble standing proud.
Free Crochet Polka Dot Pillow Pattern
Polka Dot Front Panel
With MC, ch 43.
Row 1: Sc in 2nd ch from hook and in each ch across, turn. (42 sts)
Row 2: Ch 1, sc across, turn. (42 sts)
Row 3 (RS): Ch 1, sc in first 3 sts, *change to CC, work polka dot st (dc, tr, dc) in next st, change to MC, sc in next 3 sts; repeat from * to last 2 sts, sc to end, turn. (63 sts — temporary increase from the polka dot bobbles)
Row 4 (WS): Ch 1, sc in first 2 sts, *change to CC, sc3tog over next 3 sts (closing one polka dot), change to MC, sc in next 3 sts; repeat from * to end, sc to end, turn. (42 sts — 10 polka dots formed)
Rows 5–6: Ch 1, sc across, turn.
Row 7 (RS): Ch 1, sc in first 5 sts, *change to CC, work polka dot st in next st, change to MC, sc in next 3 sts; repeat from * to last st, sc, turn. (61 sts — temporary increase)
Row 8 (WS): Ch 1, sc in first 4 sts, *change to CC, sc3tog over next 3 sts, change to MC, sc in next 3 sts; repeat from * to last 2 sts, sc to end, turn. (42 sts — 9 polka dots formed, offset from the row below)
Rows 9–10: Ch 1, sc across, turn. (42 sts)
Repeat Rows 3–10 until your panel measures 24 inches, ending after a full single crochet row.
With CC, sc evenly around the perimeter of the panel to create a clean border. Fasten off and weave in ends.
Back Panel
With MC, ch 43.
Row 1: Sc in 2nd ch from hook and in each ch across, turn. (42 sts)
Rows 2 onward: Ch 1, sc across, turn. Continue until the back panel measures 24 inches.
With CC, sc evenly around the perimeter of the panel to create a clean border. Fasten off and weave in ends.
Assembly
Place the wrong sides of the two panels together with the polka dot side facing out. With CC, start in one corner and sc through both borders to join the panels together. Work around three sides, then insert your 24″ pillow form — make sure it’s a snug fit. Continue working sc to close the last side around the pillow. Fasten off and weave in all ends.
Color & Styling Ideas
- Teal + cream — the original colorway, modern and calm
- Soft pastels — perfect for a nursery (blush + ivory, sage + cream)
- Bold contrast — mustard + navy, terracotta + cream for a more graphic look
- Holiday palettes — red + cream for Christmas, blush + cream for Valentine’s, black + cream for Halloween
- Monochrome — same color in two slightly different tones for a subtle, sophisticated polka dot
Love free patterns?
Get New Patterns Delivered to Your Inbox
Can I make this pillow in a different size?
Absolutely. Cast on any multiple of 4 stitches plus 3 (or adjust based on your hook and yarn) to resize. Then work to your desired length and use a pillow form that matches your finished panel size. The polka dot row repeat doesn’t lock you to 24 inches — it just happens to be the size shown.
Why are my colors tangling?
Because both colors are carried through the pattern, the strands can twist as you work. The fix is simple: at the end of each row, take a few seconds to untwist the two skeins before you turn. A few seconds of detangling each row prevents a full knot later.
What size pillow form should I use?
This pattern is sized for a 24″ pillow form. A slightly smaller form (22″) will give you a plumper, more filled pillow — a slightly larger form (26″) will stretch the cover for a snugger fit. Match the form to the panel size you make.