
November 15th, 2021
Free Crochet Dog Paw Pattern — Easy Paw Print Motif Applique
This crochet dog paw pattern is the cutest little applique you’ll work up all year. The free paw print motif is small enough to whip up in under 30 minutes, customizable in any colour, and versatile enough to add to almost anything — Christmas stockings, blankets, pillows, bags, hats, scarves, sweaters, baby items, you name it.
I originally designed this crochet dog paw pattern as an embellishment for a Christmas stocking (because no pup should be left out of the holiday season), but the more I made them, the more I realized this little paw print belongs on EVERYTHING. The full free pattern is written out below — let’s go!
Why You’ll Love This Crochet Dog Paw Pattern
This is one of those patterns that does serious work for how quick and easy it is:
✔ Works up in under 30 minutes per motif
✔ Uses scrap yarn — perfect for stash-busting
✔ Beginner-friendly basic stitches (sc, hdc, dc, tr)
✔ Versatile applique — sew onto anything
✔ Customizable in any colour (black, brown, cream, pink, holiday colours)
✔ Great for pet-themed gifts, decor, and personalized projects
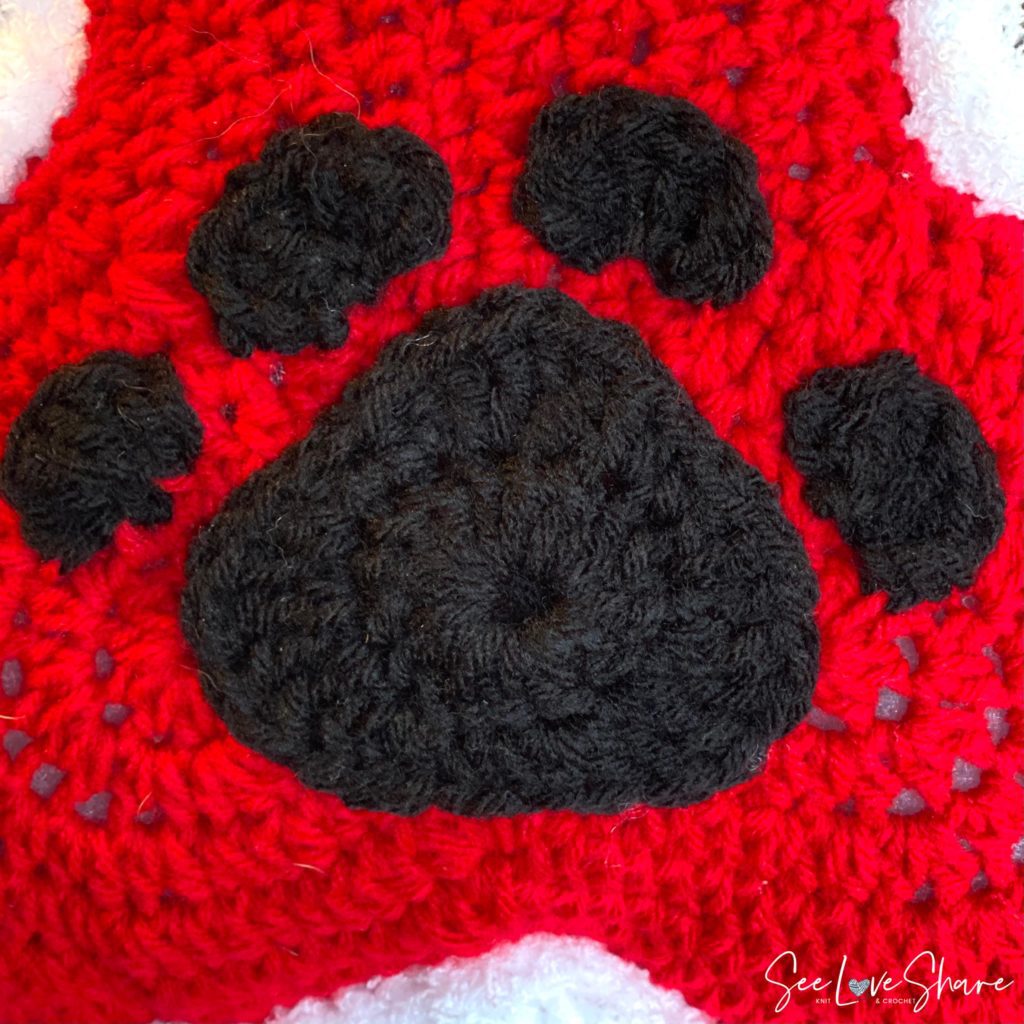
The crochet dog paw pattern is one piece (the pad) plus four small toes, all sewn together onto your project. The toes can also be omitted for a more compact “paw bean” look if you want a smaller motif.
Project Ideas for the Crochet Dog Paw Pattern
Once you make one of these little paw prints, you’ll see opportunities to use them everywhere. A few favourites:
- Christmas stockings — add a paw print to your pet’s stocking (or each pet’s stocking) for a personalized holiday touch
- Pet blankets and beds — applique a few paws onto a baby blanket-sized throw for a custom pet bed
- Tote bags — sew onto a plain canvas or crocheted tote for a dog-mom signature
- Pillows and cushions — scatter several paws across a throw pillow for pet-themed home decor
- Baby items — adorable on baby blankets, bibs, or bonnets (paired with our other amigurumi animals)
- Sweaters and hats — small applique on the chest of a kid’s sweater or the front of a beanie
- Scarves and headbands — one paw at each end of a scarf for whimsy
Materials
- Worsted weight yarn in your colour of choice (black for traditional paw prints, but any colour works — try pink, brown, cream, or holiday red/green)
- 5mm (H/8) crochet hook
- Tapestry needle for weaving in ends and sewing the paw onto your project
- Scissors
Yarn quantity for the crochet dog paw pattern is minimal — a small amount of leftover yarn is enough for several paws. Excellent stash-busting project.
Abbreviations
ch = chain
sc = single crochet
hdc = half double crochet
dc = double crochet
tr = treble crochet
slst = slip stitch
st(s) = stitch(es)
rnd = round
[ ] = work all stitches inside the brackets into the same stitch
Crochet Dog Paw Pattern: The Paw Pad
The main paw pad is worked in the round, starting from a small chain ring and growing outward in two rounds. The shaping comes from clustering multiple stitches into single stitches to create the rounded, slightly oval paw shape.
Foundation: With your chosen colour, ch 4 and join with a slst to the first ch to form a ring.
Rnd 1: Ch 2, work 15 dc within the loop. (15 dc total)
Rnd 2: Brackets [ ] indicate all stitches inside the brackets are worked into the same stitch.
Ch 1, sc in same st, [hdc, dc], [2tr in same st] x 2, [2dc, hdc], [sc], [hdc & dc in same st], [dc & tr in same st], [tr & dc in same st], [dc & hdc in same st], [sc], [hdc & dc in same st], [2tr in same st] x 2, [2dc & hdc in same st], [sc], slst to first sc.
Bind off, leaving a long tail (about 8 inches) for attaching the paw to your project later.
Crochet Dog Paw Pattern: The Toes (Make 4)
The toes are tiny — each one takes about 30 seconds. Make four of them in the same colour as your paw pad.
Foundation: With same colour, ch 4.
Row 1: [hdc & dc in 2nd ch from hook], [2 dc in same st], [dc & hdc in same st].
Bind off, leaving a tail of about 6 inches to attach each toe to the stocking or project.
Repeat for all four toes. They should all be identical small curved pieces.
Assembly
Now the fun part — putting your crochet dog paw together.
- Position the main paw pad on your project where you want it.
- Arrange the four toes above the pad — slightly fanned out, with the centre two toes higher than the outer two (real paw prints have this slight fanning).
- Once you’re happy with the placement, pin the pieces in place with sewing pins so they don’t shift while you sew.
- Use the long tails from each piece and a tapestry needle to whipstitch or mattress-stitch each piece to your project.
- Weave in all ends on the inside/back of your project.
Your crochet dog paw is done!
Tips for Working the Crochet Dog Paw Pattern
Watch Your Tension
Rnd 2 has a lot of stitches clustered into single stitches — keep your tension a little loose so the paw doesn’t curl up. If it does curl, gently block it flat with a little water and pin it to a towel to dry.
Try Different Colours
Traditional paw prints are black, but the crochet dog paw pattern looks gorgeous in any colour. Pink or peach for puppy nurseries. Brown or cream for realistic prints. Holiday red, green, or gold for Christmas decor. Match the colour to your actual pup’s coat for an extra-cute personalized touch.
Make Them Bigger or Smaller
The pattern is written for worsted weight yarn with a 5mm hook. To make a smaller paw, use sport or DK weight yarn with a 3.5-4mm hook. For a larger paw, use chunky or bulky weight yarn with a 6-6.5mm hook. The pattern stays exactly the same — only the finished size changes.
Use a Sewing Pin to Place the Toes
The toes are tiny and want to move while you sew them down. Pinning them in place before stitching makes the difference between a clean-looking paw print and a wonky-looking one.
Frequently Asked Questions
Is this crochet dog paw pattern suitable for beginners? Yes — if you can work single, half double, double, and treble crochet stitches, you can make this. The cluster work in Rnd 2 is the only slightly tricky part, but the brackets in the written pattern make it clear what to do.
How big is the finished paw motif? With worsted weight yarn and a 5mm hook, the finished paw (with toes) is approximately 3 inches across. Adjust hook and yarn weight to make it smaller or larger.
Can I leave off the toes? Absolutely. Just the paw pad alone makes a nice “paw bean” shape that works great for smaller applications or a more minimalist look.
What yarn weight should I use? Worsted weight (#4) is the standard for this pattern. But the crochet dog paw pattern works in any yarn — just match your hook to your yarn weight.
Is there a PDF version? Not yet — but you can bookmark this page or print it directly from your browser. If you’d like a PDF version, drop me a note in the comments!
How do I attach it to a knit or crochet project? Use the long tail and a tapestry needle to whipstitch or mattress-stitch the paw to your project. If you’re attaching it to fabric (not a knit/crochet piece), a regular sewing needle and matching thread work well.
You Might Also Love
If you enjoyed this crochet dog paw pattern, here are more free pet-themed and embellishment patterns from SeeLoveShare to add to your queue:
- Tyson’s Doggy Bone Stocking — the perfect Christmas stocking to pair this paw motif with
- Block Stitch Pet Bandana — another pup-themed quick crochet
- Crochet Heart Embellishment — another beginner-friendly applique pattern
- Christmas Stocking Series — full collection of free crochet stocking patterns
Save This Crochet Dog Paw Pattern
Planning your next crochet project? Be sure to save this free crochet dog paw pattern to Pinterest so you can find it later — and share it with your fellow dog-loving crafters!