
April 29th, 2018
Mini Pom Pom Hack — Mass Produce Tiny Poms Without a Maker
This mini pom pom hack will forever change the way you make tiny pom poms — no mini pom maker required, no painstaking one-at-a-time finger-wrapping, and you can mass-produce dozens in a fraction of the time. I stumbled into this technique while making a giant pile of mini pink poms for a project, sitting there one-by-one frustrated, and this mini pom pom hack was the result. Total game changer.
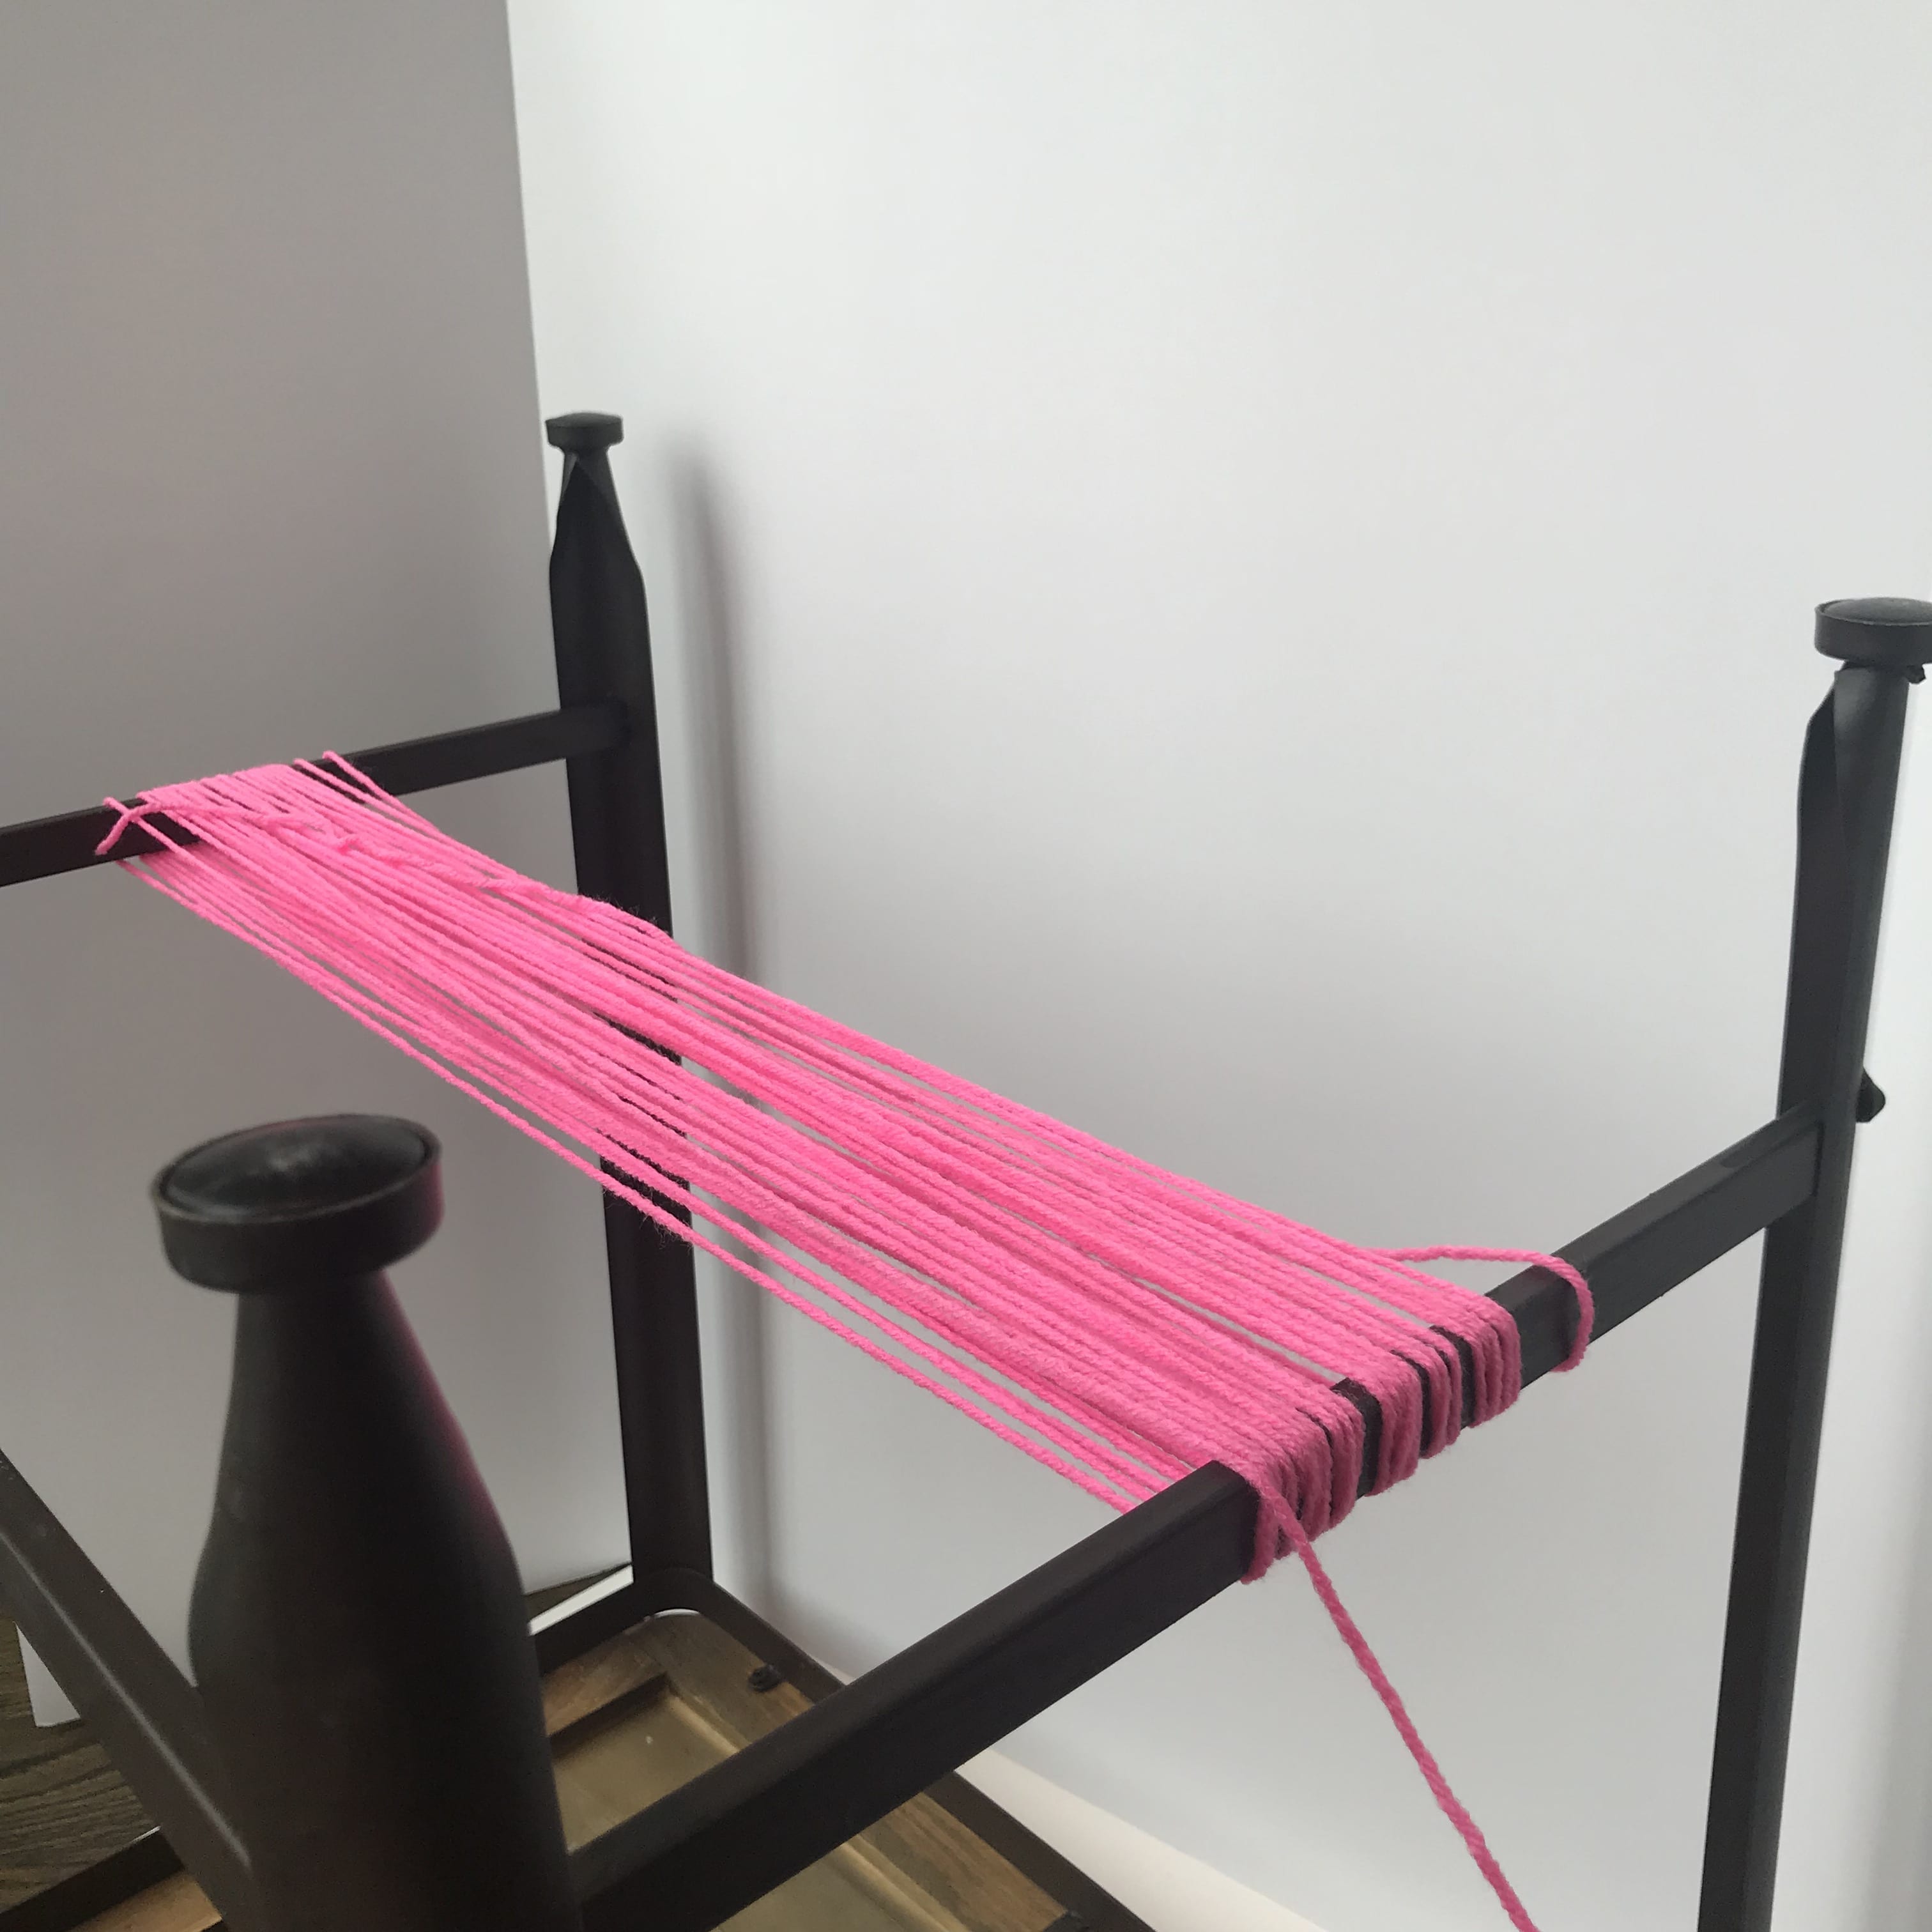
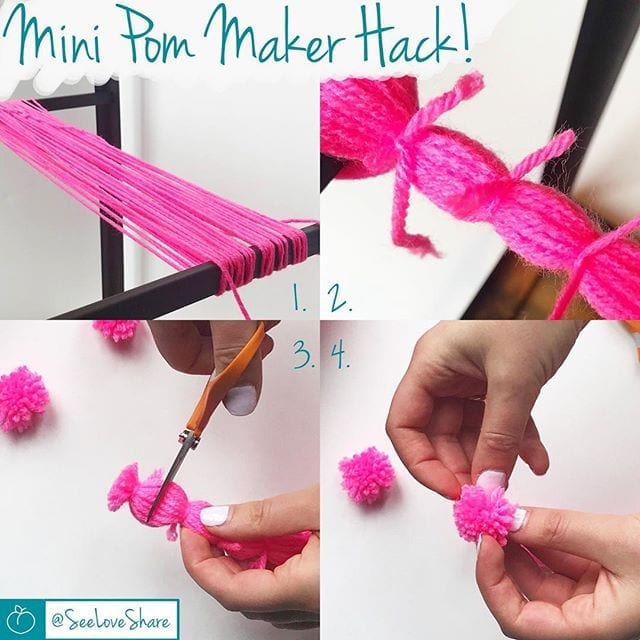
The trick is to wrap yarn around something wide (table legs, chair backs, the back of a couch — anything with two parallel surfaces a few inches apart) to make a long continuous cord. Then tie it off in small sections, snip between the ties, and fluff. That’s the entire mini pom pom hack — and you’ll end up with a row of perfect tiny poms in minutes.
Why You’ll Love This Mini Pom Pom Hack
This hack is the ultimate craft time-saver:
✔ Mass-produce 10-30+ tiny poms in minutes
✔ No mini pom maker required — use household items
✔ Perfect uniform size every time
✔ The mini pom pom hack works with any yarn weight
✔ Great for embellishing hats, scarves, blankets, garlands, and more
✔ Uses tools you already have at home (table legs, chair backs)
✔ Beginner-friendly — no special skills needed
✔ Cleaner finish than wrapping with your fingers
What You’ll Need
- Yarn — any worsted weight works (I love Red Heart Super Saver for bright vibrant pom colors)
- Two parallel surfaces about 3-6 inches apart — table legs, chair backs, the back of a couch, a sturdy book, even your forearms work in a pinch
- Small lengths of yarn for tying (scrap yarn from the same skein)
- Sharp scissors — sharper = neater poms
For best results with the mini pom pom hack, use a smooth worsted weight yarn that holds its shape when cut. Highly textured or fuzzy yarns work too but tend to fluff differently.
The Mini Pom Pom Hack — Step by Step
Step 1: Wrap a Continuous Cord of Yarn
Find two parallel surfaces 3-6 inches apart (table legs work great). Wrap yarn around them in a continuous loop — go around as many times as you want poms. More wraps per section = fuller poms. Aim for 50-100 wraps total depending on yarn thickness and how many poms you want.
When done, cut the yarn and tie the cut end to the first loop so the whole bundle stays together as a cord.
Step 2: Tie Off Every 1-1.5 Inches
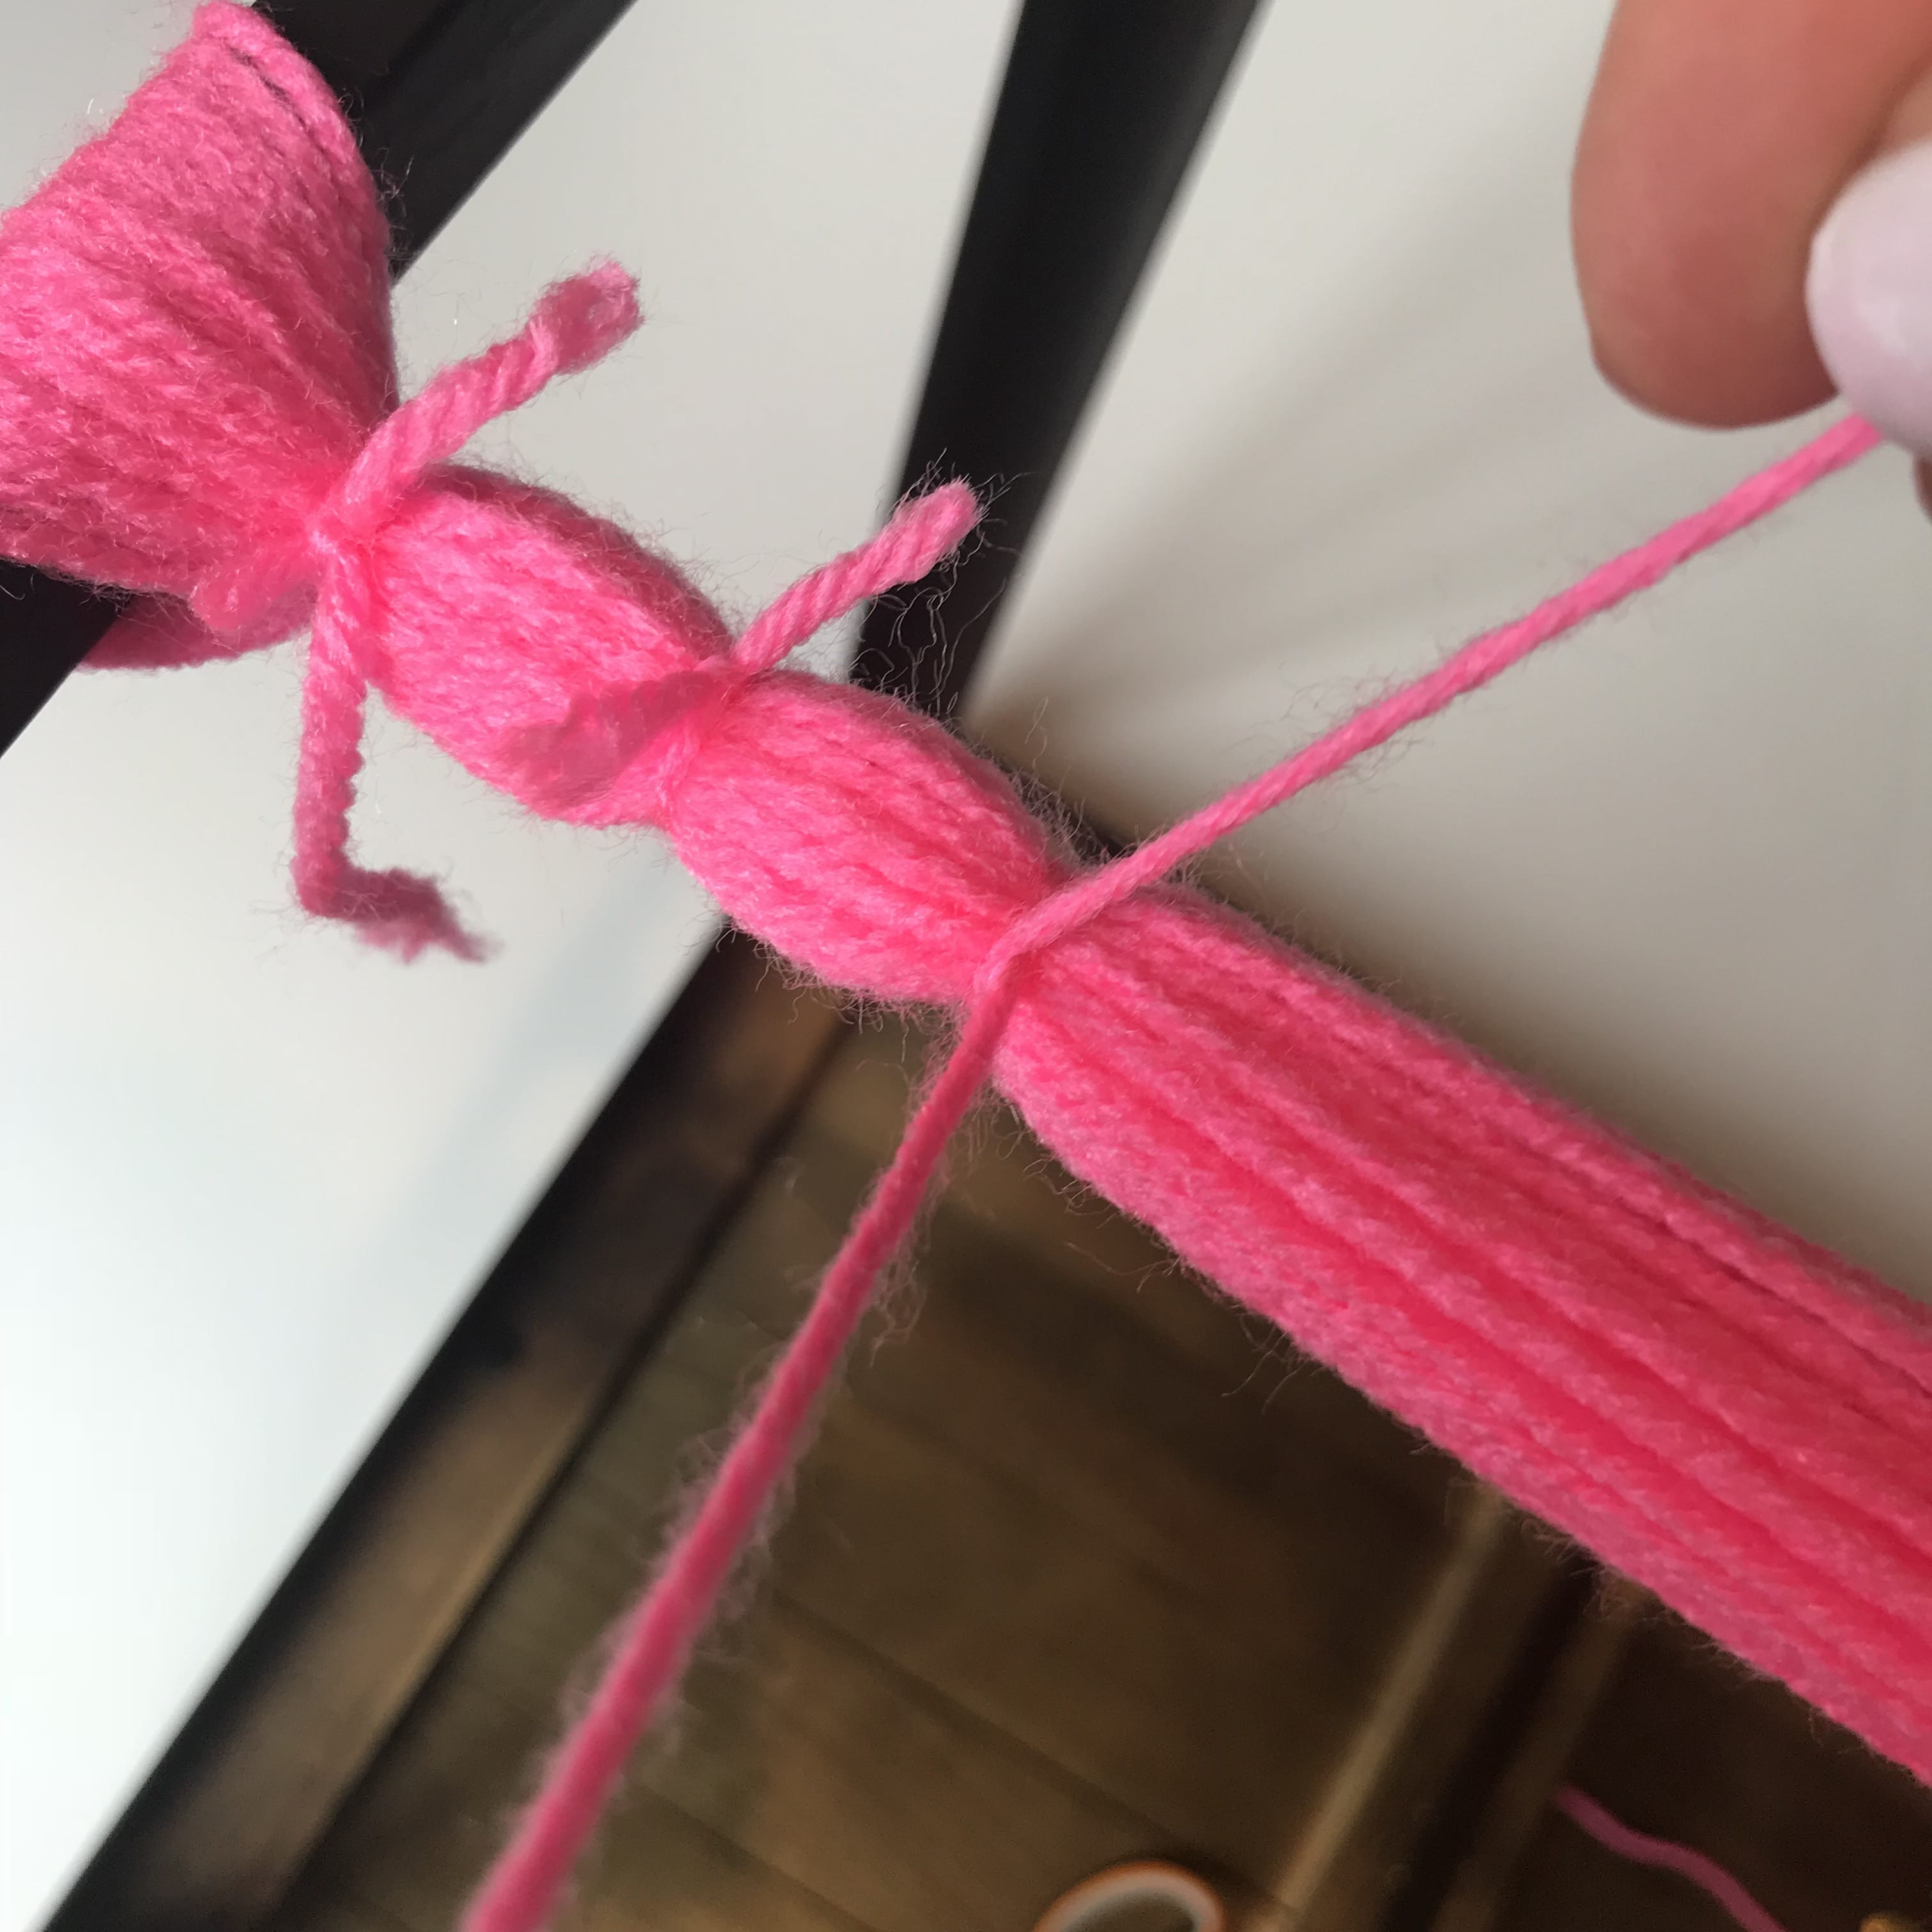
Gather and slide the cord off your table legs. Now tie a small length of yarn tightly around the cord every 1-1.5 inches. Pull each tie as tight as you can — these knots become the center of each pom, and a tight knot = a fluffier finished pom.
Keep tying along the whole length of the cord. For tiny poms, tie closer together (every 1 inch). For slightly bigger poms, space the ties further apart (every 1.5 inches).
Step 3: Cut Between the Knots
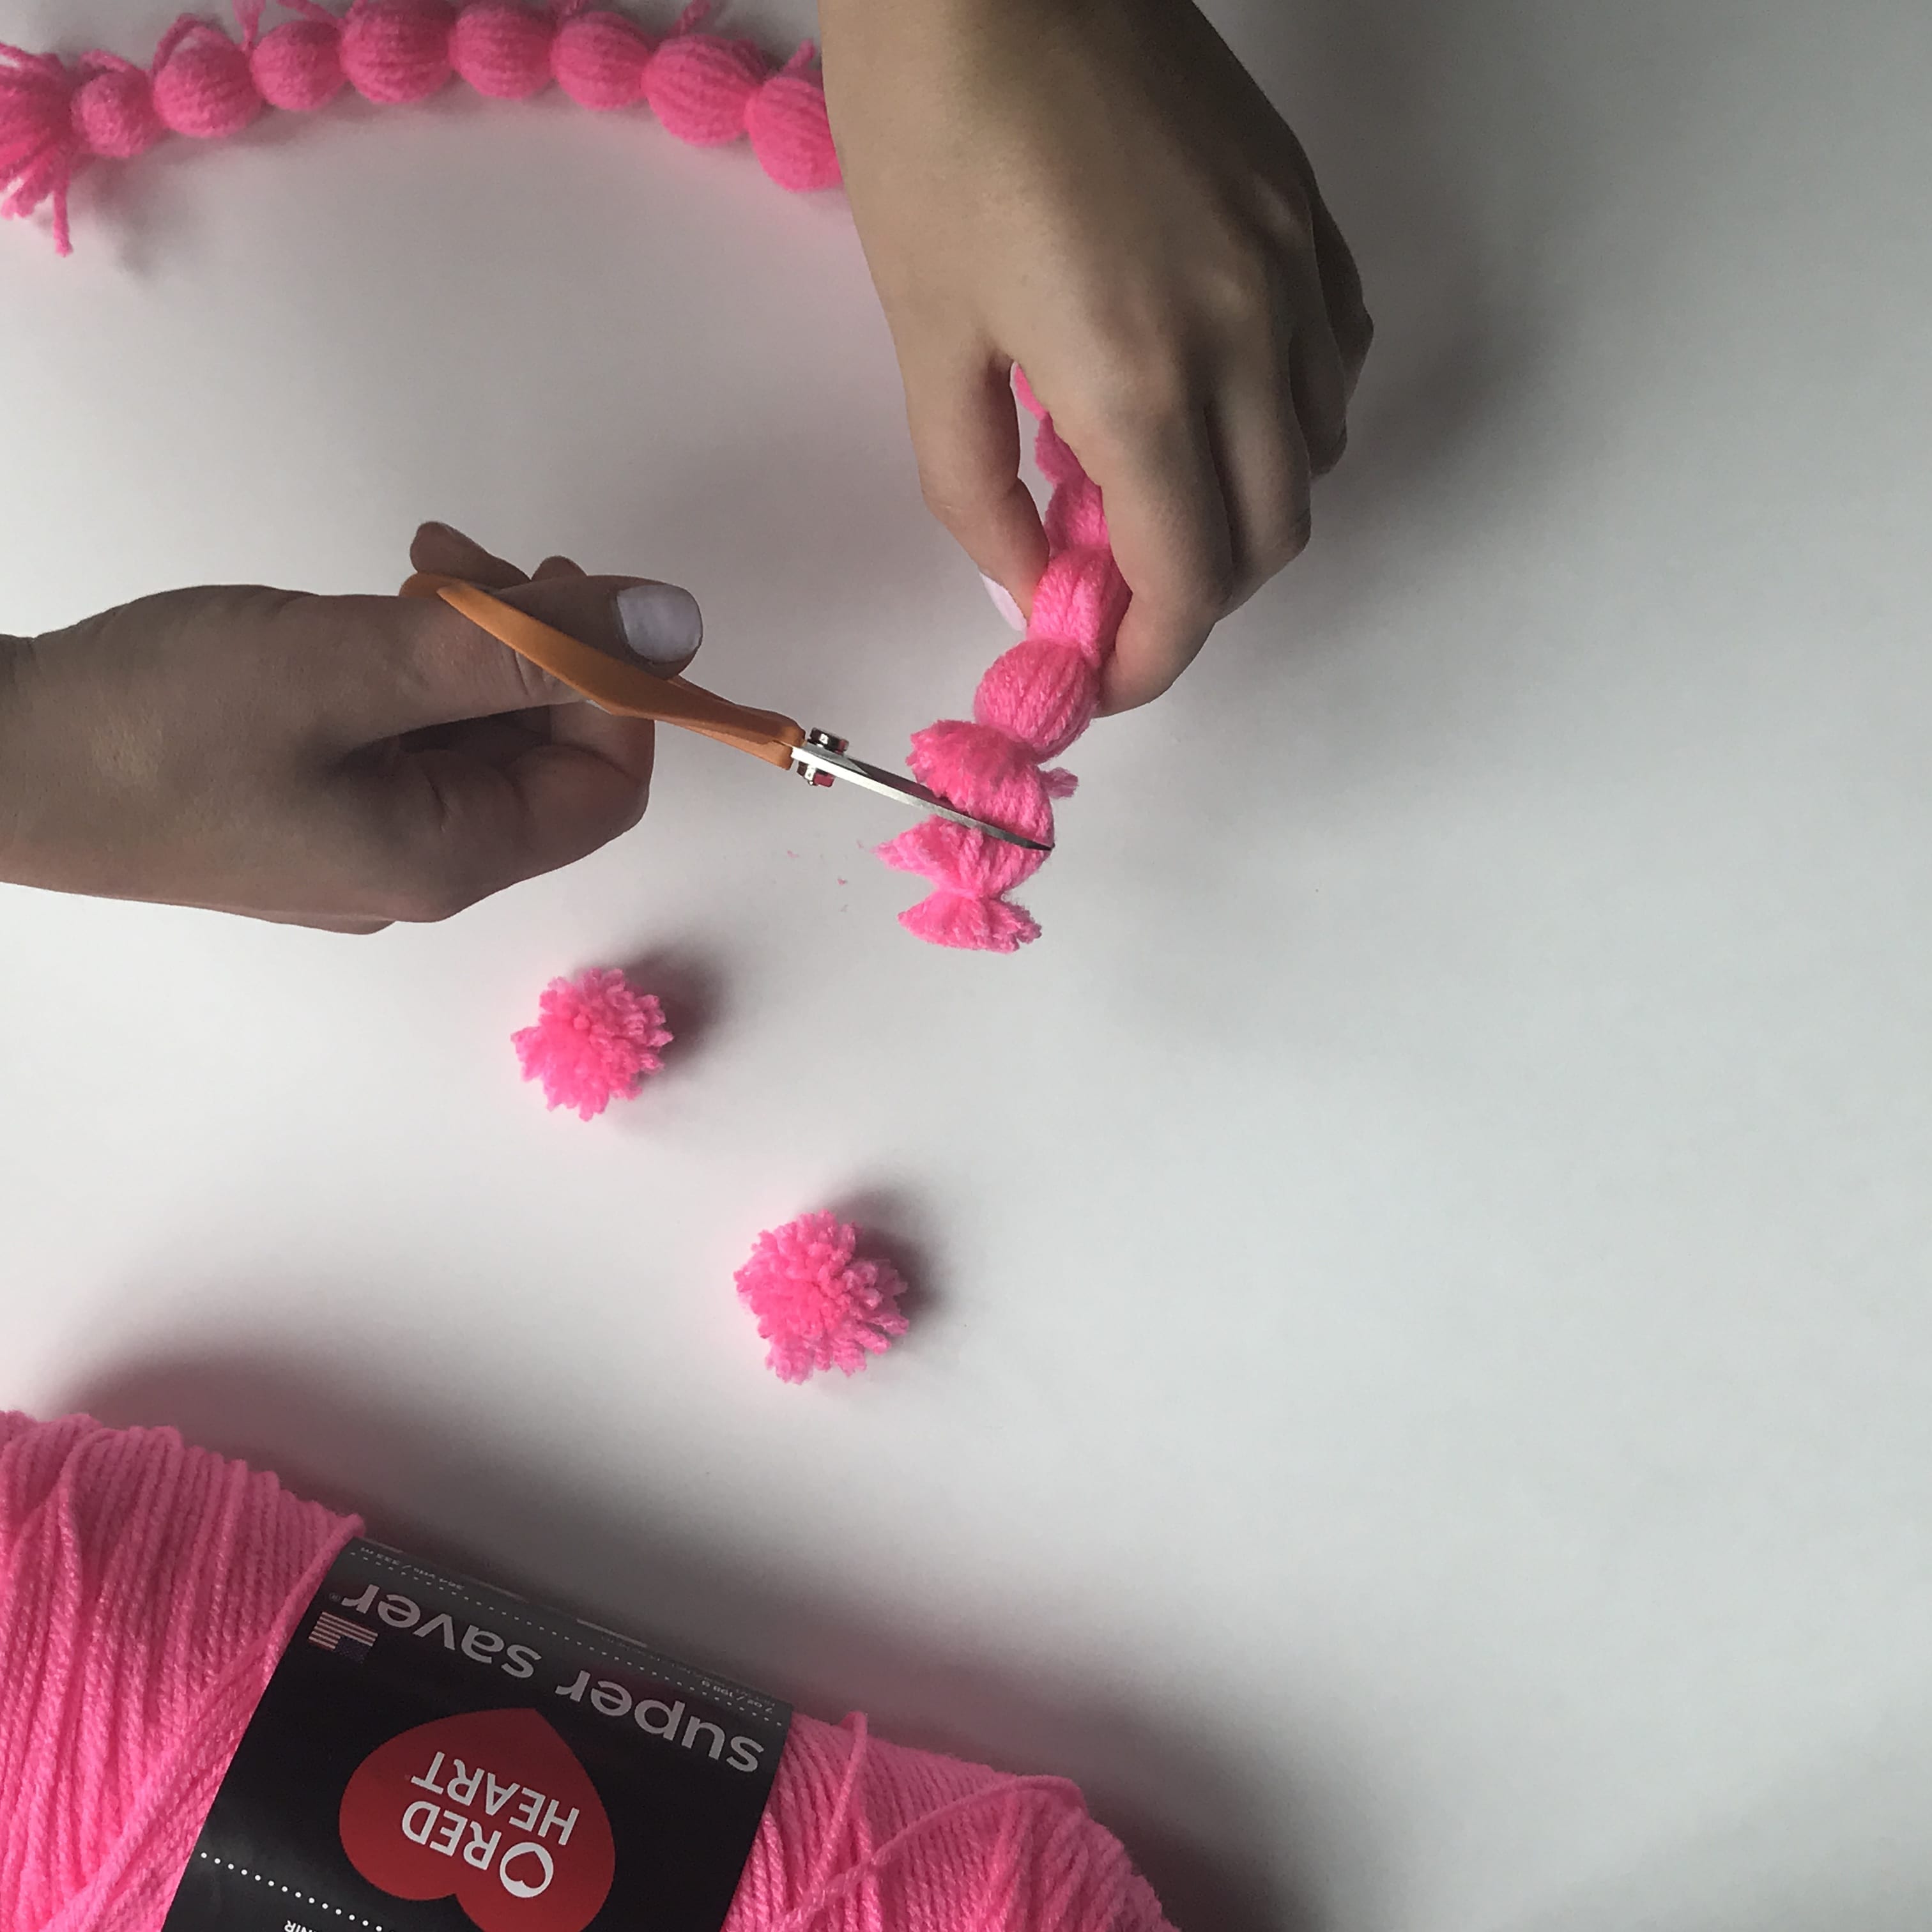
Now the satisfying part! With sharp scissors, cut the cord right in the middle between each knot. Each cut releases one pom pom. Continue cutting between every pair of knots until you have a pile of individual poms.
Step 4: Fluff and Trim
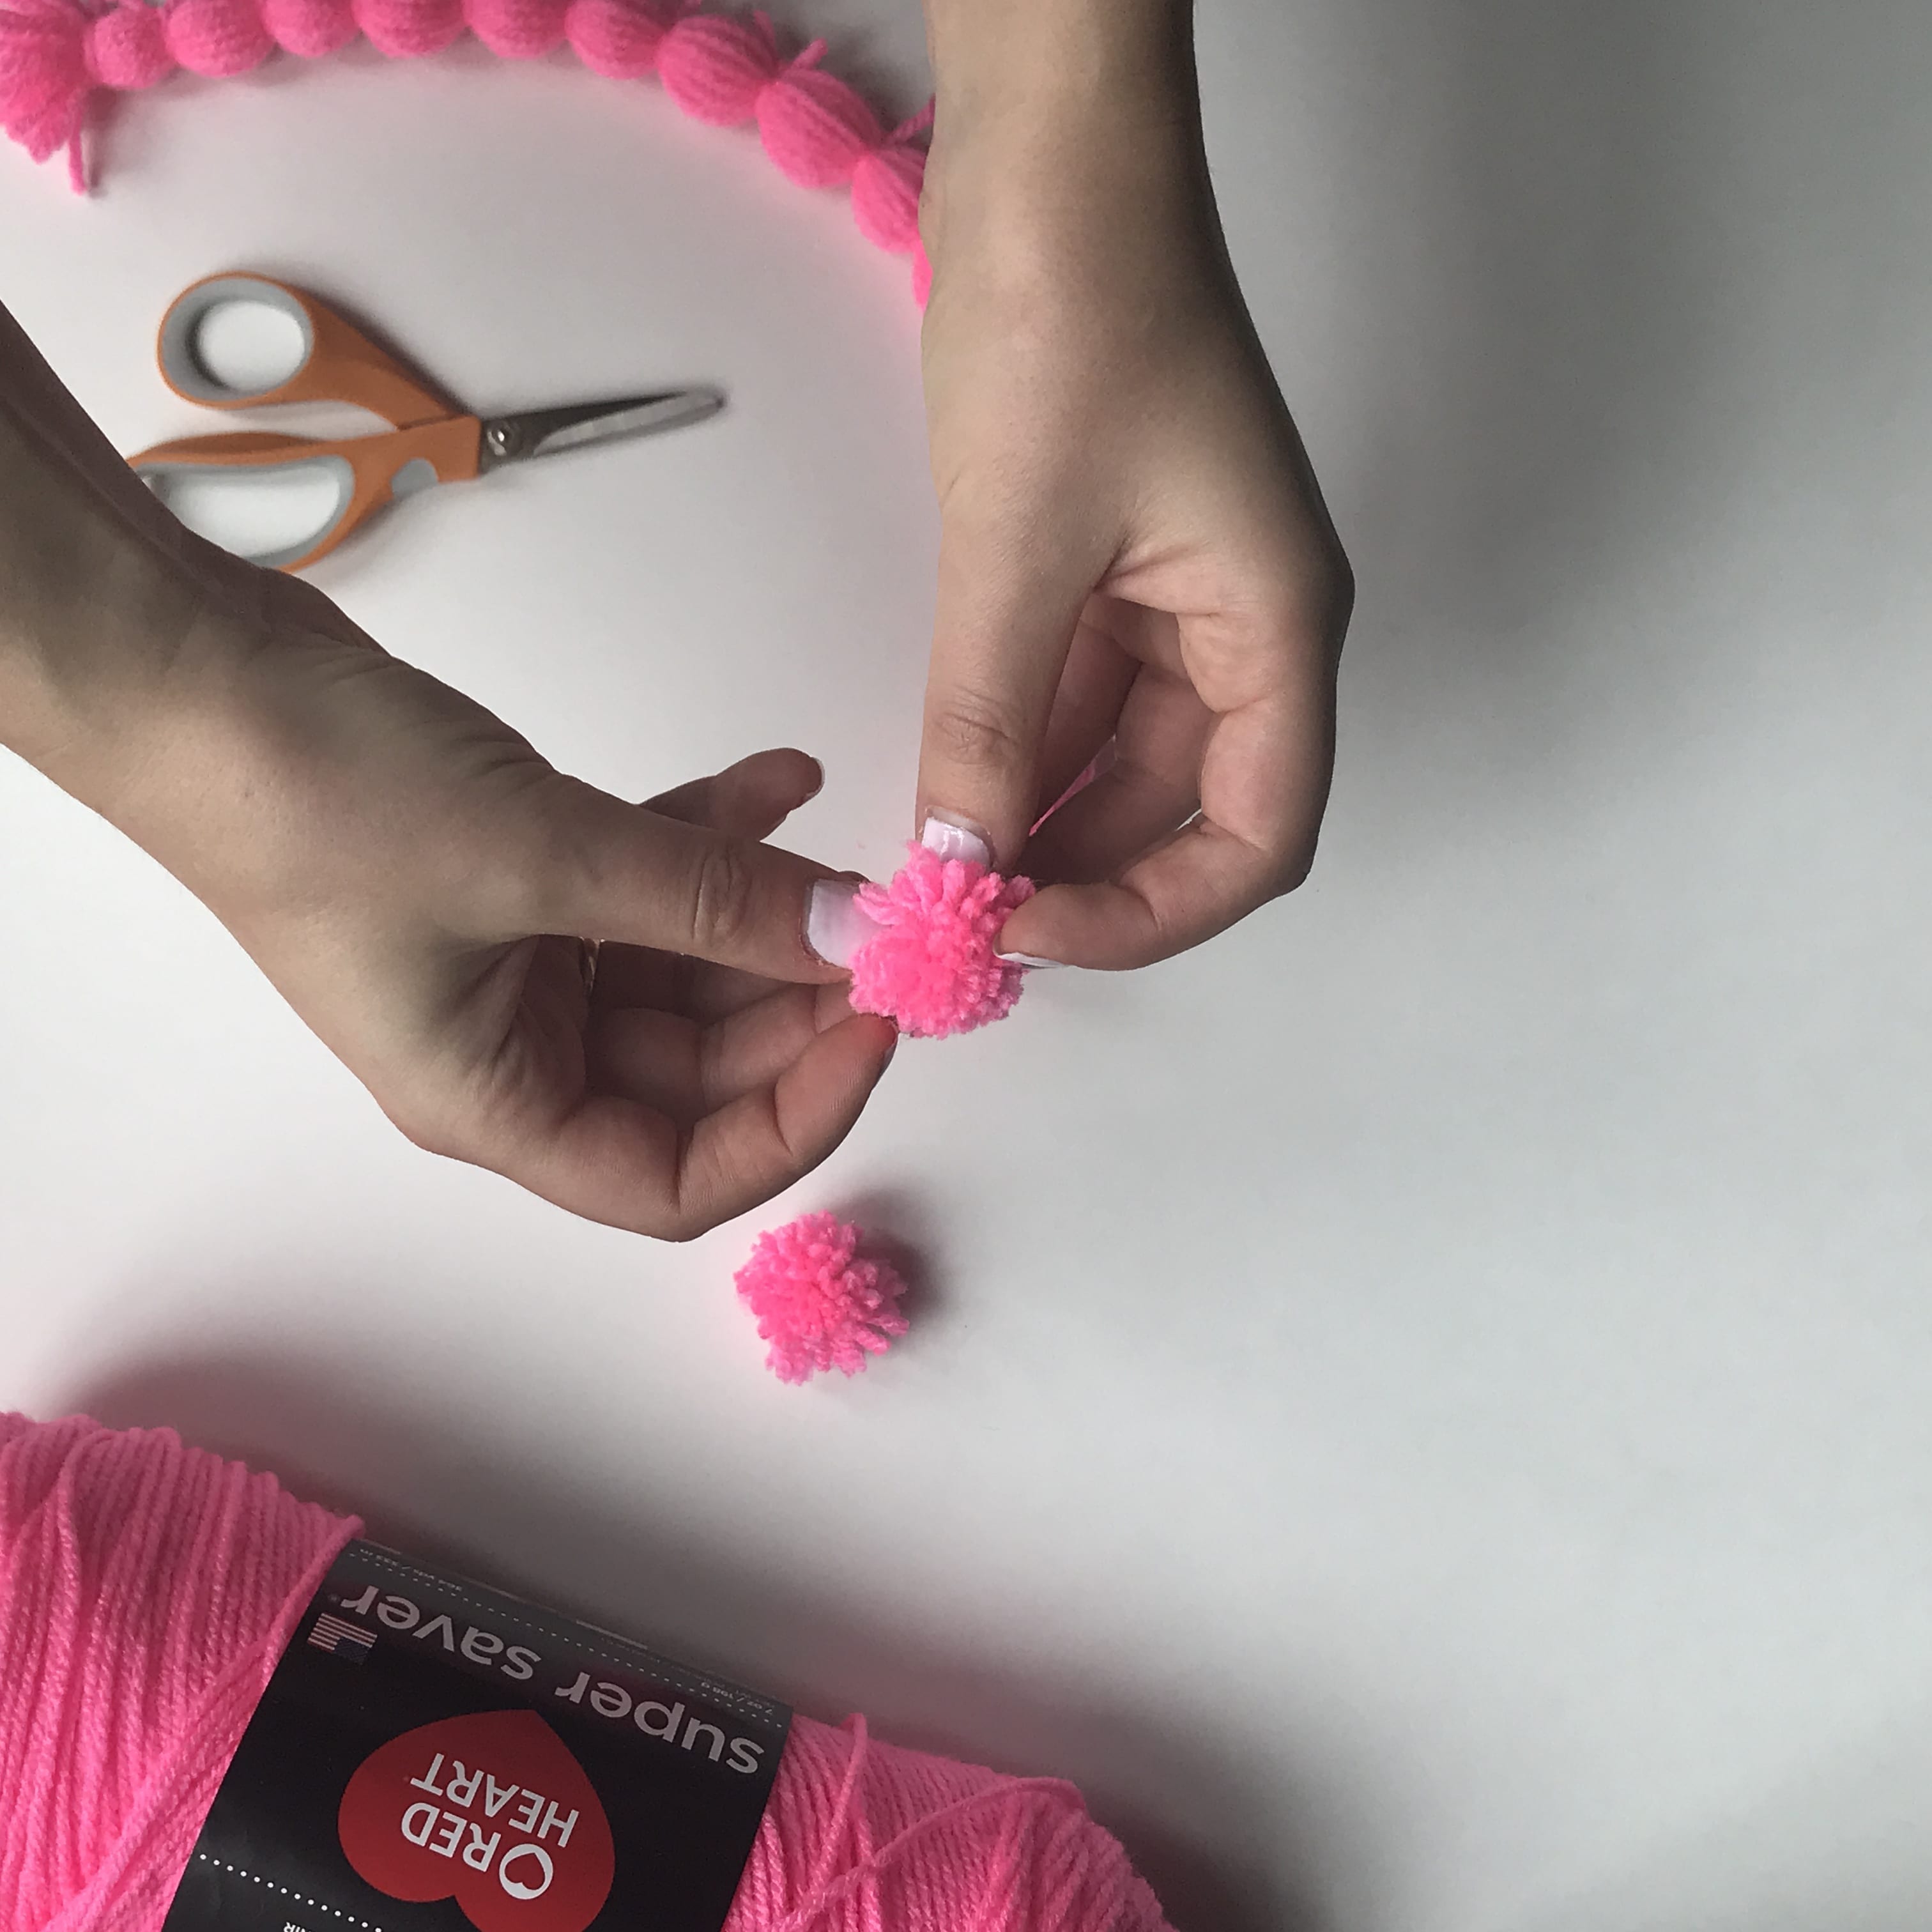
Roll each pom between your palms to fluff up the strands. Use scissors to trim any uneven ends — go around the pom rolling and trimming until it’s a perfect uniform little sphere.
That’s it! Your mini pom pom hack stash is ready to attach to anything you want.
Tips for the Perfect Mini Pom Pom Hack
- Tie super tight: a loose knot = a floppy pom. Pull the tying yarn as tight as you can without breaking it.
- More wraps = denser poms: for super fluffy poms, wrap your yarn 100+ times. Fewer wraps = sparser, lighter poms.
- Leave long tying tails: when you tie each knot, leave 4-6 inches of tail. Use those tails to attach the pom to your project.
- Use sharp scissors: dull scissors mangle the yarn and you’ll end up with a frayed-looking pom. Use the sharpest pair you have.
- Try different yarns: chunky yarn = larger plumper poms. Thin lace yarn = ultra-fine wispy poms.
- Color blocking: wrap two or three colors at once for striped or marled mini poms.
- Mass produce for gifts: the mini pom pom hack lets you make 20-30 poms at once — perfect for garland-making sessions or decorating gift wrap.
What to Make with Your Mini Pom Poms
Now that you’ve mastered the mini pom pom hack, here are some fun ways to use them:
- Garlands: string mini poms on twine for a colorful party banner or nursery decor.
- Hat embellishments: attach a cluster of mini poms instead of one big pom for a unique look.
- Pillow trims: hot-glue or sew mini poms around the edge of a throw pillow for a boho vibe.
- Blanket borders: tie mini poms to the corners or edges of a finished crochet/knit blanket.
- Gift wrap accents: tie a mini pom to the bow of a wrapped present for instant elegance.
- Keychains: attach a single mini pom to a keychain or zipper pull.
- Holiday ornaments: string mini poms with beads for festive Christmas tree decor.
Frequently Asked Questions
How long does this mini pom pom hack take? About 10-15 minutes from start to finish to produce 15-20 mini poms — way faster than making them one at a time with your fingers.
Do I really not need a pom maker? Correct. The mini pom pom hack is specifically for when you don’t have a maker, or when you need too many poms to be worth using one. The technique is faster than a pom maker for mass production.
What size poms does this make? About 1-1.5 inches across, depending on how many times you wrap your yarn and how tightly you tie the knots. Adjust wrap count for bigger or smaller poms.
Can I use any yarn? Yes. Worsted weight is easiest, but you can use anything from lace weight to chunky. Just adjust wrap count to compensate.
What if my poms come out lopsided? Either the knot wasn’t tight enough or you have uneven wraps. Trim with scissors to even them out, or re-tie tighter next time.
Can I do this with kids? Yes — the wrapping and tying parts are great for kids. Adults should handle the scissors-cutting step.
More Craft Hacks & Patterns You’ll Love
If you enjoyed this mini pom pom hack, you’ll love these related tutorials:
- Mini Pom Poms — Complete Tutorial
- Puff Spike Stitch Crochet Tutorial
- Puff Stitch Crochet Flower
- Crochet Pumpkin Trio — Free Fall Pattern
- Honeycomb Knit Throw — Chunky Cable Pattern
Save This Mini Pom Pom Hack
Want to come back to this mini pom pom hack later? Save it to Pinterest so you can find it when you need to mass-produce tiny poms — and share it with your crafty friends!