All Adult Patterns Free Patterns Crochet
September 14th, 2018
Simple Comfy Blanket Sweater Pattern (Knit & Crochet)
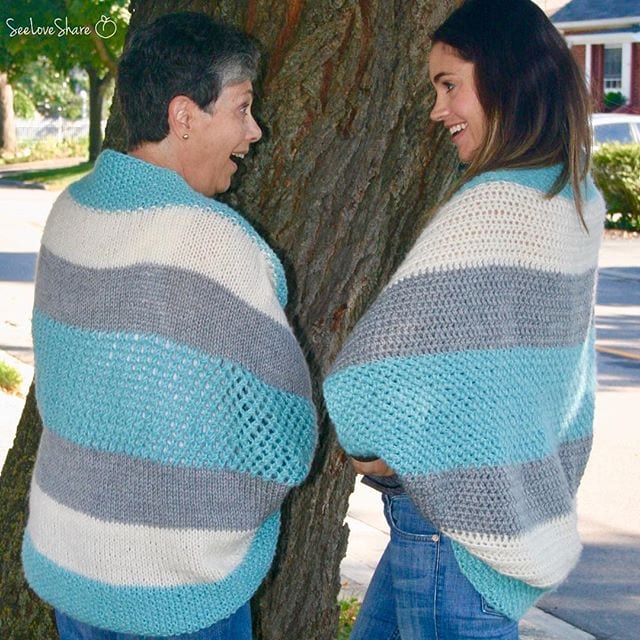
So this is what happened. My mom knits, I crochet — and we both wanted to make a blanket sweater pattern. Naturally, we turned it into a competition: whose stitches looked better, who finished faster, you name it. We had a blast. We’ve also both decided we won, regardless of the actual results. 😊
This blanket sweater was the result, and it’s still one of my favorite makes — partly because of how it turned out, mostly because of who I made it with. It’s an oversized, cozy, one-piece cardigan that’s just a striped rectangle with two corners seamed in. No shaping. No sleeves to set in. Just a beautiful, easy gift that wears like a hug. 🧶
The free pattern below includes both the knit and crochet versions — so whichever way you stitch (or whoever you’re making it with), you’ve got everything you need.
Use code SEELOVE15 for 15% off
Why you’ll love this pattern
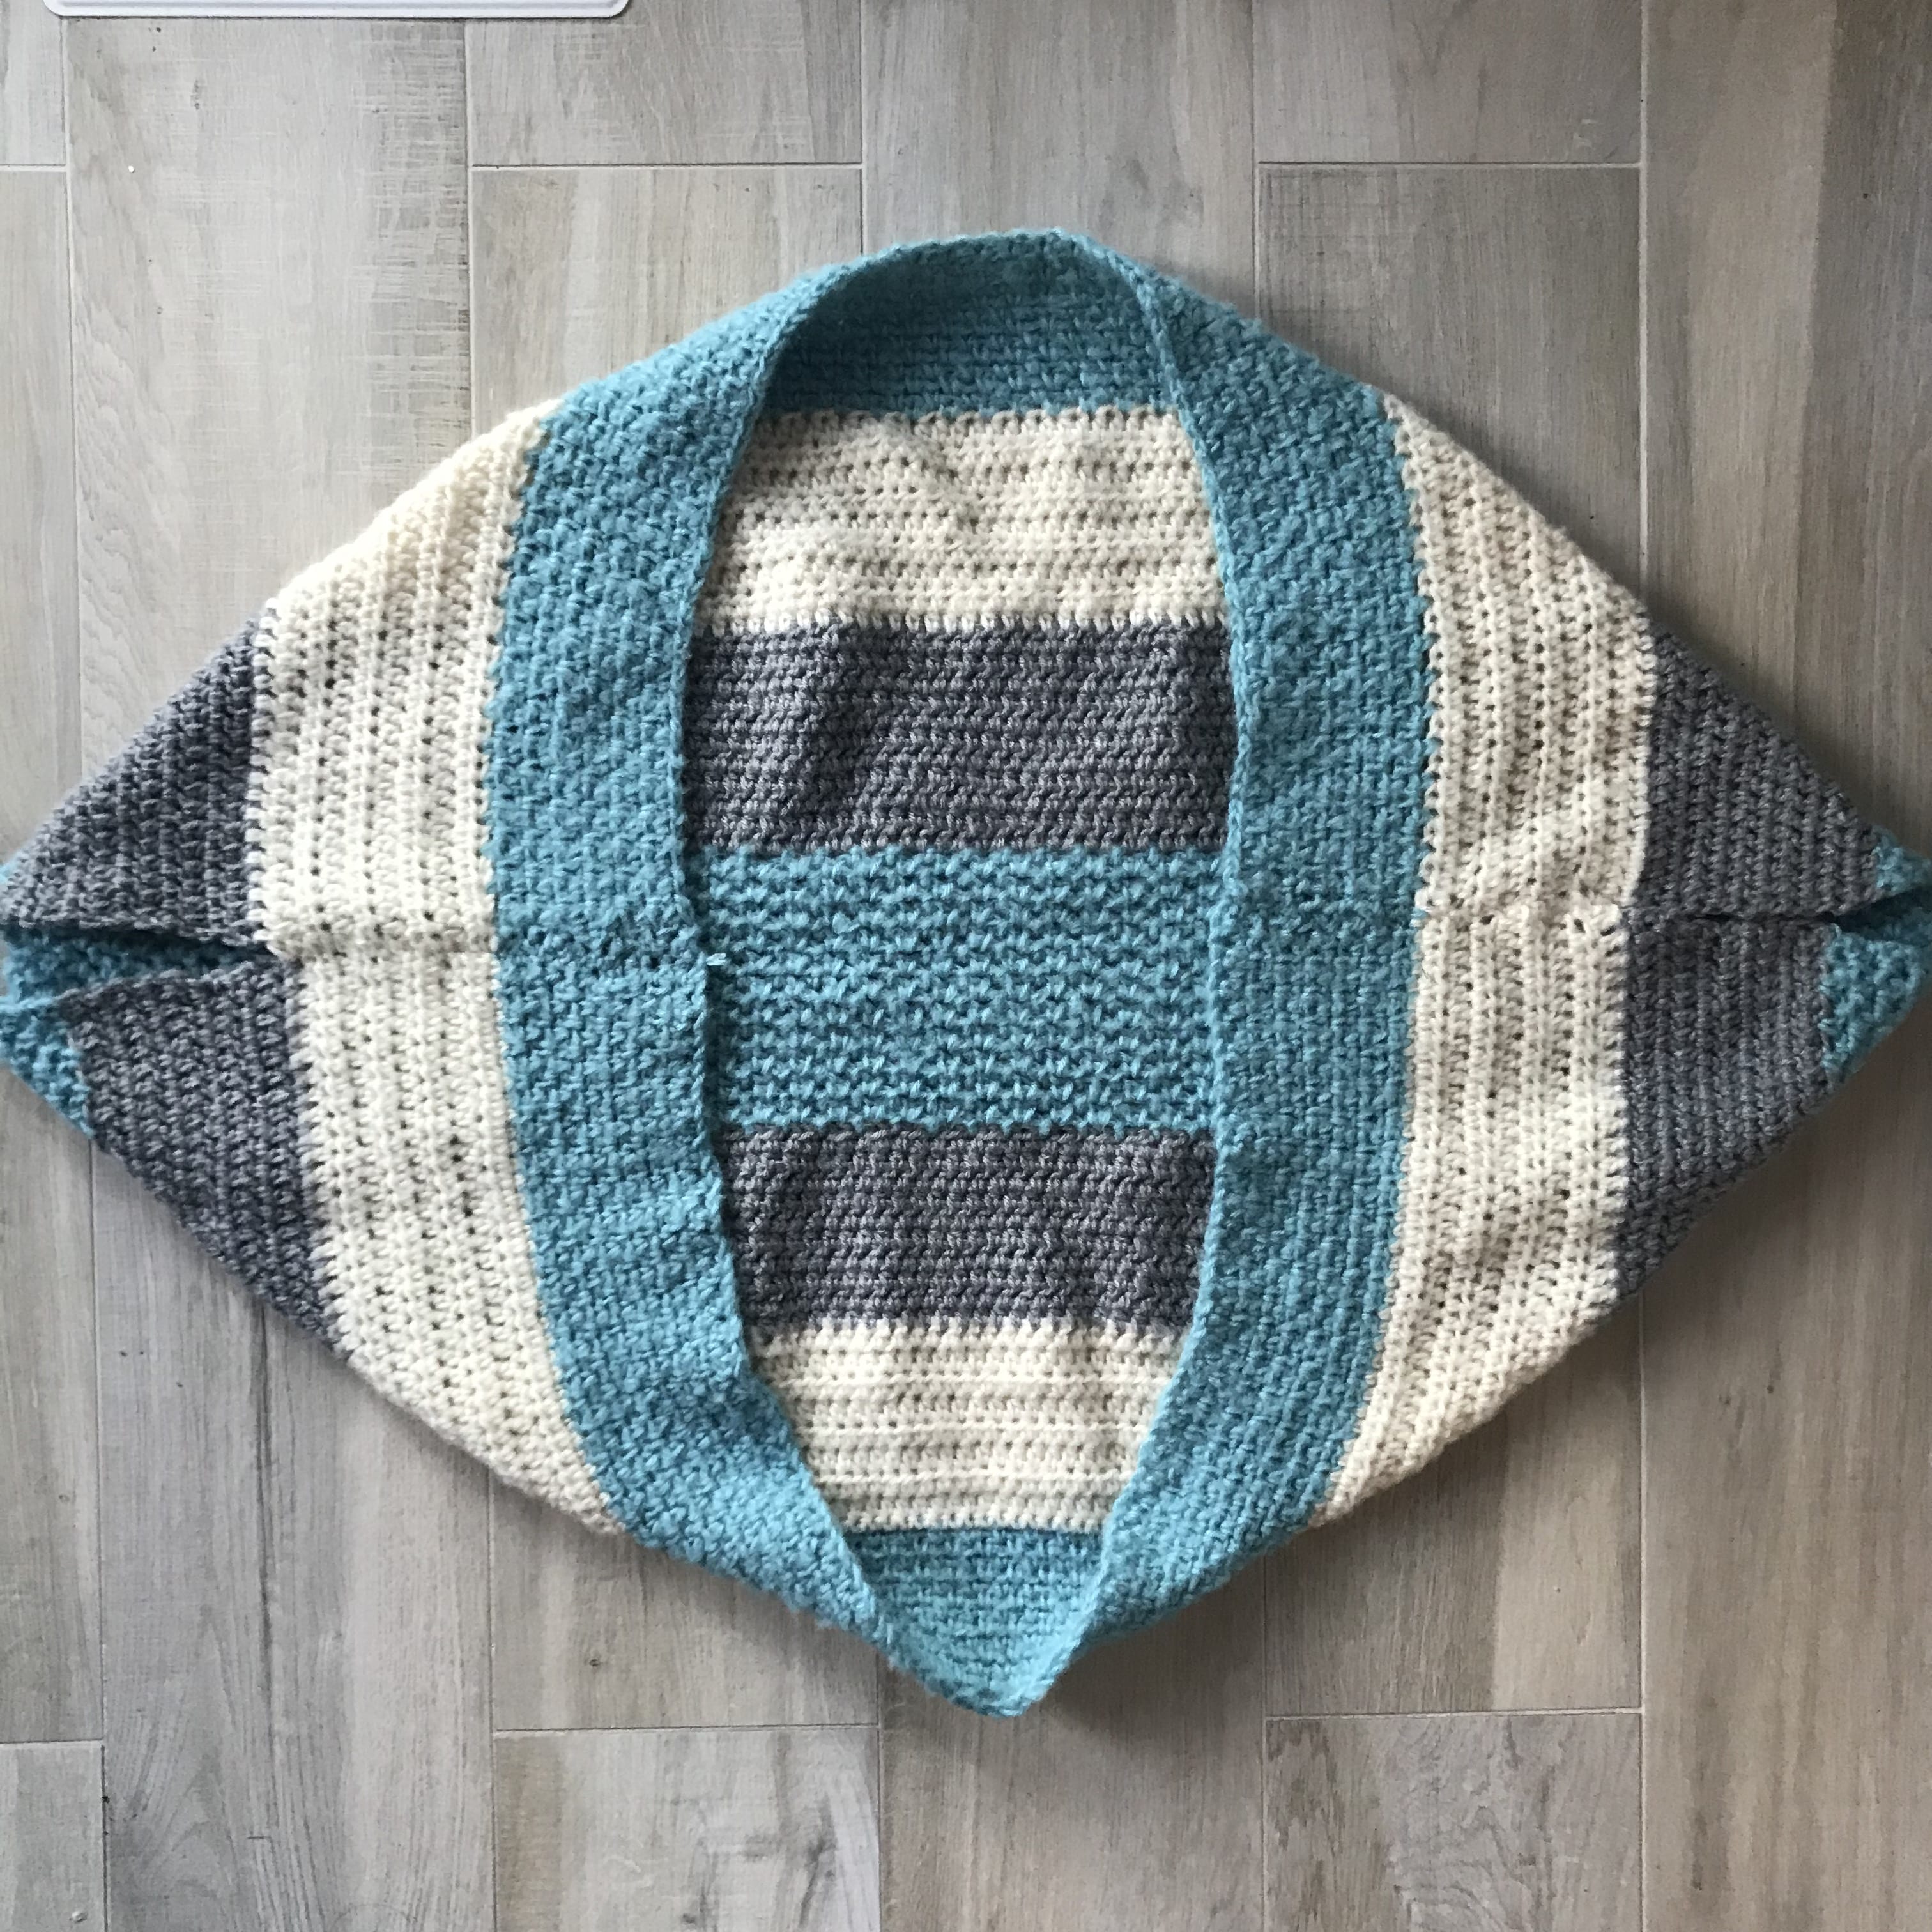
This is the perfect pattern for a confident beginner — there’s no shaping, no sleeves to set in, no sizing math. You work a single striped rectangle, fold the top corners in toward the center, and seam them down. That’s the whole construction. The result is a slouchy, oversized cardigan that drapes beautifully and feels like wearing a soft blanket.
It’s also one of the few patterns I’ve written for both knit and crochet — so it’s perfect for stitching alongside someone who works the other craft. (Highly recommend, even if it does turn into a competition.)
Pattern details
- Skill Level: Confident Beginner
- Finished Size: Approximately 30″ long × 40″ wide before assembly
- Construction: Worked flat as a single rectangle, then folded and seamed at two corners
- Time: A relaxed weekend project
- Both knit AND crochet versions included below
Materials
- 1 ball each of three coordinating colors of Red Heart Dreamy in Aqua, Grey, and Ivory — or any soft bulky #5 yarn (about 460 yds total)
- If Red Heart Dreamy is hard to find, Bernat Softee Chunky is a beautiful alternative
- For the knit version: 6.5 mm / US 10.5 circular needles (worked flat)
- For the crochet version: 6 mm / US K-10.5 hook
- Tapestry needle for seaming and weaving in ends
- Scissors
Gauge
- Knit: 15 sts × 20 rows = 4″ in stockinette on 6.5 mm / US 10.5 needles
- Crochet: 11 sc × 13 rows = 4″ on 6 mm / US K-10.5 hook
Color sequence (both versions)
Both versions follow the same striping pattern, worked one stripe at a time from the bottom up:
- 4″ Aqua — seed stitch
- 4″ Ivory — stockinette (knit) / hdc (crochet)
- 4″ Grey — stockinette (knit) / hdc (crochet)
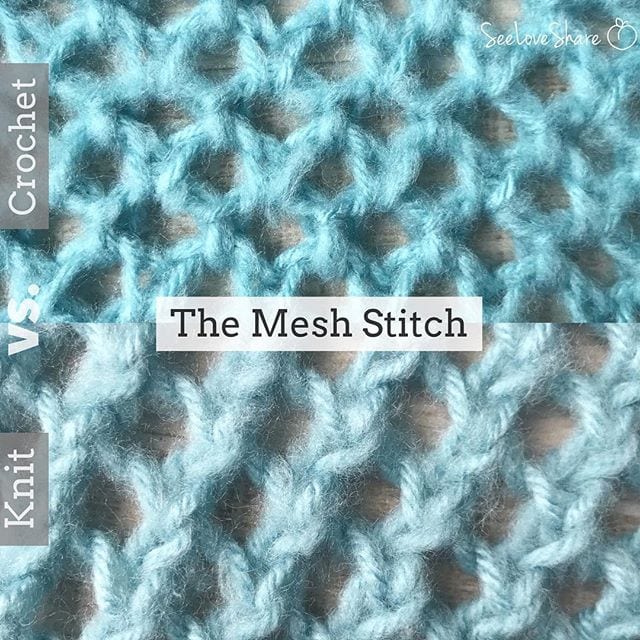
- 6″ Aqua — mesh stitch
- 4″ Grey — stockinette (knit) / hdc (crochet)
- 4″ Ivory — stockinette (knit) / hdc (crochet)
- 4″ Aqua — seed stitch
Total length: 30 inches. The mesh stitch row in the middle creates a soft drape that becomes the back of the sweater after seaming.

Abbreviations
Knit: k = knit · p = purl · rep = repeat · st(s) = stitch(es) · yo = yarn over · k2tog = knit two together · ws = wrong side
Crochet: ch = chain · st = stitch · sc = single crochet · hdc = half double crochet · sl st = slip stitch · sk = skip · sp = space
🧶 Knit pattern
With Aqua, cast on 140 sts. Continue in seed stitch for 4 inches.
Seed Stitch:
Row 1: K1, P1 — repeat to end of row.
Repeat Row 1 for 4 inches.
Change to Ivory. Continue in stockinette stitch for 4 inches.
Stockinette Stitch:
Row 1 (RS): Knit.
Row 2 (WS): Purl.
Repeat Rows 1 and 2 for 4 inches.
Change to Grey. Continue in stockinette stitch for 4 inches.
Change to Aqua. Continue in mesh stitch for 6 inches.
Mesh Stitch:
Row 1: Knit.
Row 2: K2, *yo, k2tog,* repeat * to last 2 sts, k2.
Row 3: Knit.
Row 4: K3, *yo, k2tog,* repeat * to last 1 st, k1.
Repeat Rows 1–4 for 6 inches.
Change to Grey. Continue in stockinette for 4 inches.
Change to Ivory. Continue in stockinette for 4 inches.
Change to Aqua. Continue in seed stitch for 4 inches.
Bind off and weave in ends. See assembly instructions below.
🪡 Crochet pattern
With Aqua, ch 113. Continue in seed stitch for 4 inches.
Crochet Seed Stitch:
Row 1: *Sc 1, ch 1,* repeat to last st, sc. Ch 1, turn.
Row 2: *Sc in the ch-1 space of the previous row, ch 1,* to last st, sc. Ch 1, turn.
Repeat Rows 1 and 2 for 4 inches.
Change to Ivory. Hdc across each row for 4 inches.
Change to Grey. Hdc across each row for 4 inches.
Change to Aqua. Continue in mesh stitch for 6 inches.
Crochet Mesh Stitch:
Row 1: Sc across, ch 2, turn.
Row 2: Skip the first st, sl st in the next st. *Ch 2, sk 1 st, sl st in the next st.* Repeat from * across to last st. Ch 2, turn.
Row 3: Sl st into the first ch-2 space. *Ch 2, sl st into the next ch-2 space.* Repeat from * across.
Repeat Rows 1–3 for 6 inches.
Change to Grey. Hdc across each row for 4 inches.
Change to Ivory. Hdc across each row for 4 inches.
Change to Aqua. Continue in seed stitch for 4 inches.
Fasten off and weave in ends. See assembly instructions below.
Assembly
Lay your finished rectangle flat with the wrong side facing up. Fold each top corner diagonally inward, so they meet in the middle (this creates the back panel). With a length of yarn and your tapestry needle, seam 7 inches inward along both side edges to create the armholes and back seam. Weave in any remaining ends.
That’s it! Slip it on and enjoy. 💛
Care & blocking
Block your finished sweater gently before the first wear — wet block by soaking in lukewarm water, gently squeezing out excess water (don’t wring), and laying flat to dry. This evens out the stitches and helps the mesh sections drape beautifully.
Want the ad-free printable PDF?
If you’d rather work from a clean, printable PDF — the kind you can take with you on the couch (or to the yarn shop) — I have an ad-free version of this 2-in-1 pattern in the SeeLoveShare Etsy shop with full color photos and assembly diagrams.
Use code SEELOVE15 for 15% off
More cozy throw & blanket patterns you’ll love
- Easy Star Stitch Crochet Blanket — Beginner Throw Pattern — a meditative textured throw with video tutorials and a paid PDF version
- Easy Peasy Chunky Knit Throw — Beginner Knit Blanket Pattern — my bestselling knit throw, fast and giftable
- Easy Peasy Chevron Chunky Knit Throw — Beginner Knit Pattern — same easy method with a beautiful chevron texture
Made one? I’d love to see it! Tag me on Instagram @seeloveshare or share your make in our free Facebook community. Happy stitching! 💛