
All Baby/Toddler/Kids Crochet Crochet Baby/Toddler/Kids
April 21st, 2021
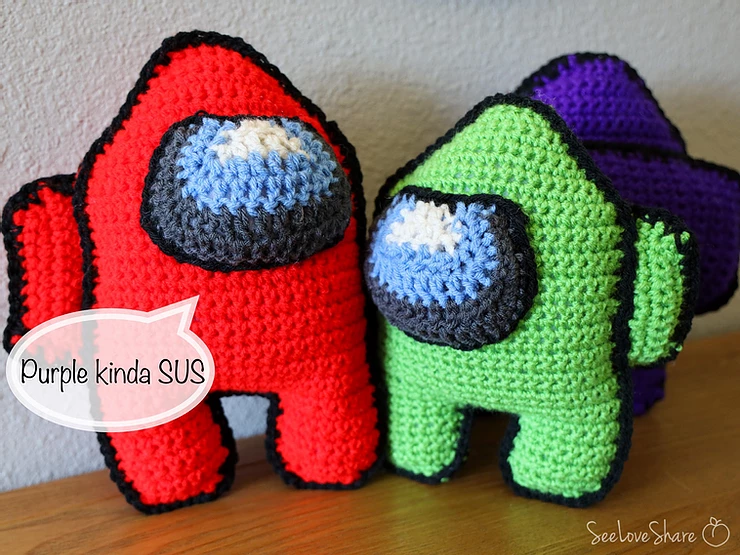
Among Us Crewmate Plushy – Free Crochet Pattern
Join your Crewmates and figure out who Among Us are SUS! Did I get that right?? Either way all of my Nephews and Nieces are completely stoked that they’re getting these plushies in the mail! Work these up in different colours and swap which side they wear their backpacks 🎒- so they can talk to each other of course!
Have fun with these and gift them to all the lil crewmates in your life!

Pattern Notes:
This pattern is worked up as 2 identical panels that will then be sewn together.
Materials:
- 1 Ball RedHeart Super Saver in Hot Red, Spring or Amethyst – I like Red Heart Super Saver Yarn for projects like these because they’re a great price, durable and come in LOADS of colors).
- White, Periwinkle and Charcoal for the visor
- Black yarn for edging
- Size 5.5 MM crochet hook
- Polyfil for stuffing
- Tapestry Needle
Gauge:
4” x 4” (10 cm x 10 cm) 12 sc and 15 rows with a 5.5 mm (U.S I-9) crochet hook
Finished measurements:
10in tall, 7in wide.
Abbreviations:
Rnd: Round Ch: Chain
Sts: Stitches
Slst: Slip stich
Sc: Single crochet
Sc2tog: Single crochet 2 together
SK: Skip
Dc: Double crochet
Hdc: Half double crochet
Pattern:
Body: Make 2
To start: ch 6
Row 1: 2 sc in 2nd ch from hook, sc to last st, 2 sc in final ch. Ch 1, turn (7)
Row 2: 2 sc in first st, sc to last st, 2 sc in final st. Ch 1, turn (9)
Row 3: 2 sc in first st, sc to last st, 2 sc in final st. Ch 1, turn (11)
Row 4: 2 sc in first st, sc to last st, 2 sc in final st. Ch 1, turn (13)
Row 5: 2 sc in first st, sc to last st, 2 sc in final st. Ch 1, turn (15)
Row 6: 2 sc in first st, sc to last st, 2 sc in final st. Ch 1, turn (17)
Row 7: 2 sc in first st, sc to last st, 2 sc in final st. Ch 1, turn (19)
Row 8: 2 sc in first st, sc to last st, 2 sc in final st. Ch 1, turn (21)
Row 9: 2 sc in first st, sc to last st, 2 sc in final st. Ch 1, turn (23)
Row 10-29 : Sc in each st across. Ch 1, turn (23)
-begin working legs-
First leg –
Row 30 -35: Sc in the first 9 sts, ch 1, turn (9)
Row 36: sc2tog in next 2 sts, sc to final 2 sts, sc2tog. Ch 1, turn (7)
Row 37: sc2tog in next 2 sts, sc to final 2 sts, sc2tog. Ch 1, turn (5)
Bind off leg.
Second leg-
Return back to Row 23 to complete.
Row 30: Skip the next 5 unworked sc on row 22, attach yarn with a sc to the next unworked sc on row 22, sc in each of the remaining 9 sc. Ch 1, turn. (9)
Row 31-35: Sc in the first 9 sts, ch 1, turn (9)
Row 36: sc2tog in next 2 sts, sc to final 2 sts, sc2tog. Ch 1, turn (7)
Row 37: sc2tog in next 2 sts, sc to final 2 sts, sc2tog. Ch 1, turn (5)
Bind off leg.
Backpack:
Front –
To begin ch11
Row 1: 2 sc in 2nd ch from hook, sc to last st, 2 sc in final ch. Ch 1, turn (12)
Row 2: Sc in each st across (12)
Row 3: 2 sc in 2nd ch from hook, sc to last st, 2 sc in final ch. Ch 1, turn (14)
Row 4: Sc in each st across (14)
Bind off.
Back –
To begin ch11
Row 1: 2 sc in 2nd ch from hook, sc to last st, 2 sc in final ch. Ch 1, turn (12)
Row 2: Sc in each st across (12)
Row 3: 2 sc in 2nd ch from hook, sc to last st, 2 sc in final ch. Ch 1, turn (14)
Row 4-21: Sc in each st across (14)
Row 22: sc2tog in next 2 sts, sc to final 2 sts, sc2tog. Ch 1, turn (12)
Row 23: Sc in each st across (12)
Row 24: sc2tog in next 2 sts, sc to final 2 sts, sc2tog. Ch 1, turn (10)
Bind off.
Pictured below:
Top left: backpack parts,
Top right, visor
Bottom: body

Visor:
With Soft White, Ch5
Row 1: Sc in 2nd ch from hook, dc in next 2 ch, sc in last ch, Ch1 turn (4)
Row 2: 2 sc in prior row sc, dc in prior row dc, 2 sc in last sc. Ch1 turn (6) Bind off.
With Light Perwinkle, attach yarn with a slst to the side of the beginning of the work.
Row 3: 2 sc along the side of the Soft White, 3 sc in the corner st (you have now returned to the the prior row last st and will continue along the row), 2 hdc in next st, dc in next 2 sts, 2 hdc in next st, 3 sc in final st. continue along the other side and work 2 sc along the edge, ch 1 turn (16)
Row 4: sc in next 3 st, 3 sc in corner st, 2 hdc in next st, dc in next 6 sts, 2 hdc in next st, 3 sc in corner st, sc in next 3 sts (22), Switch to Charcoal, ch 1 turn
Row 5: sc2tog, sc in next 3 sts, 2 sc in next st, 2 hdc in next 2 sts, dc over next 6 sts, 2 hdc in next 2 sts, 2 sc in next st, sc in next 3 sts, sc2tog, ch 1, turn (26)
Row 6: sc2tog, sc in next 3 sts, 2 hdc in next 3 sts, dc over next 10 sts, 2 hdc in next 3 sts, sc in next 3 sts, sc2tog, Bind off.
Assembly:
Body: Line up both body panels on top of each other. With black and starting at either side of the body, sc through both panels. Begin edging by sc along the edge of the body, before you close up the edging, stuff with polyfil. Use small handfuls of polyfil to fill in the legs and body. Do not overstuff. They should be plump but not firm. Close up the body with the remaining of the edging. Bind off. Weave in ends.
Backback: Align the backpack parts on top of each other. Similarly to the body and using black, sc through both panels attaching them together. Continue edging around the entire backpack (even after the front part of the backpack drops off: Bind off leaving a long tail which we will use to sew the backpack on to the body.
Visor: with black, sc around the edge of the visor. Bind off leaving a long tail which we will use to sew the visor on to the body.
Attach the backpack to the back of the body (the opposite side of the sc edging). Position to either side, allowing for the front of the backpack to over hang and be visible from the front.
Attach the visor on the front of the body, positioned to the opposite side that the backpack was poisoned on.
Weave in ends and ENJOY!