
May 9th, 2018
Beginner Crochet Stitch Guide – All Essential Stitches
Learning to crochet starts with understanding a handful of core stitches — and the good news is that once you have these down, you can make almost anything. This guide walks you through every essential beginner crochet stitch with clear written instructions, so you can keep it bookmarked and come back whenever you need a refresher. 🧶
Once you’ve practised these stitches, head over to our beginner crochet patterns to put them to work on your first real project!
What You’ll Need to Get Started
- 🧶 Worsted weight yarn (level 4) — the easiest weight for beginners
- 🪝 A crochet hook bundle (4.0mm–6.5mm) — a 5.0mm or 5.5mm is ideal for learning
- 🧵 Tapestry needle — for weaving in ends
- ✂️ Scissors
- 🔖 Stitch markers — optional but really helpful for beginners
Essential Beginner Crochet Stitches
1. Slip Knot
The slip knot is how every crochet project begins. It creates the first loop on your hook.
How to make a slip knot:
Make a loop with your yarn, crossing the working end over the tail. Insert your hook through the loop, catch the working yarn and pull it through. Tighten gently until the loop sits snugly on the hook — not too tight, not too loose. You should be able to slide it up and down the hook easily.
2. Chain Stitch (ch)
The chain stitch is the foundation of almost every crochet project. Your starting chain sets the width of your work.
How to chain:
Start with a slip knot on your hook. Yarn over (wrap yarn over the hook from back to front) and pull through the loop on your hook. That’s one chain. Repeat — yarn over, pull through — until you have the number of chains your pattern calls for. Keep your tension even as you go: not so tight the hook struggles, not so loose the chains look sloppy.
How to count chains: Each V-shape on the front of your chain counts as one stitch. Don’t count the loop currently on your hook.
3. Slip Stitch (sl st)
The slip stitch is the shortest crochet stitch. It’s used to join rounds, move yarn across stitches without adding height, and finish edges.
How to slip stitch:
Insert your hook into the designated stitch. Yarn over and pull through both the stitch AND the loop on your hook in one motion. You’re left with one loop on your hook. That’s it — quick and clean.
4. Magic Ring (Magic Circle)
The magic ring is the best way to start projects worked in the round — hats, amigurumi, granny squares. It creates a tight, adjustable centre with no hole.
How to make a magic ring:
Wrap the yarn around two fingers to create a loop, with the working yarn crossing over the tail. Insert your hook through the loop, catch the working yarn and pull up a loop. Chain one to secure. Work your first round of stitches into the ring. When you’ve completed the round, pull the tail end to close the centre hole completely. Join with a slip stitch.
Tip: If the magic ring feels tricky at first, practise a few times on scrap yarn before starting your project. It clicks quickly!
5. Single Crochet (sc)
The single crochet is the most fundamental crochet stitch. It creates a tight, dense fabric — perfect for amigurumi, dishcloths, and structured projects.
How to single crochet:
Insert your hook into the designated stitch (under both loops of the V unless your pattern says otherwise). Yarn over and pull up a loop — you now have 2 loops on your hook. Yarn over again and pull through both loops. One loop remains on your hook. That’s one single crochet complete.
Abbreviation: sc Symbol: x or +
6. Half Double Crochet (hdc)
The half double crochet sits between a single and double crochet in height. It creates a slightly looser, softer fabric with a lovely texture — great for hats, scarves, and baby items.
How to half double crochet:
Yarn over first, then insert your hook into the designated stitch. Yarn over and pull up a loop — you now have 3 loops on your hook. Yarn over one more time and pull through all 3 loops at once. One loop remains. That’s your half double crochet.
Abbreviation: hdc Height: 2 chains
7. Double Crochet (dc)
The double crochet is one of the most used stitches in crochet. It’s taller than single crochet, works up faster, and creates an open, flexible fabric. Most blanket and garment patterns use it heavily.
How to double crochet:
Yarn over, then insert your hook into the designated stitch. Yarn over and pull up a loop — 3 loops on your hook. Yarn over and pull through the first 2 loops — 2 loops remain. Yarn over and pull through the remaining 2 loops. One loop on your hook. That’s one double crochet.
Abbreviation: dc Height: 3 chains Symbol: T with a cross bar
8. Treble Crochet (tr)
The treble crochet (also called triple crochet) is taller still, creating an open, lacy fabric. It’s used in decorative stitches, lace patterns, and anywhere you want more height and drape.
How to treble crochet:
Yarn over twice, then insert your hook into the designated stitch. Yarn over and pull up a loop — 4 loops on your hook. Yarn over and pull through 2 loops — 3 loops remain. Yarn over and pull through 2 loops — 2 loops remain. Yarn over and pull through the final 2 loops. One loop on your hook.
Abbreviation: tr Height: 4 chains
9. How to Increase
An increase adds a stitch to your work, making it wider. In written patterns it’s usually shown as “2 sc in next st” or “inc.”
How to increase:
Simply work two stitches into the same stitch instead of one. For a single crochet increase: work one sc into the stitch, then work a second sc into the exact same stitch. You’ve added one stitch to your row or round. The same principle applies to any stitch — two hdc or two dc in the same stitch creates an hdc or dc increase.
10. How to Decrease (sc2tog)
A decrease removes a stitch from your work, making it narrower. The most common decrease is sc2tog — single crochet two together.
How to sc2tog:
Insert your hook into the next stitch, yarn over and pull up a loop — 2 loops on hook. Now insert your hook into the following stitch, yarn over and pull up a loop — 3 loops on hook. Yarn over and pull through all 3 loops at once. You’ve turned two stitches into one, decreasing your stitch count by one.
Quick Reference — Stitch Heights
Each stitch requires a turning chain at the start of a new row to bring your hook up to the correct height. Here’s a quick reference:
| Stitch | Abbreviation | Turning Chain | Height |
|---|---|---|---|
| Slip stitch | sl st | 0 chains | Shortest |
| Single crochet | sc | 1 chain | Short |
| Half double crochet | hdc | 2 chains | Medium-short |
| Double crochet | dc | 3 chains | Medium |
| Treble crochet | tr | 4 chains | Tall |
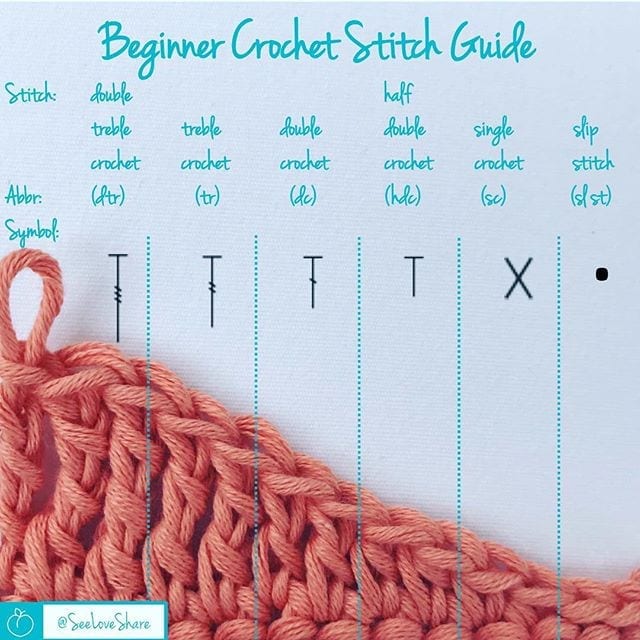
How to Read Crochet Symbol Charts
Crochet patterns can be written in text or shown as symbol charts — or both. Symbol charts are visual representations of a pattern where each symbol represents a different stitch. Once you learn to read them they can actually be faster and clearer than written instructions, especially for complex stitch patterns.
The Craft Yarn Council maintains a set of standardized crochet symbols used across most patterns. The symbols are designed to look like the stitches themselves — an x or + for single crochet, a T with a crossbar for double crochet, and so on. Once you’ve learned the stitches above, the symbols will start to make intuitive sense.
Key things to know when reading symbol charts:
- Charts are read from bottom to top, just like you crochet
- Right-side rows are read from right to left
- Wrong-side rows are read from left to right
- Rounds are read counterclockwise (the direction you crochet)
- A key or legend is usually provided alongside the chart
Common Crochet Abbreviations
| Abbreviation | Meaning |
|---|---|
| ch | Chain |
| sl st | Slip stitch |
| sc | Single crochet |
| hdc | Half double crochet |
| dc | Double crochet |
| tr | Treble/triple crochet |
| yo | Yarn over |
| st(s) | Stitch(es) |
| rnd | Round |
| rep | Repeat |
| inc | Increase |
| dec | Decrease |
| BLO | Back loop only |
| FLO | Front loop only |
| FO | Fasten off |
| WS | Wrong side |
| RS | Right side |
Ready to Start Your First Project?
Now that you know the basics, the best way to cement these stitches is to put them to work on a real pattern. Here are some of the most popular beginner crochet patterns from SeeLoveShare — all designed with new crocheters in mind:
- Browse all beginner crochet patterns →
- Baby and kids crochet patterns →
- Holiday crochet patterns →
- More tips and tutorials →
Disclosure: