
Knit All Holiday Patterns Free Patterns
October 2nd, 2018
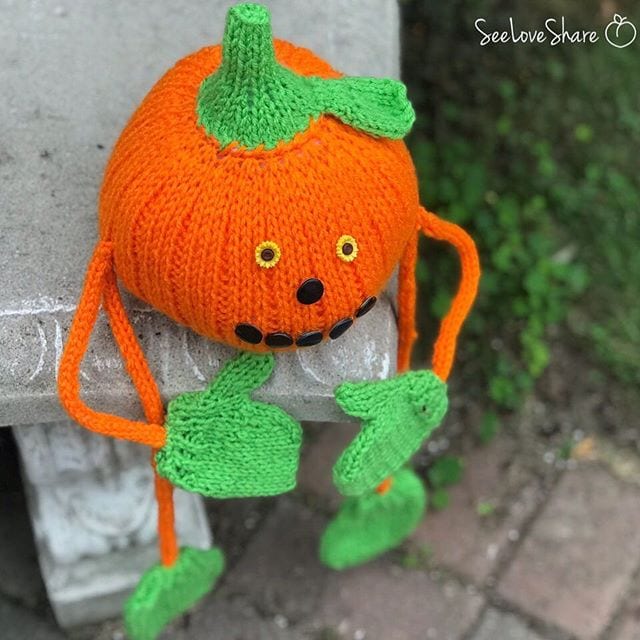
Nicky the Knit Pumpkin — Free Knit Pumpkin Pattern
Meet Nicky — my free knit pumpkin pattern dressed up as a costumed little character with arms, legs, mittens, and booties. He’s worked from the top down with all the limbs and accessories knit separately and sewn together, and he’s named after my nephew (mom’s grandson) — we are in looooove. 🎃
If you’ve been wanting a knit pumpkin pattern that’s more than just a plain orange pumpkin, this one is for you. Nicky stands about 8 inches tall, uses just one ball of orange worsted yarn (plus scrap green for the stem and accessories), and is the perfect quirky fall decor piece for your shelf, mantel, or tiered tray.
Why You’ll Love This Knit Pumpkin Pattern
This knit pumpkin pattern is full of character. The little arms, legs, and accessories make Nicky feel like a stuffed friend rather than just a decoration — and the textural knit/purl ribbing on the pumpkin body gives him beautiful definition.
- ✅ One ball of worsted yarn — uses just one ball of orange plus a small amount of green
- ✅ Adorable costumed details — comes with mittens, booties, arms, legs, leaf, and stalk
- ✅ Beautiful texture — knit/purl ribbing creates the classic pumpkin definition
- ✅ Customizable face — sew or glue buttons however you like for Nicky’s personality
- ✅ Perfect fall decor — sits beautifully on shelves, mantels, and tiered trays
- ✅ Free pattern right here on the blog — full written instructions below

Knit Pumpkin Pattern Details
| Skill Level | Intermediate |
| Construction | Top-down, limbs and accessories sewn on |
| Finished Size | Approx. 8 in tall, 21 in around |
| Yarn | 1 ball worsted weight (#4) orange + scrap green |
| Needles | Size 9 (5.5mm) double pointed needles, 9 in length |
| Gauge | 17 sts, 23 rows = 10cm / 4 in |
Knit Pumpkin Pattern Materials
- 🧶 1 ball Red Heart Super Saver in orange/pumpkin — I used Pumpkin colourway
- 🧶 Scrap Red Heart Super Saver in green for the stem, leaf, and accessories — I used Spring Green
- 🧷 Size 9 (5.5mm) double pointed needles, 9 in length
- 🔘 8 buttons (2 can be different colours for the eyes — make Nicky’s personality your own!)
- 🧵 Tapestry needle for assembly and weaving in ends
- 🌟 Polyfil stuffing for the pumpkin body
Yarnspirations stocks the full Red Heart colour range if you want different pumpkin shades. The Craft Yarn Council has a helpful weight chart if you want to substitute yarn.
Knit Pumpkin Pattern Notes
This knit pumpkin pattern is worked from the top down, with the limbs and hands/booties knit as their own parts and sewn together. The booties follow the same pattern as the hands, omitting the seam for the thumbs to create the foot. All parts have their own pattern and Nicky comes together by sewing them all together.
Knit Pumpkin Pattern Abbreviations
- K — knit
- P — purl
- St(s) — stitch(es)
- Tog — together
- Inc1 — increase 1 stitch
- M1 — make 1 stitch
- TBL — through back loop
Free Knit Pumpkin Pattern
Leaf
With green:
Cast on 3 sts.
Row 1-4: Work stocking stitch 4 rows.
Row 5: (Inc1) into every st to end (6 sts).
Row 6: P1 row.
Row 7: Cast on 1 st and knit to end (7 sts).
Row 8: Cast on 1 st and purl to end (8 sts).
Row 9: K2tog, k4, k2tog (6 sts).
Row 10: P2tog, p2, p2tog (4 sts).
Row 11: K2tog twice (2 sts).
Row 12: P2tog.
Bind off.
Stalk
With green:
Cast on 16 sts.
Row 1: K1 row.
Row 2: P1 row.
Row 3: K2, k2tog to last sts, k2 (10 sts).
Row 4: P1 row.
Row 5: (K2tog) to last stitch (5 sts).
Row 6-12: Stocking stitch and cast off.
Sew up the cast-off edge and the side seam. Stuff the base lightly and attach over where you drew up the cast off stitches on the pumpkin.
Pumpkin Body
Using orange, cast on 20 sts.
Row 1: Purl.
Row 2: (Inc1) into every stitch to end (40 sts).
Row 3: P to end.
Row 4: (Inc1) into every stitch to end (80 sts).
Row 5: K1, p3 to end.
Row 6: K3, p1 to end.
Repeat these last 2 rows 24 times.
Row 30: K1, k2tog, p1 to end (60 sts).
Row 31: K1, p2 to end.
Row 32: K2tog, p1 to end (40 sts).
Row 33: P2tog to end (20 sts).
Break yarn and draw through these 20 stitches and pull up tight. Join seam — this will be at the back. Leave about an inch to make stuffing easier, then stuff and sew the remainder of the seam. Thread through cast on stitches and pull up tight and secure.
Mittens (make 2)
Using green, cast on 22 sts and work 3 rows in K1, P1 single rib.
Row 4: Rib 3, M1, *(Rib 4, M1)* repeat from * to the last 3 sts, rib 3 (27 sts).
Work 2 rows stocking sts starting with a knit row.
Row 7: K13, M1, k1, M1, k13. Purl next row.
Row 9: K13, M1, k3, M1, k13. Purl next row.
Row 11: K13, M1, k5, M1, k13.
Row 12: Purl 20, turn.
Row 13: K7, turn.
Now work 2 rows stocking sts on these 7 sts for the thumb. Next row: P1, (P2tog) 3 times (4 sts). Break the yarn and thread through these 4 sts and, right sides together, stitch thumb seam.
Now with the wrong side facing, rejoin the yarn to the next set of sts and purl 13. Next row: K12, k2tog, k12 (25 sts).
Work 3 rows in stocking st, then shape the top:
Row 1: K2togTBL, k8, k2tog, k1, K2togTBL, k8, k2tog.
Row 2: Purl.
Row 3: K2togTBL, k6, k2tog, k1, K2togTBL, k6, k2tog.
Row 4: P7, p2tog (8 sts).
Bind off and sew seams.
Booties (make 2)
Using green, cast on 22 sts and work 3 rows in K1, P1 single rib.
Row 4: Rib 3, M1, *(Rib 4, M1)* repeat from * to the last 3 sts, rib 3 (27 sts).
Work 2 rows stocking sts starting with a knit row.
Row 7: K13, M1, k1, M1, k13.
Row 8: Purl.
Row 9: K13, M1, k3, M1, k13.
Row 10: Purl.
Row 11: K13, M1, k5, M1, k13.
Rows 12 – 19: Stocking stitch.
Now shape the top:
Row 1: K2togTBL, k8, k2tog, k1, K2togTBL, k8, k2tog.
Row 2: Purl.
Row 3: K2togTBL, k6, k2tog, k1, K2togTBL, k6, k2tog.
Row 4: P7, p2tog (8 sts).
Bind off and sew seams.
Arms & Legs (make 2 of each)
Arms: Work 5-st I-cord for 7 in (instructions below).
Legs: Work 5-st I-cord for 12 in.
I-Cord Instructions
- Cast on your stitches.
- Hold the needle with stitches in your right hand.
- Slip each stitch onto the left needle.
- Bring the yarn behind the work over to the right-hand side.
- Insert the right needle into the next stitch from left to right and knit normally.
- Pull firmly on this stitch to tighten up.
- Repeat across remaining stitches.
- Transfer stitches as before and repeat the knit process.
- When the cord is the length needed, cast off.
Assembly
Sew the stalk to the top of the pumpkin. Sew the leaf at the base of the stalk. Tuck the arms and legs into the hands (mittens) and bootie pockets. Attach the arms and legs together and fix to the middle of the pumpkin, making sure that the pumpkin seam is at the back. Sew or glue buttons for eyes and any face you like for Nicky!
Enjoy! 🎃
Tips for the Perfect Knit Pumpkin
- Stuff firmly but not stiff. A well-stuffed pumpkin holds its shape and shows off the ribbed texture, but over-stuffing distorts the knit/purl pattern.
- Use mismatched eye buttons. Two different colour or size buttons for the eyes give Nicky way more personality than matched ones.
- Sew the limbs on last. Position the arms and legs only after the body is stuffed and the stalk is attached — it’s easier to get the proportions right.
- Make a family. Knit Nicky in multiple sizes by changing yarn weight and needle size — bigger needles + chunky yarn = giant Nicky.
- Customize the colours. Cream and white for ghost-Nicky, deep burgundy for a sophisticated fall version, or any colour for a cosy pumpkin pal.
- Hide the seam. Position the back seam carefully — it’s a natural place to tuck and hide where the leaf and stalk meet.
More Pumpkins to Make
Crochet Cable Pumpkin Pattern
Love Nicky? My beginner-friendly crochet cable pumpkin is one of my most popular Etsy patterns — beautiful texture, beginner-friendly. Use code SEELOVE15 for 15% off.
Knit Pumpkin Pattern FAQ
Is this knit pumpkin pattern beginner friendly?
It’s an intermediate pattern — you’ll need to know how to knit, purl, increase, decrease, and work in the round on double pointed needles. The mittens and booties have some shaping but the instructions guide you through it.
How long does it take to knit?
Plan on a few evenings for this knit pumpkin pattern — the pumpkin body itself is quick, but the accessories (mittens, booties, arms, legs, leaf, stalk) add time. It’s a great project to work on in pieces while watching a show.
Can I make Nicky in different colours?
Absolutely! Cream for a ghost version, deep burgundy or rust for an autumnal palette, or any colour combination you like. The pattern works in any worsted weight yarn.
What yarn do you recommend for this knit pumpkin pattern?
Any smooth worsted weight (#4) yarn works well. I used Red Heart Super Saver in Pumpkin and Spring Green — it’s affordable, holds its shape, and the solid colours show off the textured stitches beautifully.
Do I need double pointed needles for this knit pumpkin pattern?
Size 9 (5.5mm) DPNs in 9 in length are recommended. You can use short circular needles with the magic loop method if you prefer.
Can I sell finished Nicky pumpkins?
Yes — small batch sales of finished items are welcome with this knit pumpkin pattern. Please credit SeeLoveShare as the designer and don’t redistribute or resell the pattern itself.
Get Free Patterns by Email
More Pumpkin & Fall Patterns You’ll Love
- Crochet Cable Pumpkin — beautiful cabled texture, beginner friendly
- Crochet Pumpkin Trio — three pumpkin sizes from one ball
- Farmhouse Stackable Crochet Pumpkins — a beginner trio
- Rustic Ribbed Crochet Pumpkins — fall farmhouse style
- Gingham Plaid Crochet Pumpkin — cottagecore fall pattern
- Browse All Knit Holiday Patterns
Save This Knit Pumpkin Pattern for Later
Want to come back to this knit pumpkin pattern later? Save it to Pinterest so you can find it when you’re ready to start your fall knitting. I’d love to see your Nicky pumpkins — tag @seeloveshare on Instagram! 🎃
This knit pumpkin pattern, photos, and instructions are © SeeLoveShare LLC. For personal use only — please do not redistribute or resell the pattern. Small-batch sales of finished items are welcome with credit. Thank you for supporting an independent designer! 🎃