

All Baby & Kids Free Baby & Kids Free Crochet
August 19th, 2022
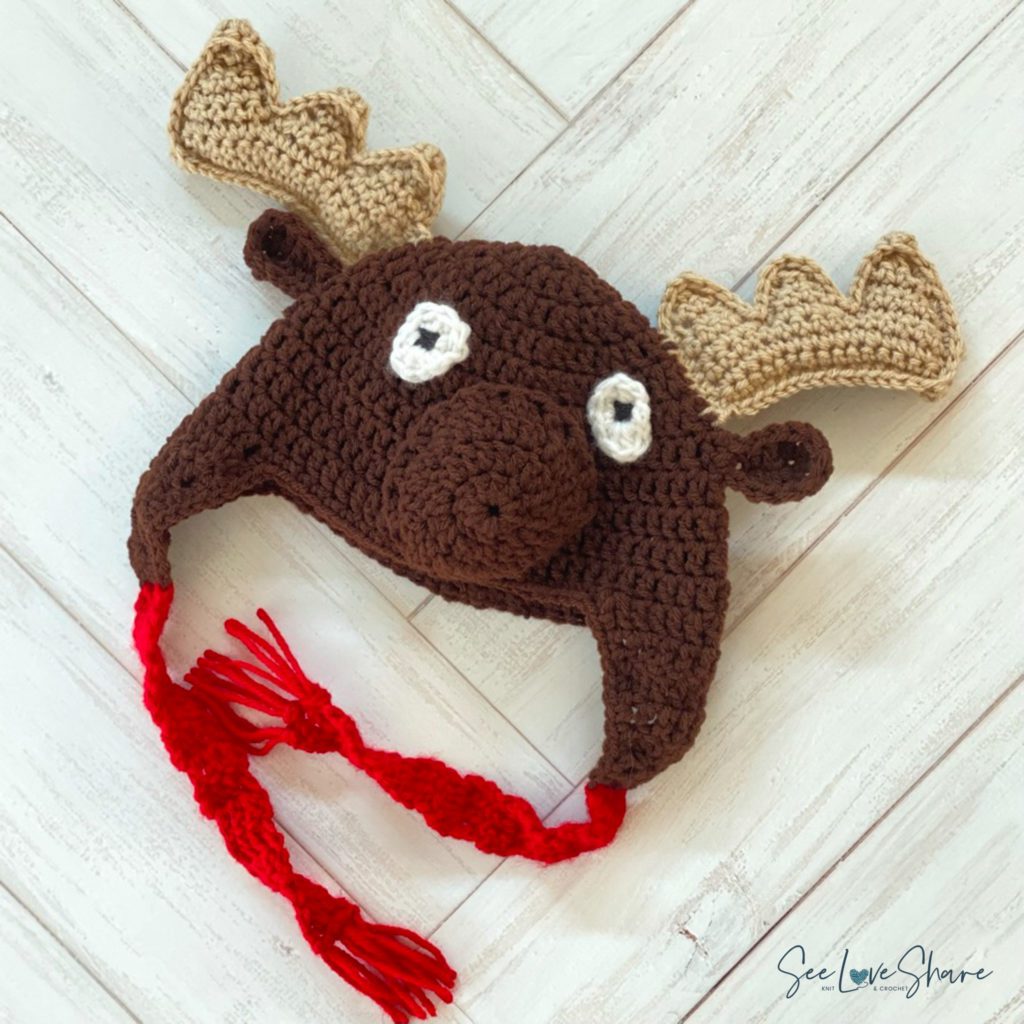
Crochet Moose Hat — Free Pattern for Baby, Kiddo & Toddler
This crochet moose hat pattern came together after a recent trip home to Toronto, when my son Hudson was gifted the sweetest little moose stuffy and was instantly head-over-heels in love. The two of them together was just about the cutest thing I’d ever seen — so this was born! It’s a simple, beginner-friendly pattern with charming antlers, sweet little ears, and a cozy red scarf detail at the bottom. 🦌❤️
The crochet moose hat works up in pieces (hat, antlers, ears, eyes, nose, scarf straps) that get sewn together for that polished, full-character look. All you need is your hook and Red Heart Super Saver yarn in five colors — and voila! The pattern sizes up or down easily by adjusting the starting rounds. Let’s get into it.
Why You’ll Love This Crochet Moose Hat Pattern
There’s something so satisfying about a project that’s quick, beginner-friendly, and absolutely melt-your-heart cute when it’s done. This crochet moose hat pattern is all three. The little antlers, the embroidered face, the red scarf straps — every detail adds up to something that looks like it took way longer than it actually did.
- ✅ Adorable woodland creature design with antlers, ears, and embroidered face
- ✅ Sizes up or down easily for babies through big kids
- ✅ Worked in pieces and sewn together — manageable in short crafting sessions
- ✅ Beginner-intermediate friendly with sc, dc, hdc, and basic shaping
- ✅ Cozy ear-flap design with red scarf straps for actual winter wear
- ✅ Makes an unforgettable winter or baby shower gift
- ✅ Customize antler color, hat color, and scarf for different vibes
Crochet Moose Hat Pattern Details
| Skill Level | Beginner-Intermediate |
| Key Technique | Pieced construction + sewn assembly |
| Yarn Weight | Worsted #4 |
| Hook Size | 5.0mm |
| Gauge | 4″ x 4″ (10cm x 10cm) = 12 sc and 15 rows |
| Sizes | Baby through Adult (adjustable) |
Materials Needed for the
Crochet Moose Hat Pattern
- 🪝 5.0mm crochet hook
- 🧵 Tapestry needle
- ✂️ Sharp scissors
- 🧸 Polyfil to lightly stuff antlers
- 🧶 Red Heart Super Saver Yarn in:
- Coffee (dark brown — hat)
- Buff (light brown — antlers)
- Cherry Red (bright red — scarf straps)
- White (scraps for eyes)
- Black for embroidery
Shop the materials


This works best in worsted #4 yarn. Red Heart Super Saver in the listed colors gives the classic moose palette I used for Hudson’s hat. Yarnspirations stocks the full Red Heart color range. The Craft Yarn Council has helpful info on worsted yarn weight standards if you’d like a refresher.
Abbreviations
- Ch — Chain
- Sts — Stitches
- Sl st — Slip stitch
- Sc — Single crochet
- Sc2tog — Single crochet 2 together
- Sk — Skip
- Dc — Double crochet
- Dc2tog — Double crochet 2 together
- Hdc — Half double crochet
- Tr — Treble crochet
The Crochet Moose Hat Pattern
Hat
Chain 3, join to first ch with a slst, loop created.
Round 1: Ch 2 and dc 10 times into loop. Join with slst into 1st dc (10 dc)
Round 2: Ch 2, 2 dc into 1st st. 2 dc in each st around. Join with sl st into 1st dc (20 dc)
Round 3: Ch 2, 2 dc into 1st st. Dc into next st. *2 dc into next st, dc into next st.* Repeat within ** around. Join with a sl st into the 1st dc. (30 dc)
Round 4: Ch 2, 2 dc into 1st st. Dc into next 2 sts. *2 dc into next st, dc into next 2 sts.* Repeat within ** around. Join with a sl st into the 1st dc. (40 dc)
Round 5: Ch 2, 2 dc into 1st st. Dc into next 3 sts. *2 dc into next st, dc into next 3 sts.* Repeat within ** around. Join with a sl st into the 1st dc. (50 dc)
Round 6: Ch 2, 2 dc into 1st st. Dc into next 4 sts. *2 dc into next st, dc into next 4 sts.* Repeat within ** around. Join with a sl st into the 1st dc. (60 dc)
Round 7-11: Ch 2, dc in each st around. Join with a sl st into the 1st dc. At the end of row 11 proceed to ear flaps.
1st Ear Flap
Round 12: Ch 2, Dc in next 10 sts, turn
Round 13: Ch2, Dc2tog, dc in next 6 sts, dc2tog, turn (8 dc)
Round 14: Ch2, Dc2tog, dc in next 4 sts, dc2tog, turn (6 dc)
Round 15: Ch2, Dc2tog, dc in next 2 sts, dc2tog, turn (4 dc)
Round 16: Ch2, Dc2tog twice, turn (2 dc)
Round 17: Ch2, Dc2tog, bind off
2nd Ear Flap
Return to Round 11, skip 15 sts after the first ear flap. Repeat Rounds 12-17:
Round 12: Join and ch 2, dc in next 10 sts, turn.
Round 13: Ch2, Dc2tog, dc in next 6 sts, dc2tog, turn (8 dc)
Round 14: Ch2, Dc2tog, dc in next 4 sts, dc2tog, turn (6 dc)
Round 15: Ch2, Dc2tog, dc in next 2 sts, dc2tog, turn (4 dc)
Round 16: Ch2, Dc2tog twice, turn (2 dc)
Round 17: Ch2, Dc2tog, bind off
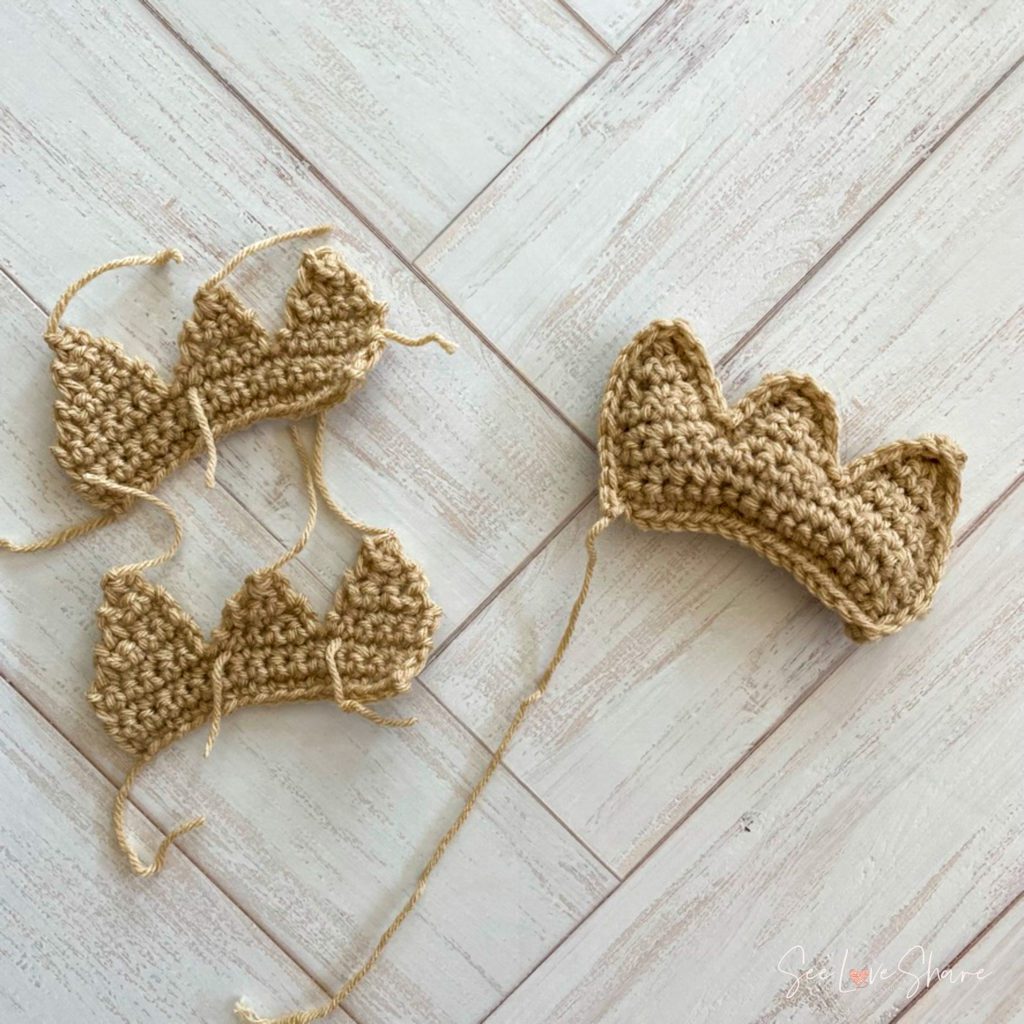
Antlers: Make 4 panels (2 per antler)
With light brown, ch 17
Row 1: Sc in 2nd ch from hook across, turn (16 sts)
Row 2-3: ch1, sc in each st across (16 sts)
Work first point:
Row 4: ch1, sc in next 6 sts, turn
Row 5: ch 1, sc in first 4 sts, sc2tog, turn (5 sts)
Row 6: ch 1, sc2tog, sc in first 3 sts, turn (4 sts)
Row 7: ch 1, sc in next 2 sts, sc2tog, turn (3 sts)
Row 8: ch 1, sc2tog, sc, turn (2 sts)
Row 9: sc2tog, bind off.
Work 2nd point:
Return to Row 3: join in next st following the first point, sc in next 5 sts
Next row: ch1, sc2tog, sc next st, sc2tog, turn (3 sts)
Next row: ch1, sc to end, turn
Next row: ch1, sc3tog, bind off
Work 3rd point:
Return to Row 3: join in next st following the 2nd point, sc in last 5 sts
Next row: ch1, sc in each st across, turn
Next row: ch1, sc2tog, sc next st, sc2tog, turn (3 sts)
Next row: ch1, sc to end, turn
Next row: ch1, sc3tog, bind off
Antler assembly: Place 2 antler panels on top of each other and, starting along the bottom of the antler, sc along the bottom edge and around the work, tucking in loose ends as you go. When you’re at the last side edge of the work, lightly stuff with polyfil to bring the antler to life. Sc to end, leaving a long tail to attach to the side of the hat.
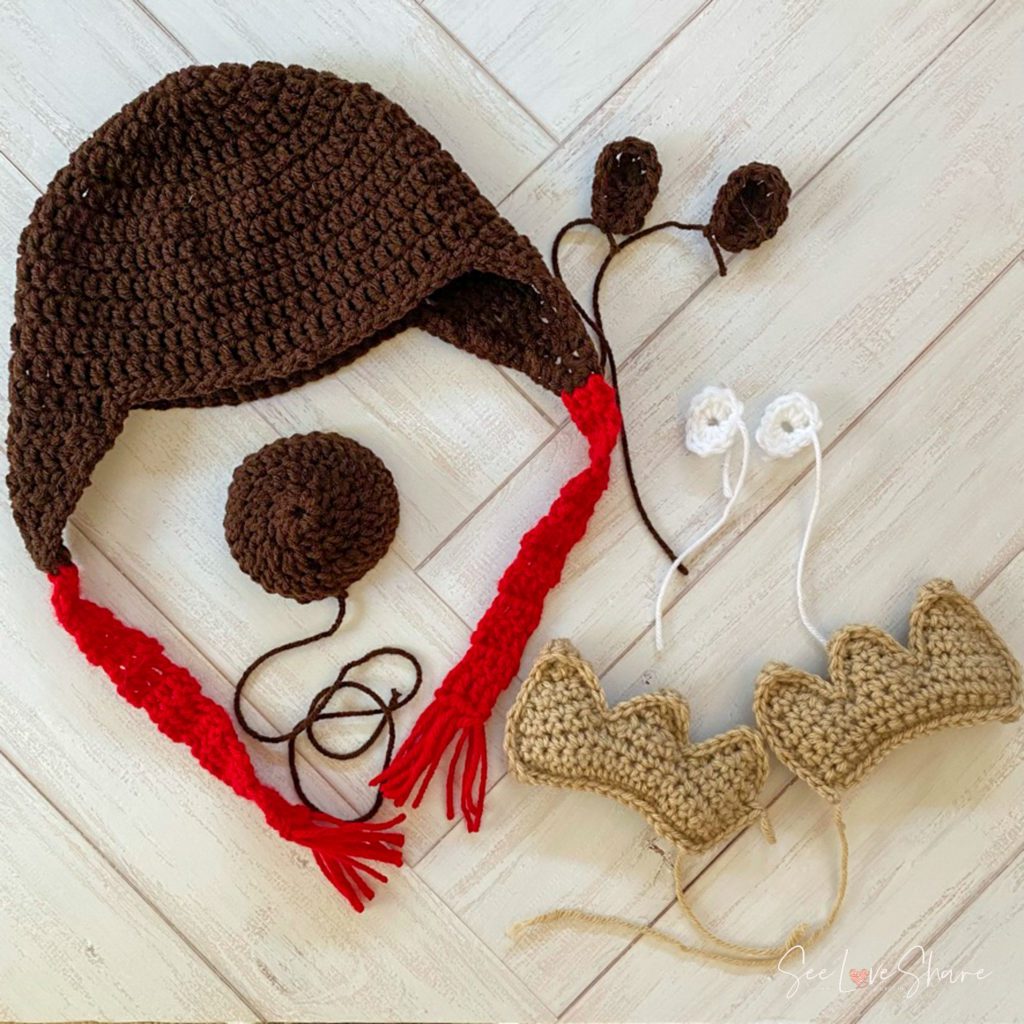
Nose
With Dark Brown: Chain 3, join to first ch with a slst, loop created.
Round 1: Ch 2 and dc 10 times into loop. Join with slst into 1st dc (10 dc)
Round 2: Ch 2, 2 dc into 1st st. 2 dc in each st around. Join with sl st into 1st dc (20 dc)
Round 3: Ch 2, 2 dc into 1st st. Dc into next st. *2 dc into next st, dc into next st.* Repeat within ** around. Join with a sl st into the 1st dc. (30 dc)
Round 4: Ch 2, dc in each st around. Bind off, leaving a long tail to attach to the hat.
Ear: Make 2
With Dark Brown, ch 5, sc in 2nd ch from hook, dc in next 2 ch, 5 tr in final ch. Continue along back side of chain, dc in next 2 ch, sc in final ch. Bind off leaving a long tail to attach to hat. The ear will naturally curl.
Eyes: Make 2
With White, ch3, join to first ch with a slst, loop created.
Row 1: ch 2, 3 dc, 2 sc, 3 dc, 2 dc all within loop. Join with a slst and bind off, leaving a long tail to attach to hat.
Scarf / Hat Straps
With Cherry Red, attach to the center 3 sts at the bottom of the ear flap. Ch 2, dc in bottom 3 sts, turn.
Row 2-13: ch 2, dc in each st, turn.
Attach fringe at the bottom edge for a finished scarf look.
Tips for the Perfect Crochet Moose Hat
- Size up or down easily: the hat sizes adjust naturally — start with fewer rounds for baby, more for toddler or kid. Each round adds approximately 1/2″.
- Stuff antlers lightly: over-stuffed antlers stand stiff. Lightly stuffed antlers stand naturally without looking puffy.
- Embroider the eyes with care: position the embroidered pupils centered on the white eye discs. Practice placement before stitching to make sure the moose has a friendly, balanced expression.
- Block the antlers: a light wet-block makes antlers stand crisp and symmetrical instead of flopping sideways.
- Attach pieces in order: sew on antlers first, then ears, eyes, and nose. Each piece anchors the next visually.
- Add a pom on the scarf: finish the cherry red scarf straps with little pom poms for extra cuteness.
- Make a gift set: pair the hat with a coordinating moose stuffy or chunky scarf for an unforgettable winter gift.
Crochet Moose Hat Pattern FAQ
How long does the crochet moose hat take to make?
About 6-10 hours total — 3-4 hours for the hat, 2-3 hours for antlers and details, 1-2 hours for assembly. Perfect for a weekend project.
What sizes does this fit?
The pattern as written fits toddlers and kiddos. To size for baby, work fewer increase rounds; to size for adult, work additional increase rounds in 10-stitch increments. Each round adds about 1/2″ to the circumference.
Can I use a different yarn?
Yes — any worsted #4 weight works. Caron Simply Soft, Bernat Softee Cotton, or Lion Brand Wool-Ease all crochet up similarly. Just check your gauge against the 4″ x 4″ = 12 sc + 15 rows standard.
Are the scarf straps functional?
Yes — the cherry red scarf straps tie under the chin to keep the hat secure on wiggly toddlers. Perfect for actual winter wear, not just photos.
What if my antlers flop?
Stuff them slightly more firmly and use a starched blocking finish to keep them upright. Cardstock inserts also work for very floppy antlers — just slip a strip inside before sewing the seam closed.
Can I sell finished hats?
Yes — small batch sales of finished items are permitted with this crochet moose hat pattern. Please credit SeeLoveShare as the designer and don’t redistribute or resell the pattern itself.
More Patterns for Kiddos You’ll Love
- Browse All Baby & Kids Patterns
- Hudson’s First Baby Beanie — Free Crochet Pattern
- Baby’s First Pumpkin Beanie — Halloween Crochet
- Crochet Slouchy Beanie — Spotted Hat in DK Weight
- Slouchy Toddler Hat — Free Winter Hat
- Crochet Lion Wrap with Loop Stitch Mane
Save This Crochet Moose Hat Pattern for Later
Want to come back to this pattern later? Save it to Pinterest so you can find it when winter hat season rolls around — and share it with your crochet friends!
This crochet moose hat pattern, photos, and instructions are © SeeLoveShare LLC. For personal use only — please do not redistribute or resell the pattern. Small-batch sales of finished items are welcome with credit. Thank you for supporting an independent designer! 🦌