
September 11th, 2022
Cable Knit Pumpkin Pattern — Beginner Guide
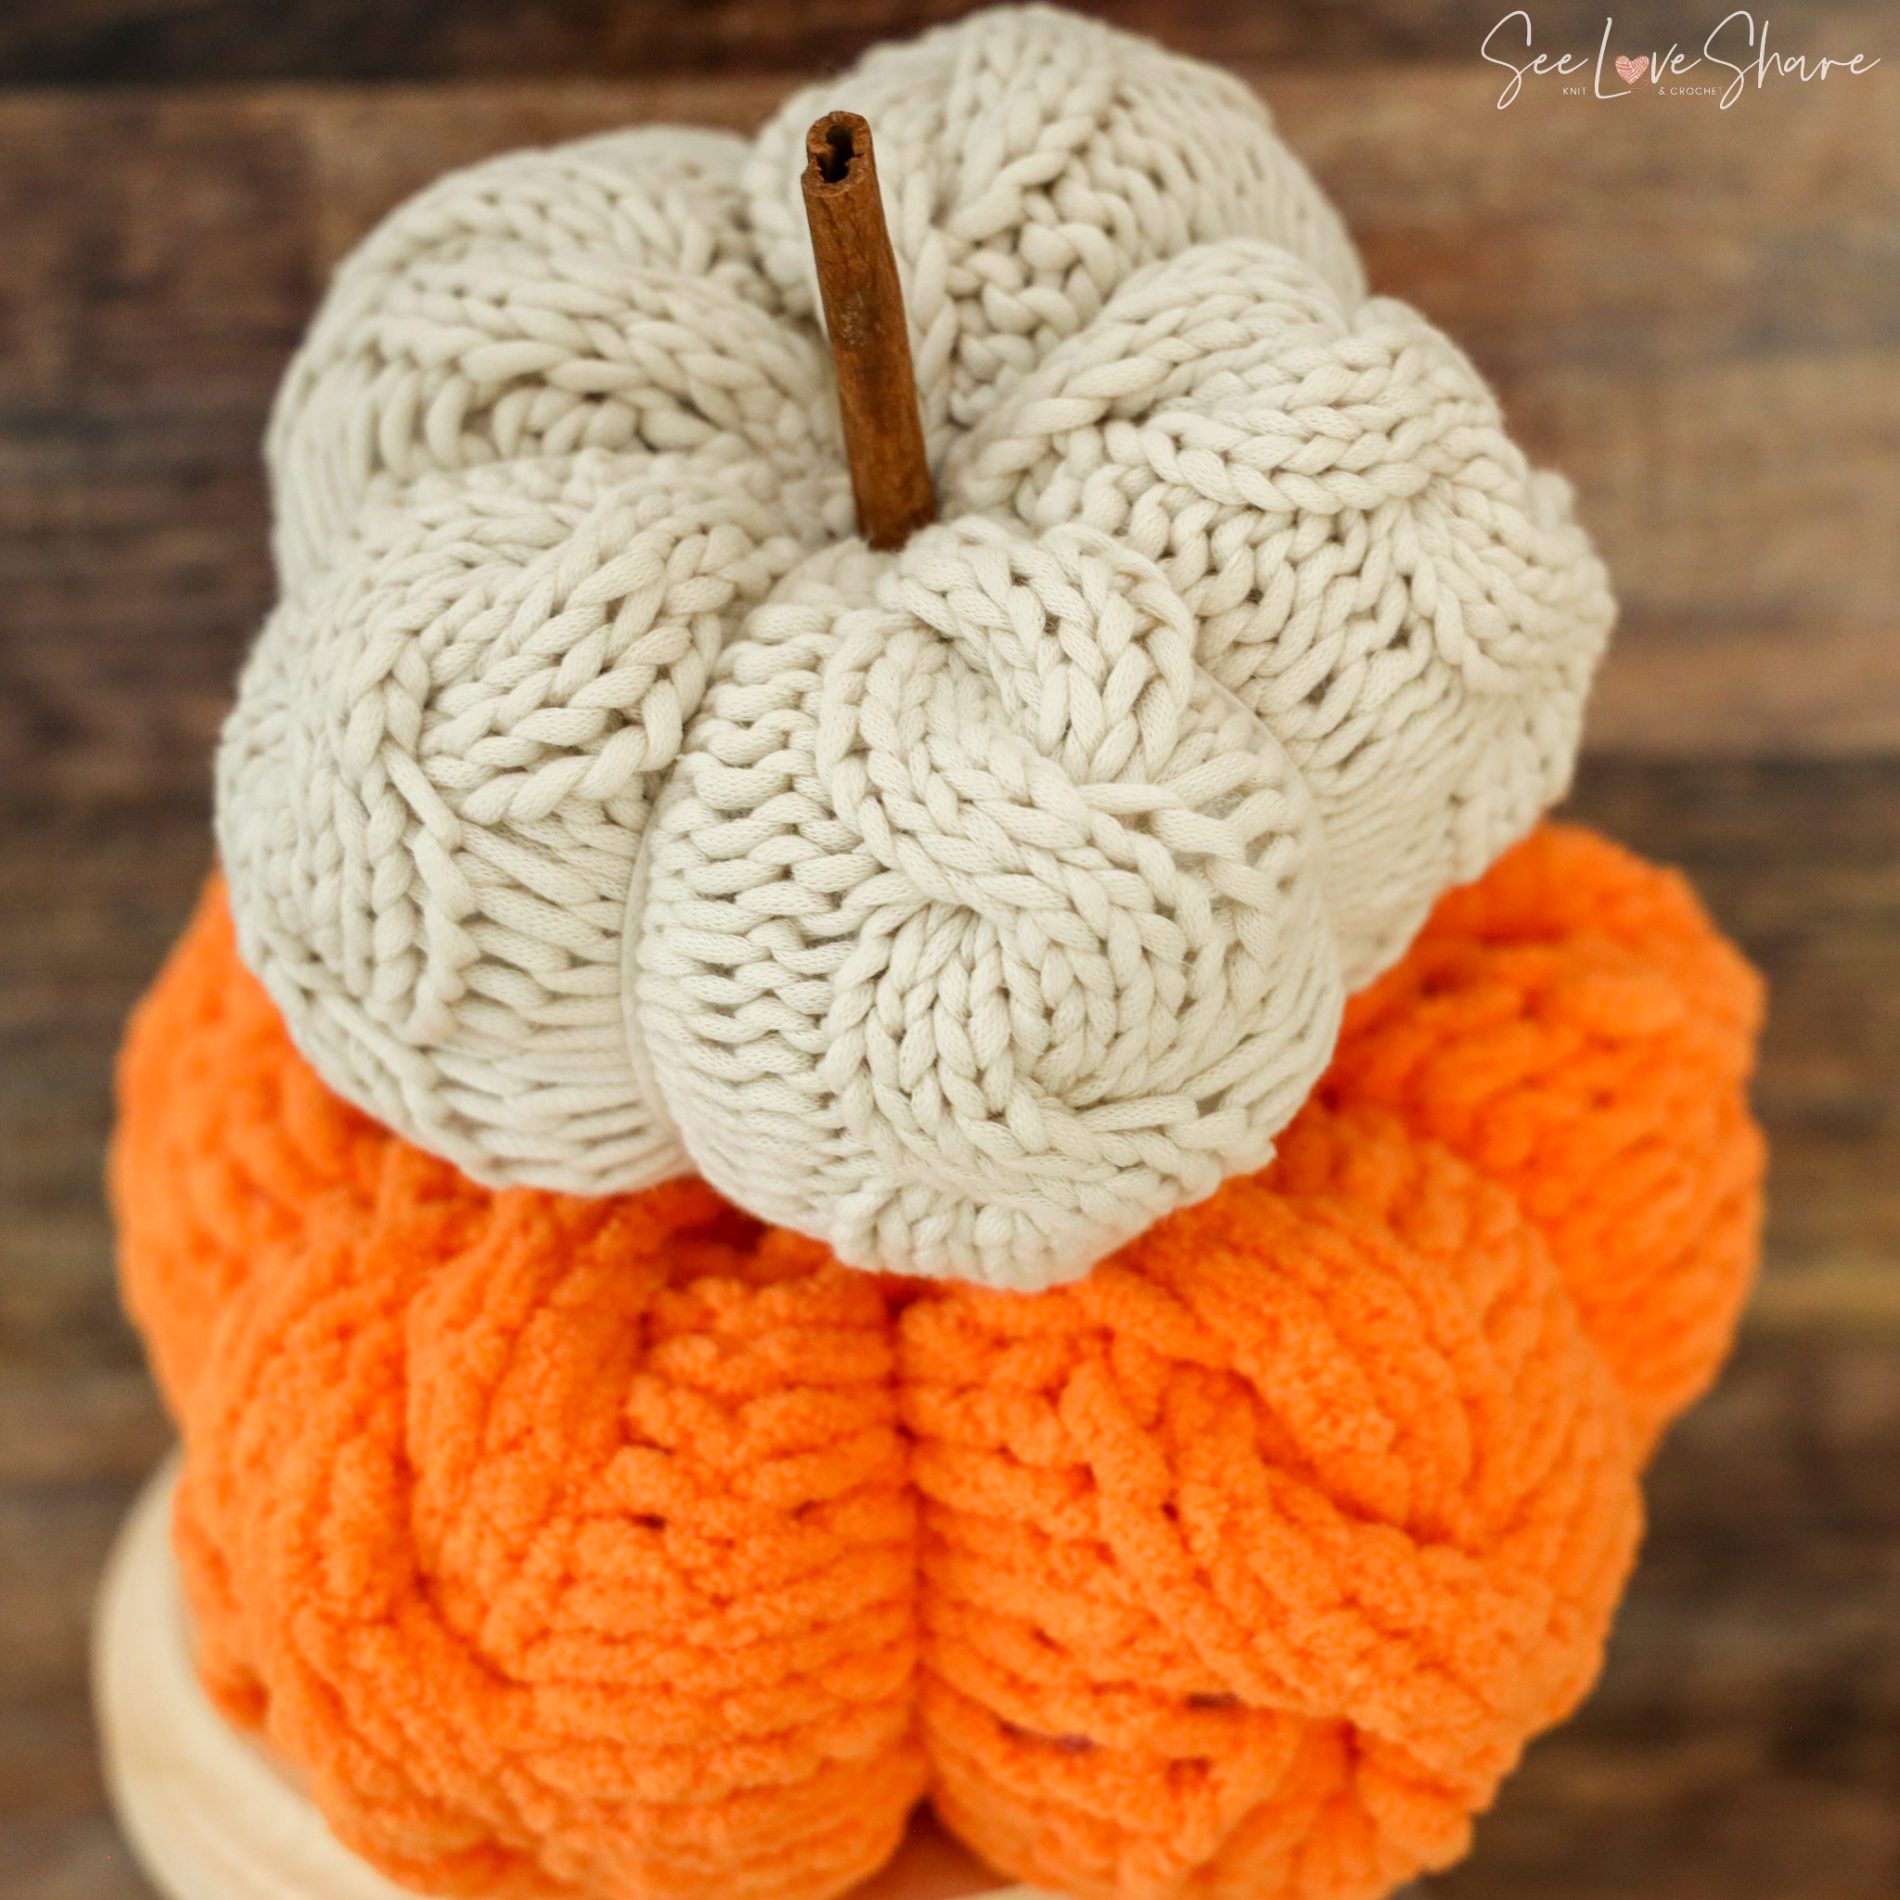
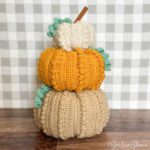
This cable knit pumpkin pattern is one of the most beautifully textured fall projects you can knit — a classic chunky pumpkin worked flat with a beginner-friendly cable design that creates the iconic ribbed-and-twisted look that elevates a simple knit pumpkin into something truly special. The pattern includes a full beginner guide to working cables, so even if you’ve never tried cable knitting before, you’ll have everything you need to make this project a success. Sized as a perfect mantel or tiered-tray pumpkin, this is the handmade fall décor piece that gets the most “where did you get that?” comments.
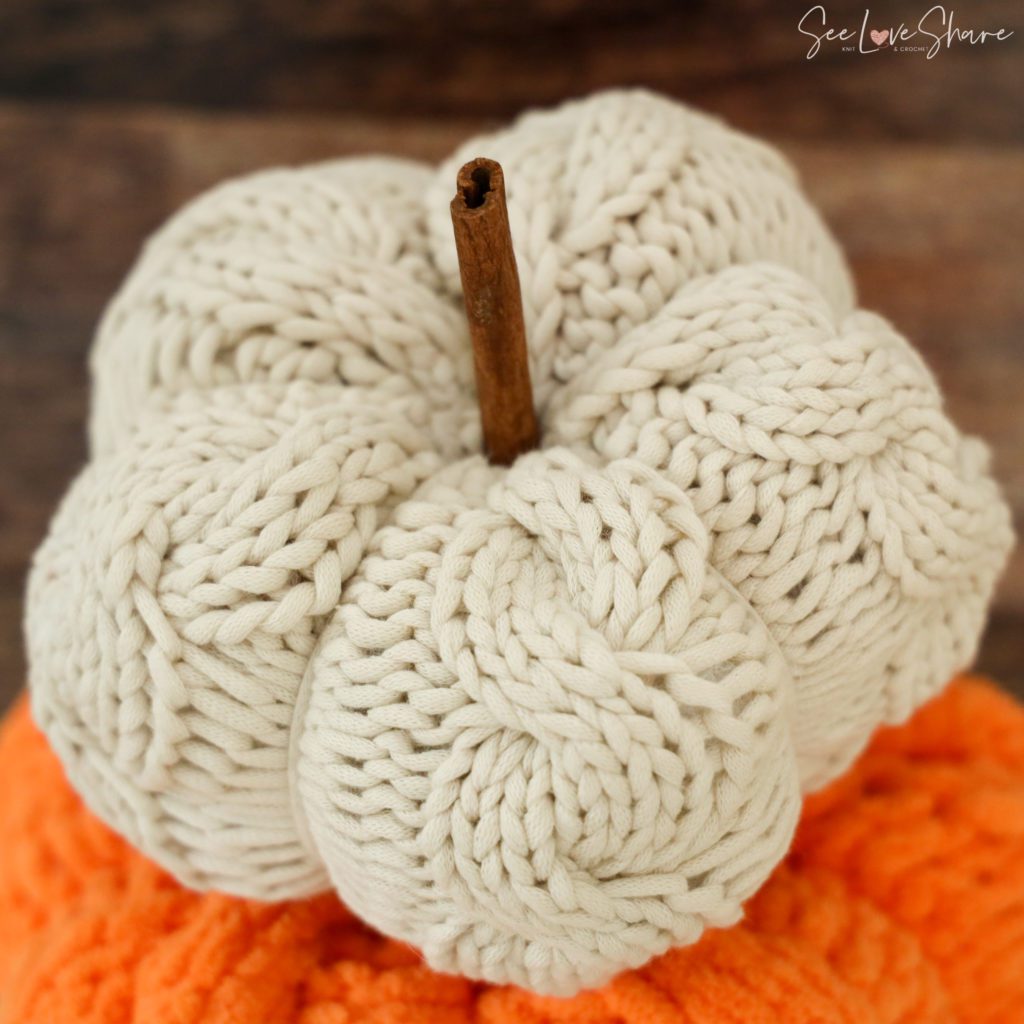
Make this cable knit pumpkin pattern as a single statement piece in classic orange, a coordinated trio in graduated sizes, or a whole pumpkin patch in modern neutrals (cream, sage, dusty rose) for a designer-look fall display. The cable detail photographs beautifully, making this the kind of handmade décor piece you’ll want to feature front-and-center in your fall styling.
Get the Pattern
Cable Knit Pumpkin Pattern PDF
The full printable PDF cable knit pumpkin pattern (with beginner cable guide) is instant-download in my Etsy shop. Step-by-step stitch instructions, full assembly walkthrough, ad-free formatting, ready to print. Use code SEELOVE15 for 15% off your order.
Why You’ll Love This Cable Knit Pumpkin Pattern
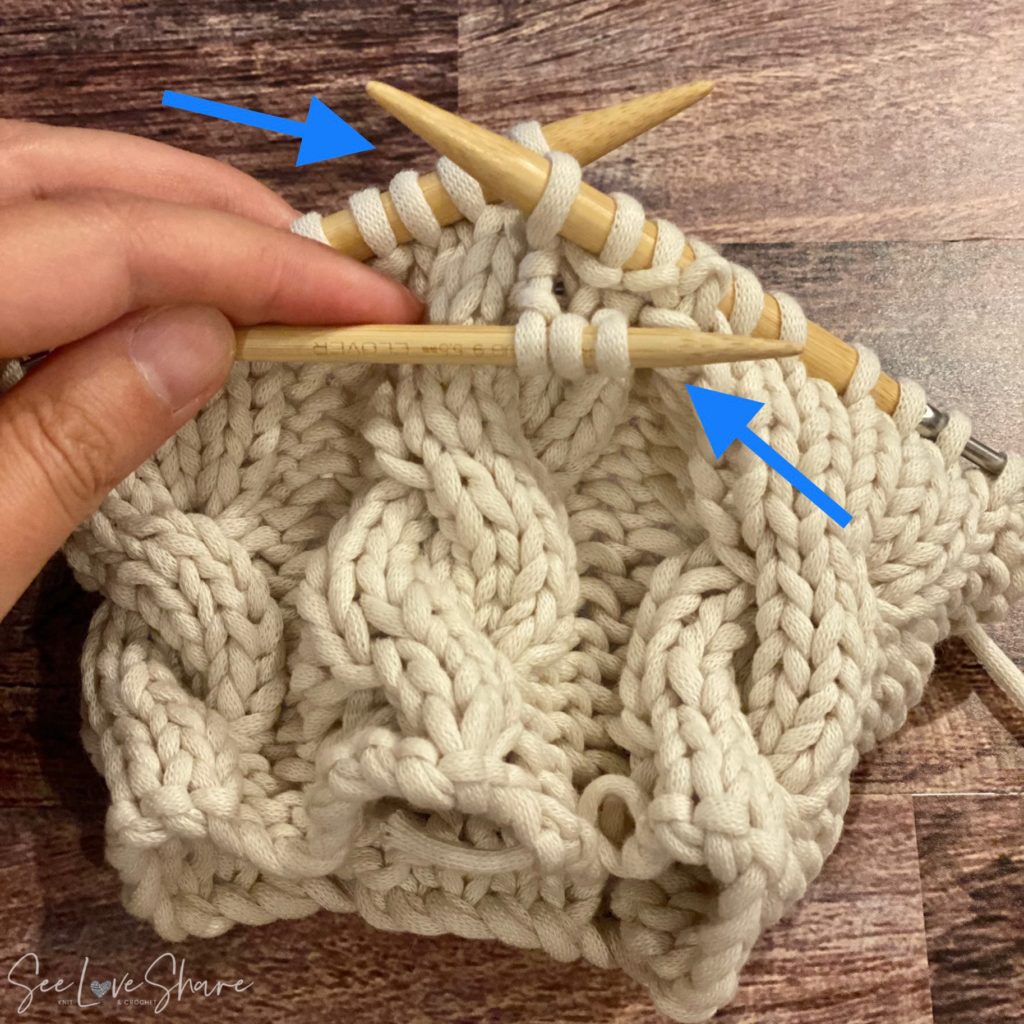
- Beginner-friendly cable knitting — full beginner guide to cables included in the PDF
- Beautifully textured — the cable design creates iconic ribbed-and-twisted pumpkin shape
- Versatile sizing — easy to scale up or down by adjusting yarn weight and needle size
- Customizable colors — classic orange, modern neutrals, or unexpected colors like dusty pink
- Reusable handmade décor — the kind of fall piece you’ll bring out year after year
- Photographs beautifully — the cable texture catches light and gives real visual depth
Cable Knit Pumpkin Pattern Details
- Skill Level: Advanced Beginner — full beginner cable guide included
- Construction: Worked flat, seamed, then stuffed and gathered
- Yarn Weight: Worsted weight (#4) or bulky (#5) for a chunkier pumpkin
- Format: PDF instant download — full written instructions, beginner cable guide, finishing notes
Recommended Materials for Your Cable Knit Pumpkin Pattern
Once you’ve grabbed the cable knit pumpkin pattern, here are the supplies you’ll want on hand:
- Red Heart Super Saver yarn in classic pumpkin orange (Pumpkin or Carrot), or any color of your choice. Try cream, sage, dusty rose, or rust for a designer-look fall palette.
- Knitting needles in size recommended by the pattern
- Cable needle for working the cable twists
- Tapestry needle for seaming and finishing
- Polyfil stuffing for plumping the pumpkin
- Scissors
- Optional: real cinnamon stick or wooden dowel for the stem (or use yarn to crochet a stem — see Rustic Ribbed Pumpkin pattern)
Shop the materials


Display Ideas for Your Cable Knit Pumpkin Pattern
- Fall mantel display — a single statement pumpkin or a coordinated trio of varied sizes
- Tiered tray styling — perfect mid-size for fall tiered tray decor with mini pumpkins and leaves
- Dining table centerpiece — a row of pumpkins down the center of a Thanksgiving table
- Entryway styling — a single oversized pumpkin by the front door for cozy autumn welcome
- Bookshelf accent — tuck a small pumpkin between fall books for festive shelf styling
- Coffee table styling — paired with candles, leaves, and a fall-scented candle for instant atmosphere
- Coordinated pumpkin patch — group multiple sizes and colors for a layered fall display
Customization Ideas for Your Pumpkin
- Classic fall — pumpkin orange with brown stem and twine wrap
- Modern neutral — cream, oatmeal, or warm beige for a more sophisticated fall palette
- Designer fall — sage green, dusty pink, terra cotta for trending fall color stories
- Mini pumpkins — use DK weight yarn and smaller needles for tiny tiered-tray sized pumpkins
- Oversized statement — bulky yarn and large needles for floor-standing entryway pumpkin
- Real cinnamon stem — use a real cinnamon stick for the stem for fragrant fall décor
- Twine and ribbon details — wrap the stem with twine or tie a small bow at the base
More Free Fall Crochet & Knit Patterns You’ll Love
If you love this cable knit pumpkin pattern, here are more handmade fall projects to add to your queue:
- Free Crochet Pumpkin Pattern with Curly Vines — 6 pumpkin shapes for a whole patch
- Rustic Ribbed Crochet Pumpkins — fall farmhouse style with cinnamon stick stems
- Gingham Plaid Crochet Pumpkin Pattern — beginner-friendly pumpkin in classic gingham plaid
- Free Crochet Maple & Oak Leaf Patterns — quick fall accents to pair with your pumpkins
- Fall Bobble Pillow Pattern Bundle — coordinated pillow set for full fall display
- Browse all holiday and seasonal patterns
What Knitters Are Saying About This Cable Knit Pumpkin Pattern
“These patterns from SeeLoveShare are so well written and contain all the info you need to have a successful project! Love this shop!!”
⭐⭐⭐⭐⭐ Etsy Customer Review
“The instructions were clear, it was easy to create, and I was thrilled with the outcome.”
⭐⭐⭐⭐⭐ Etsy Customer Review
Cable Knit Pumpkin Pattern FAQ
Can a true beginner make this cable knit pumpkin pattern?
Yes — the pattern includes a full beginner guide to working cables, so even if you’ve never tried cable knitting before, you’ll have step-by-step instruction. If you can cast on, knit, and purl, you can make this pumpkin.
How long does it take to knit?
About 2-4 evenings of relaxed knitting. The pumpkin is small enough to feel quick but rewarding, and most knitters finish a single pumpkin in a weekend.
What size knitting needles do I need?
The pattern is written for size 11 (8.0mm) circular knitting needles with a 16in cord, and uses bulky weight (#5) yarn for the chunky look. You can scale up or down by adjusting yarn and needle size — DK weight on smaller needles makes a mini tiered-tray version.
How big does the finished pumpkin turn out?
Approximately 8 inches wide and 5 inches tall — perfect mantel or tiered-tray pumpkin size. You can adjust in multiples of 9 stitches to size up or down.
What’s the best yarn for a cable knit pumpkin?
Bulky weight (#5) yarn gives the chunkiest, most textured look. Bernat Maker Home Dec in cream and Bernat Blanket Yarn Brights in orange are both photographed in the pattern. Worsted weight (#4) works for a smaller, more delicate pumpkin.
Can I sell finished pumpkins from this pattern?
Yes — small-batch sales of finished items are welcome. Please credit SeeLoveShare as the pattern designer and don’t redistribute or resell the pattern itself.
Ready to Cast On?
Cable Knit Pumpkin Pattern PDF
Grab the printable PDF from my Etsy shop — instant download, ad-free formatting, full beginner cable guide included, ready to print. Use code SEELOVE15 for 15% off.
Get Free Patterns by Email
More Pumpkin Patterns You’ll Love
 Crochet Cable Pumpkin — the crochet version of this same cable look
 Nicky the Knit Pumpkin — another chunky knit pumpkin for your mantel
- Rustic Ribbed Crochet Pumpkins — fall farmhouse pattern with a cinnamon stick stem
- Farmhouse-Chic Stackable Pumpkins — a neutral pumpkin trio
- Gingham Plaid Crochet Pumpkin — cottagecore texture in classic gingham


Save This Cable Knit Pumpkin Pattern for Later
Want to come back to this cable knit pumpkin pattern later? Save it to Pinterest so you can find it next time you’re planning your fall décor. I’d love to see your finished pumpkins — tag @seeloveshare on Instagram! 🎃
This cable knit pumpkin pattern, photos, and instructions are © SeeLoveShare LLC. For personal use only — please do not redistribute or resell the pattern. Small-batch sales of finished items are welcome with credit. Thank you for supporting an independent designer!