
October 4th, 2020
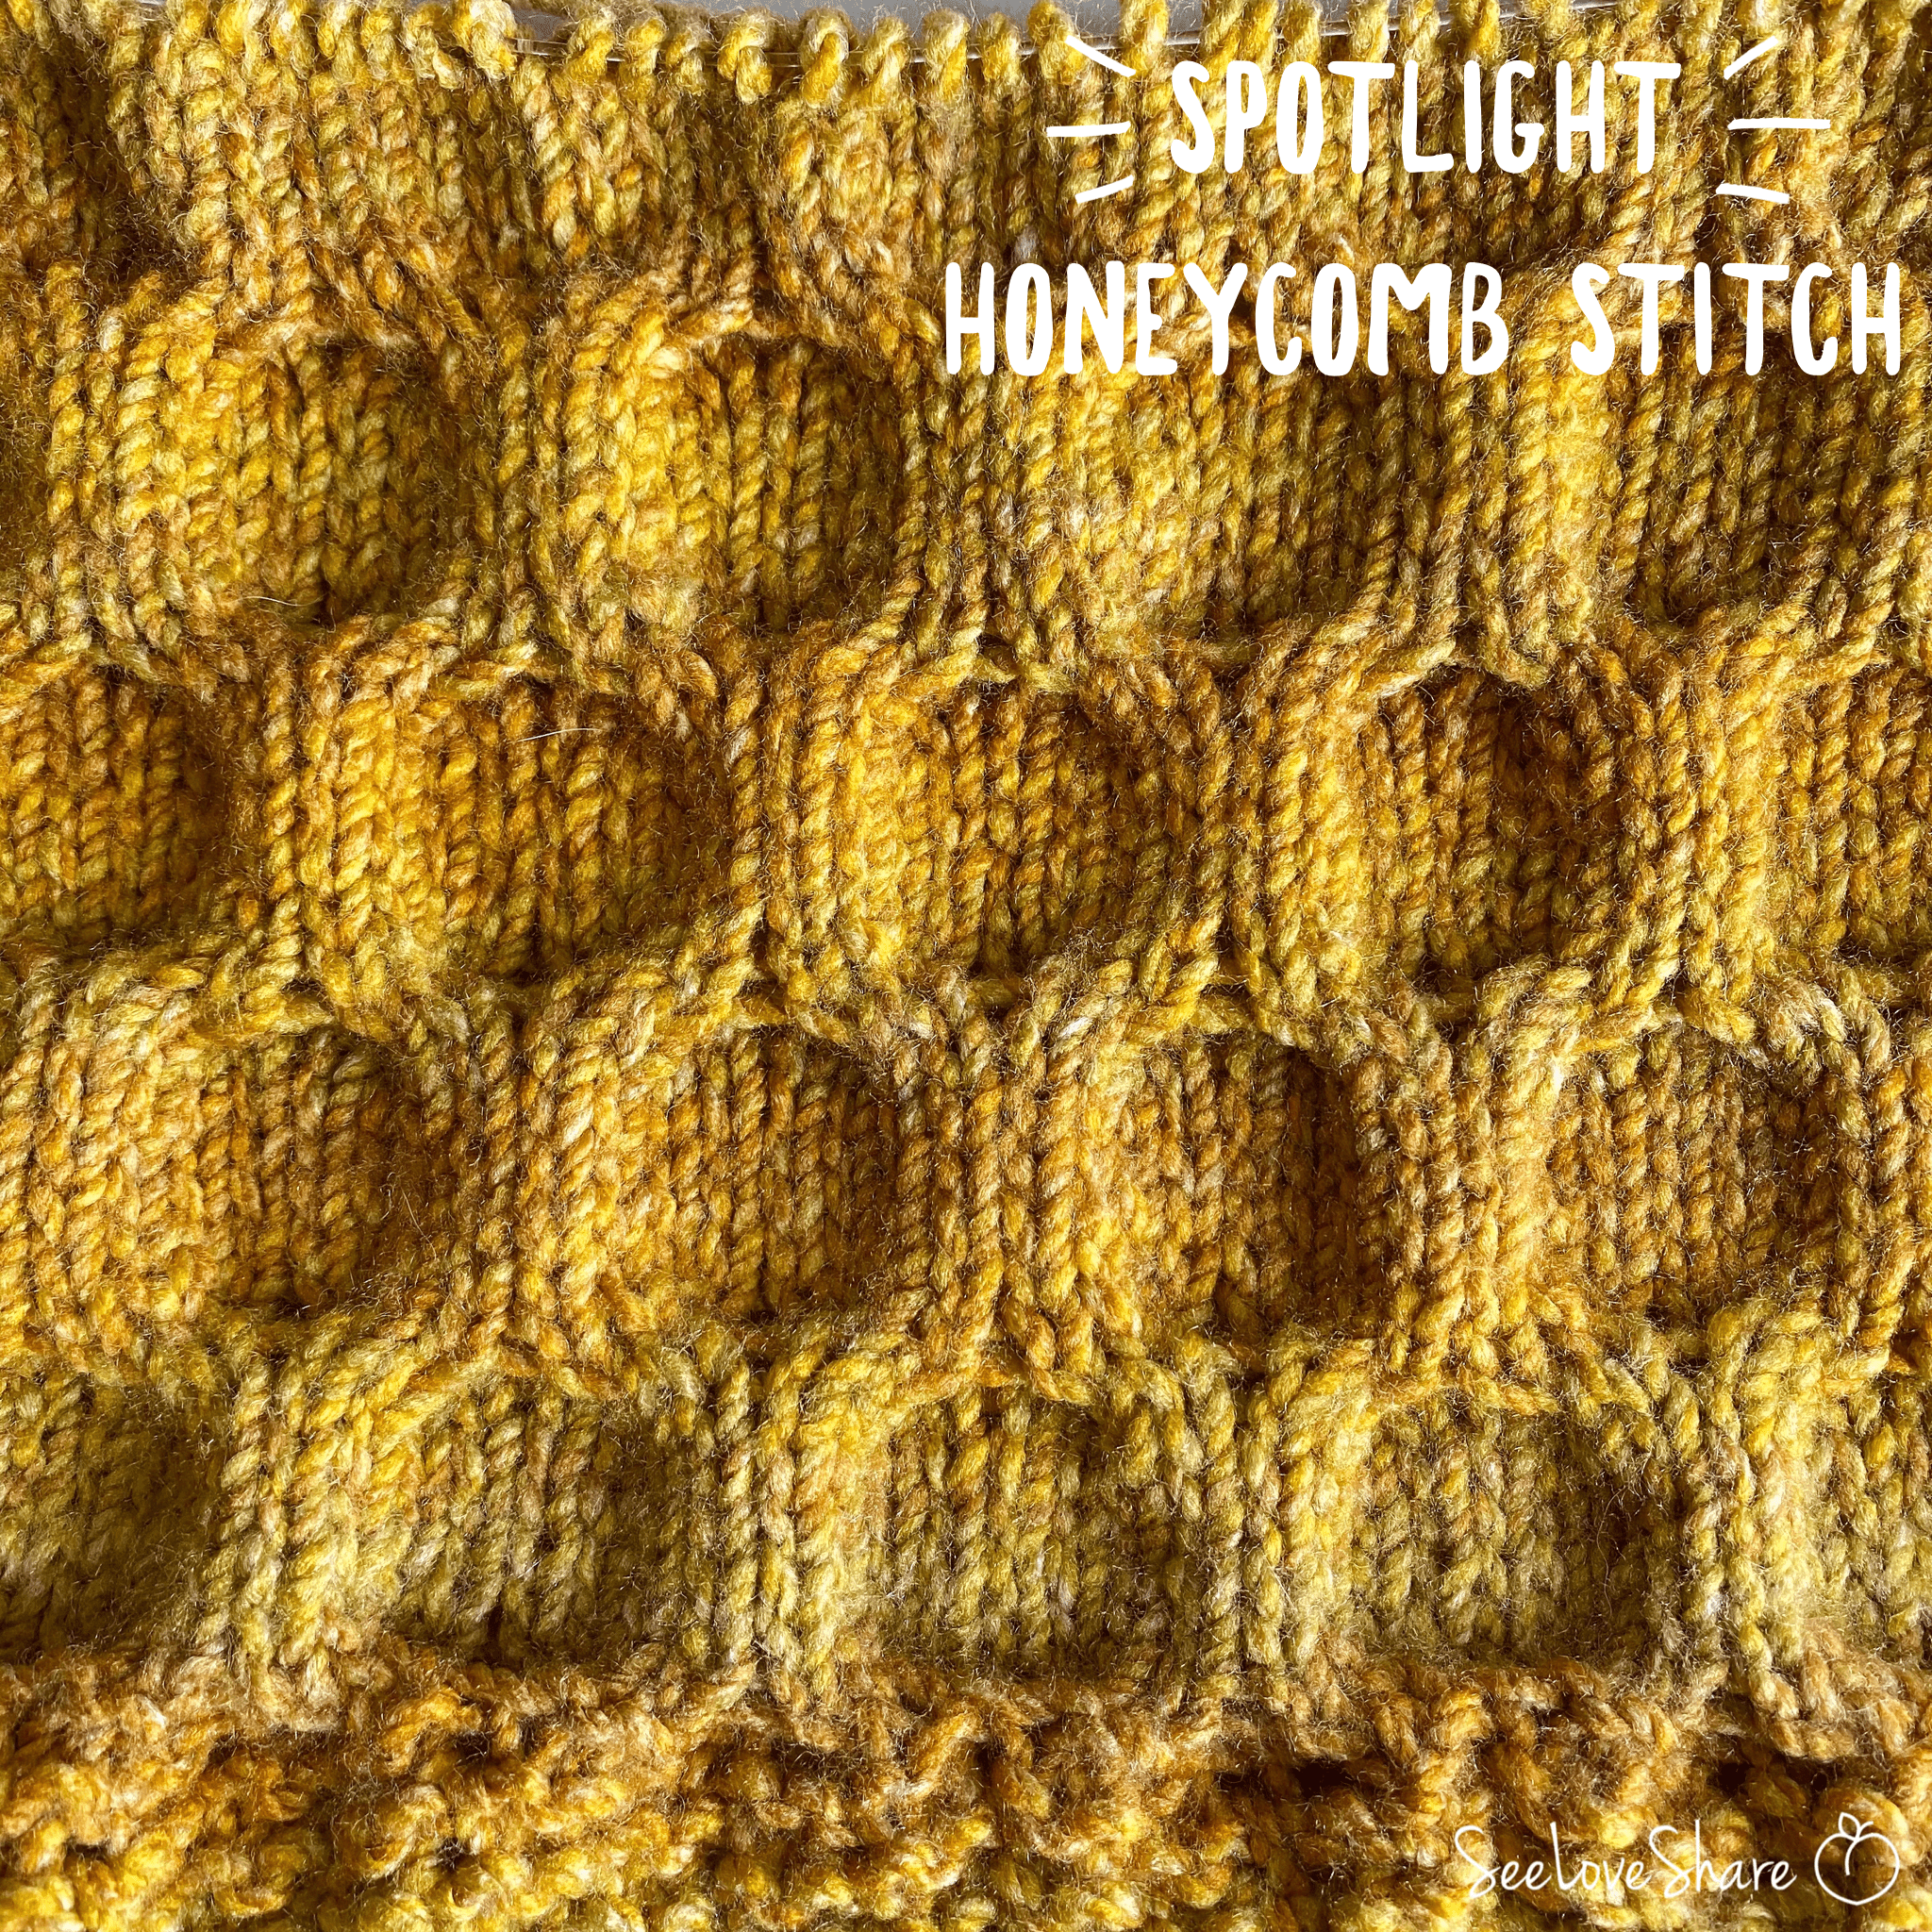
Knit Honeycomb Stitch — Free Tutorial with Photos
The knit honeycomb stitch is one of those textured patterns that looks far more complex than it actually is — and the finished fabric is stunning. Worked over a simple 16-row repeat using a cable needle, the knit honeycomb stitch creates a dimensional hexagonal pattern that’s perfect for blankets, scarves, sweaters, and pillows.
If you’ve never used a cable needle before, this tutorial is a great place to start. The knit honeycomb stitch uses simple front and back cable crosses, then plain knit and purl rows in between to set the texture. Once you have the rhythm, the rows fly by.
Why You’ll Love the Knit Honeycomb Stitch
This stitch hits the sweet spot between “looks impressive” and “actually beginner-friendly”:
✔ Beautiful dimensional honeycomb texture
✔ Beginner cable stitch — perfect for learning to use a cable needle
✔ 16-row repeat that becomes intuitive quickly
✔ Works up in worsted weight or heavier yarns
✔ Versatile — gorgeous in blankets, scarves, sweater panels, pillows
✔ Hides minor tension issues thanks to the texture
The knit honeycomb stitch is the kind of pattern that makes plain yarn look luxurious. A solid worsted or bulky weight yarn in any colour shows off the texture beautifully.
Project Ideas for the Knit Honeycomb Stitch
- Throw blankets — the textured honeycomb makes blankets feel substantial and high-end
- Chunky scarves — works up cozy and warm with worsted or bulky yarn
- Throw pillows — perfect feature stitch for a textured accent pillow
- Sweater panels — use as the front panel of a cardigan or pullover
- Baby blankets — sized down with softer baby yarn, makes a beautiful heirloom gift
- Hats and beanies — works nicely as a single decorative panel
Pattern Notes
The knit honeycomb stitch is worked over multiples of 4 stitches, with a minimum of 8 stitches if you’re testing a swatch. I recommend adding a small garter stitch or seed stitch border around the bottom and sides of your project to prevent the edges from curling — especially in larger pieces like blankets.
This pattern uses two cable crosses (C4B and C4F) on Rows 1 and 9 — those are the rows that create the honeycomb shapes. The rows in between are simple knit and purl rows that let the texture set.
Materials
- Bernat Wavelength worsted weight yarn in your colour of choice (I used Amber)
- Size US 10½ (6.5mm) knitting needles
- Cable needle (any size that holds 2 stitches comfortably)
- Tapestry needle for weaving in ends
- Scissors
Solid colour yarn shows off the knit honeycomb stitch best. Variegated yarns can hide the dimensional texture — save them for plain stockinette projects.
Abbreviations
K = Knit
P = Purl
Rep = Repeat
P2tog = Purl next 2 stitches together
C4B = Slip next 2 stitches onto cable needle and leave at back of work. K2, then K2 from cable needle.
C4F = Slip next 2 stitches onto cable needle and leave at front of work. K2, then K2 from cable needle.
Knit Honeycomb Stitch Pattern
Cast on any multiple of 4 stitches (minimum 8 for a swatch). Add 2-3 extra stitches on each side if you want a non-curling border.
Row 1: *C4B, C4F* Repeat from * to end of row.
Row 2: Purl across.
Row 3: Knit across.
Row 4: Purl across.
Row 5: Knit across.
Row 6: Purl across.
Row 7: Knit across.
Row 8: Purl across.
Row 9: *C4F, C4B* Repeat from * to end of row.
Row 10: Purl across.
Row 11: Knit across.
Row 12: Purl across.
Row 13: Knit across.
Row 14: Purl across.
Row 15: Knit across.
Row 16: Purl across.
Repeat Rows 1-16 until you’ve reached your desired length. Bind off in pattern, weave in ends, and block your finished piece for the cleanest texture.
How to Work the C4B and C4F Cables (Step-by-Step)
If this is your first time using a cable needle, here’s the breakdown:
C4B (Cable 4 Back) — leans right
Step 1: Slip the next 2 stitches from your left needle onto your cable needle.
Step 2: Hold the cable needle behind your work (this is the “back” in C4B).
Step 3: Knit the next 2 stitches from your left needle as normal.
Step 4: Now knit the 2 stitches off your cable needle.
You’ve just crossed 2 stitches over 2 stitches, leaning the cable to the right.
C4F (Cable 4 Front) — leans left
Step 1: Slip the next 2 stitches from your left needle onto your cable needle.
Step 2: Hold the cable needle in front of your work (this is the “front” in C4F).
Step 3: Knit the next 2 stitches from your left needle as normal.
Step 4: Knit the 2 stitches off your cable needle.
Same crossing motion, but now the cable leans to the left. The combination of these two cable directions on Rows 1 and 9 (and the offset of “BF” then “FB”) is what creates the honeycomb shape.
Tips for Working the Knit Honeycomb Stitch
Don’t Pull Too Tight on Cable Rows
Cable rows naturally tighten the fabric as you cross stitches. If you pull too hard the honeycombs will pucker. Keep your tension a touch looser than usual on Rows 1 and 9, and the texture will bloom nicely after blocking.
Use a Stitch Marker Between Repeats
For larger pieces, place a stitch marker after every 8 stitches across your row. It makes counting the cable repeats much easier and helps you catch mistakes early.
Add a Border to Prevent Curling
Cable patterns curl at the edges. For blankets and scarves, add 4-6 stitches of garter stitch (knit every row) or seed stitch on each side to keep the edges flat. Also work a few rows of garter or seed at the top and bottom.
Block Your Finished Piece
The honeycomb texture really pops after blocking. Wet block by soaking in cool water, gently squeezing out excess, then pinning to shape on a clean towel and letting air dry fully.
Use a Solid Colour Yarn
Variegated and tonal yarns hide the dimensional cable texture. The knit honeycomb stitch deserves a solid colour that lets all that beautiful structure show.
Frequently Asked Questions
Is the knit honeycomb stitch suitable for beginners? If you know basic knit and purl stitches and are comfortable working with a cable needle (or are willing to learn), yes. It’s actually one of the easier cable stitches because the cable rows are simple 2-over-2 crosses.
What’s the smallest swatch I can make? Cast on 8 stitches (or 12 if you want a small garter border on each side). That gives you 2 honeycomb units across — enough to see the pattern develop.
Can I substitute a different yarn? Absolutely. Any worsted or bulky weight yarn works beautifully. Use the recommended needle size for whichever yarn you choose. Avoid very thin yarns — the texture gets lost.
What if I don’t have a cable needle? You can use a double-pointed needle (DPN), a spare straight needle, or even a smooth pencil in a pinch. Just needs to be the same size or smaller than your working needles.
Why does my honeycomb pattern look uneven? Three usual culprits: tension is too tight on cable rows, you’ve mixed up C4B and C4F somewhere, or you haven’t blocked yet. Block first and see if it evens out — most cable issues disappear after a good blocking.
More Knit Stitch Tutorials
Loved learning the knit honeycomb stitch? Here are more knit stitch tutorials from SeeLoveShare to add to your skills:
 Knit Tilt Decrease — Right and Left Slant Tutorial
 Spotlight Stitch: Mesh Stitch (Knit and Crochet)
 Knit Brick and Mortar Baby Blanket — beginner slip stitch colour work
 Simple Color Block Knit Throw Pattern
Save This Knit Honeycomb Stitch Tutorial
Want to come back to this knit honeycomb stitch tutorial later? Save it to Pinterest so you can find it whenever you need a refresher — and share it with your knitting friends!