Crochet Free Crochet Free Patterns
September 25th, 2022
3-Stack Jack-O-Lantern Topiary – Free Crochet Pattern
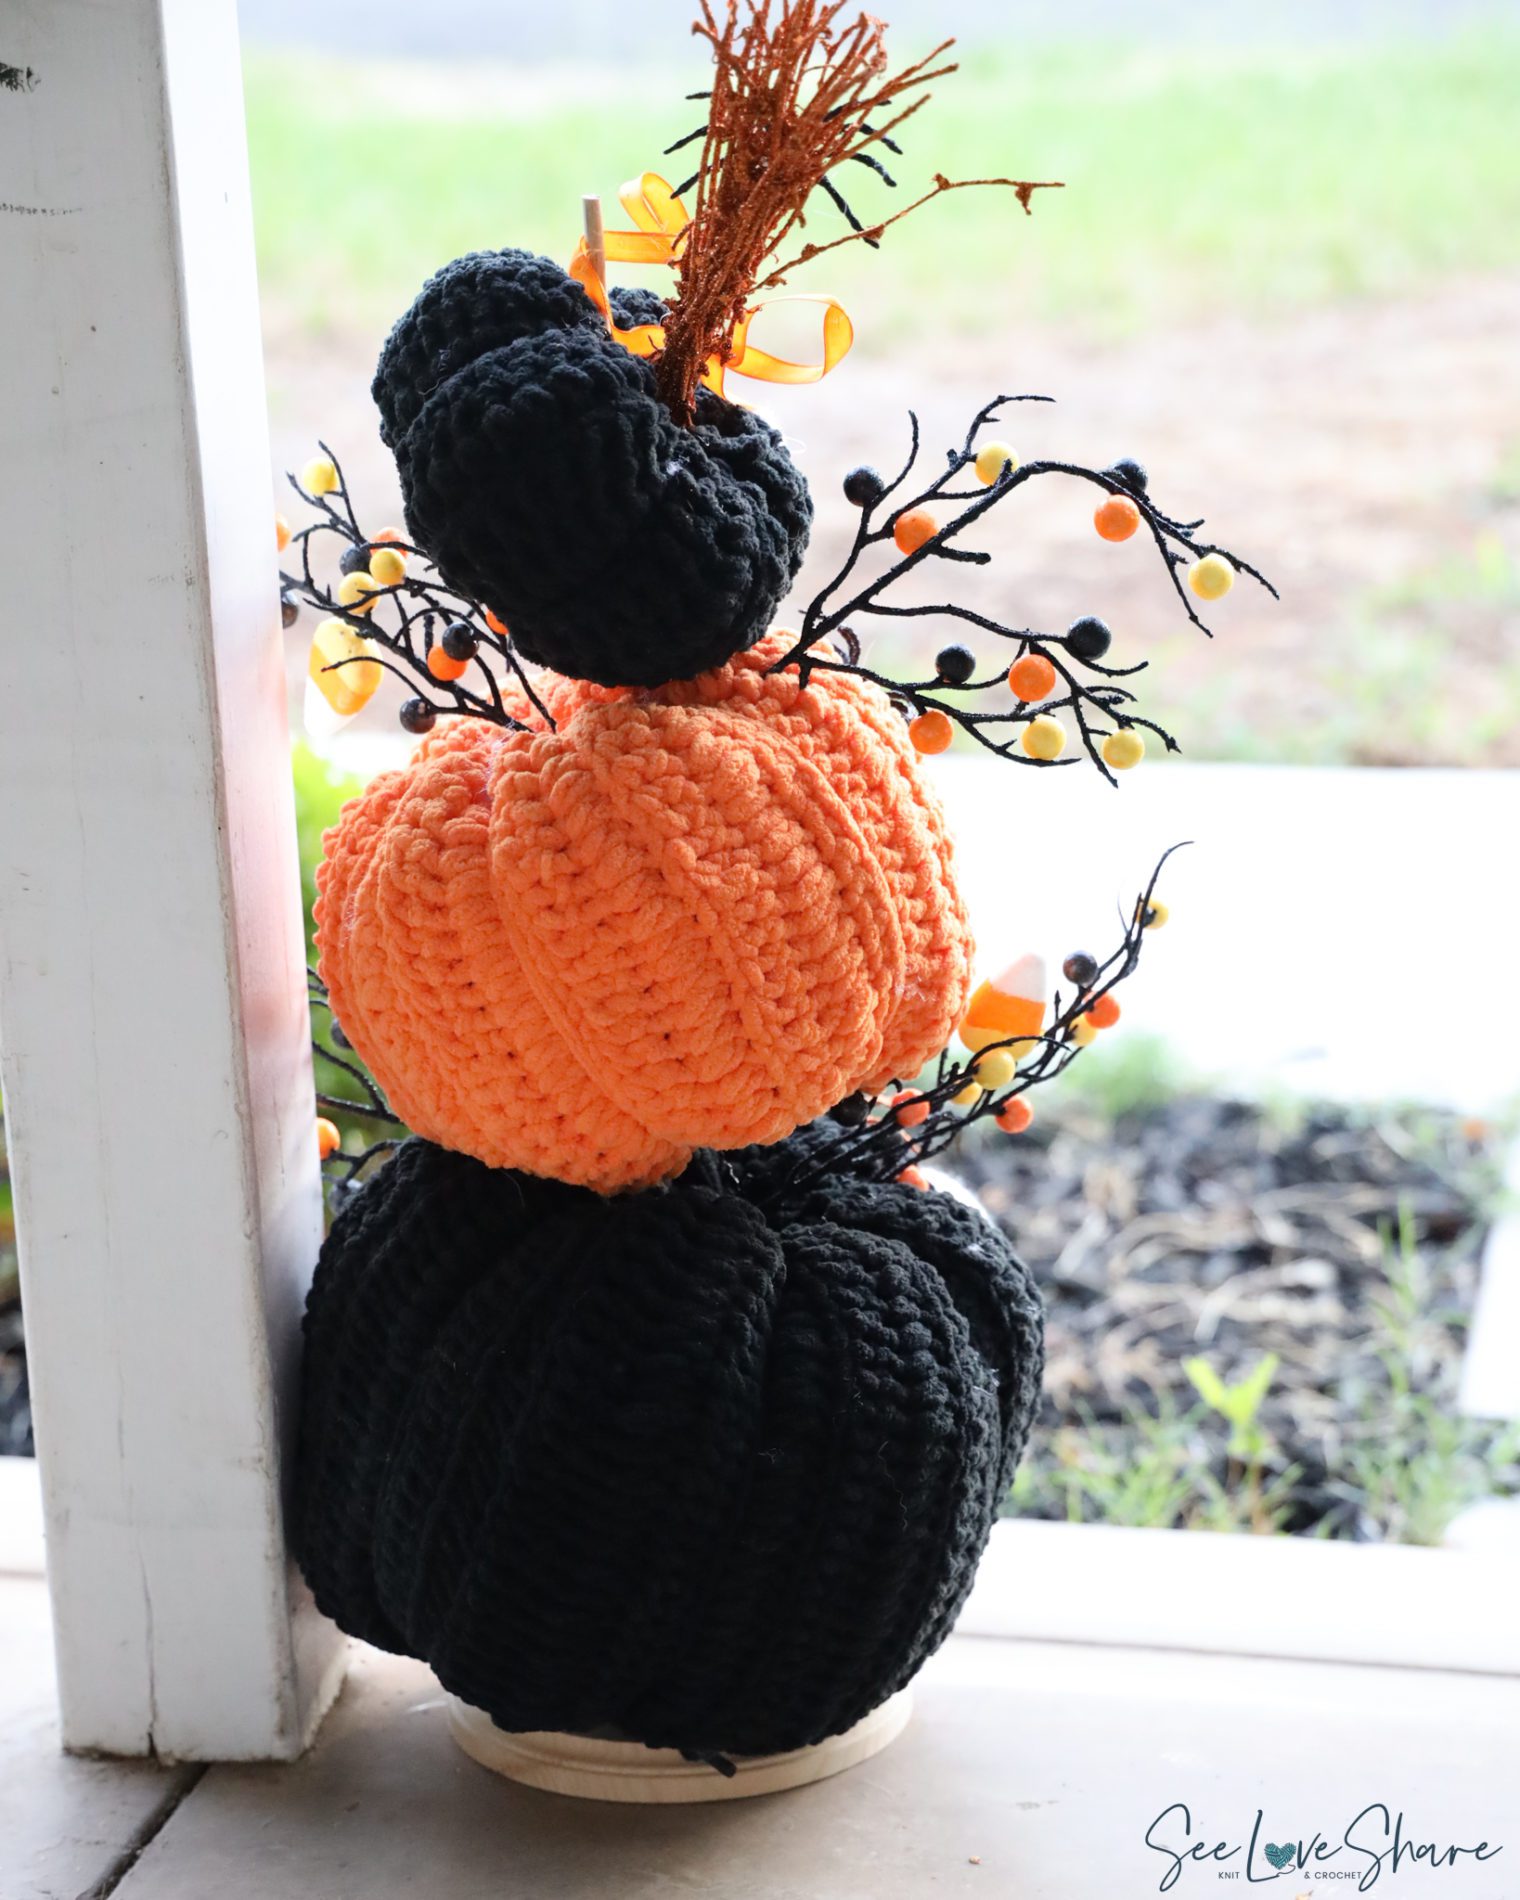
This jack-o-lantern crochet pattern is the year we ditched the real pumpkin and went fully handmade — and honestly we’re never going back. This three-stack jack-o-lantern topiary is one of the most fun Halloween crochet projects I’ve ever made. It looks impressive, it’s completely customizable, and it works up so much faster than it looks. At approximately 24 inches tall it makes a serious statement on the front porch or as a Halloween dinner table centrepiece. 🎃
The pattern involves three crochet pumpkins in graduating sizes stacked on a wooden dowel, decorated with faces, Halloween floral picks, and whatever spooky embellishments your heart desires. We’ll walk you through every step — the crochet, the assembly, and the decorating.
Why You’ll Love This Jack-O-Lantern Crochet Pattern – Halloween Topiary
- 🎃 Stunning display piece — front porch, entryway, or Halloween table centrepiece
- 🎃 Three sizes in one pattern — small, medium, and large pumpkins create a bottom-heavy topiary shape
- 🎃 Completely customizable — decorate with any Halloween embellishments you like
- 🎃 Lasts for years — unlike a real pumpkin this one comes out every October
- 🎃 Beginner friendly — simple HDC stitch worked in back loops only
- 🎃 Free pattern — full written instructions right here on this page

Jack-O-Lantern Crochet Pattern Details
| Skill Level | Beginner |
| Finished Size | Approx. 24″ tall x 12″ wide (full topiary) |
| Yarn | Bernat Blanket yarn in orange, black, and green |
| Hook Size | 8.0mm |
| Gauge (pumpkins) | 7 sc and 8 rows = 4″ with 8mm hook |
| Cost | Free — full pattern below |
Materials Needed for this Jack-O-Lantern Crochet Pattern
The pumpkins are worked in super bulky #6 yarn for maximum chunky texture. For more on choosing the right yarn weight for crochet projects, the Craft Yarn Council yarn weight system is a helpful reference.
Yarn and Hook
- 🧶 Bernat Blanket yarn in orange (main pumpkin colour), black (faces), and green (stems)
- 🪝 8.0mm crochet hook
- 🧵 Tapestry needle
- ✂️ Scissors
- 🧸 Polyfil stuffing
Shop the materials


Assembly Supplies
- 🪵 Wooden dowel — for the topiary structure
- 🔫 Hot glue gun — for securing the dowel and decorations
- 👀 Googly eyes — glued onto crochet eye pieces
- ✂️ Wire cutters — for breaking down Halloween floral sprays
- 🕷️ Halloween floral picks, spider embellishments, and any other spooky decorations you love — grab 2 bunches and break them into smaller pieces
Abbreviations
- ch — Chain
- sc — Single crochet
- hdc — Half double crochet
- dc — Double crochet
- dc3tog — Double crochet 3 together (decrease)
- BLO — Back loop only
- st(s) — Stitch(es)
Jack-O-Lantern Crochet Pattern: 3-Stack Topiary Instructions
Large Pumpkin
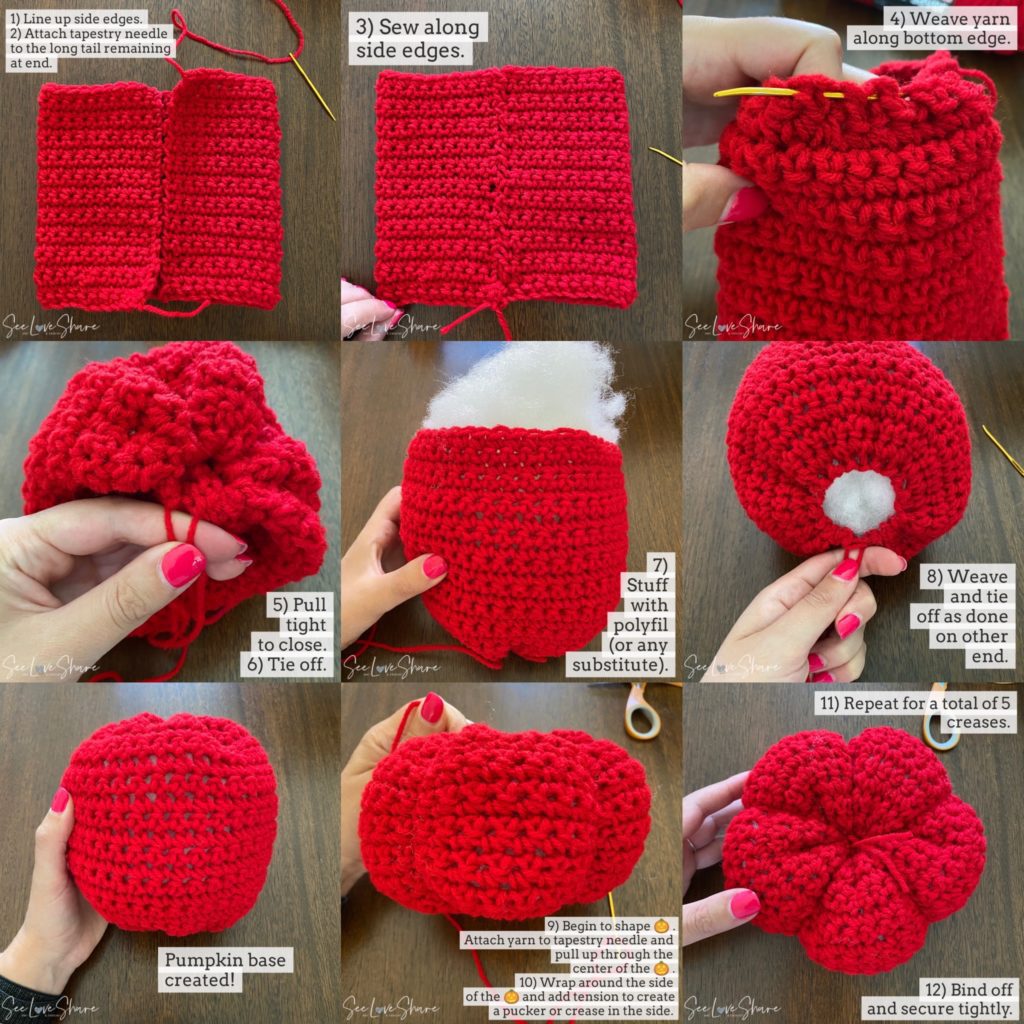
With orange yarn, ch 29.
Row 1: HDC in 2nd ch from hook to end
Rows 2–28: HDC in BLO to end, ch 1, turn
Fasten off leaving a long tail. Sew the first and last rows together to form a cylinder. Weave a length of yarn along one open end and pull tight to close the top. Stuff firmly with polyfil. Weave yarn along the other open end and pull tight to close. Secure and weave in ends.
Medium Pumpkin
With orange yarn, ch 25.
Row 1: HDC in 2nd ch from hook to end
Rows 2–24: HDC in BLO to end, ch 1, turn
Assemble as for large pumpkin.
Small Pumpkin
With orange yarn, ch 21.
Row 1: HDC in 2nd ch from hook to end
Rows 2–20: HDC in BLO to end, ch 1, turn
Assemble as for large pumpkin.
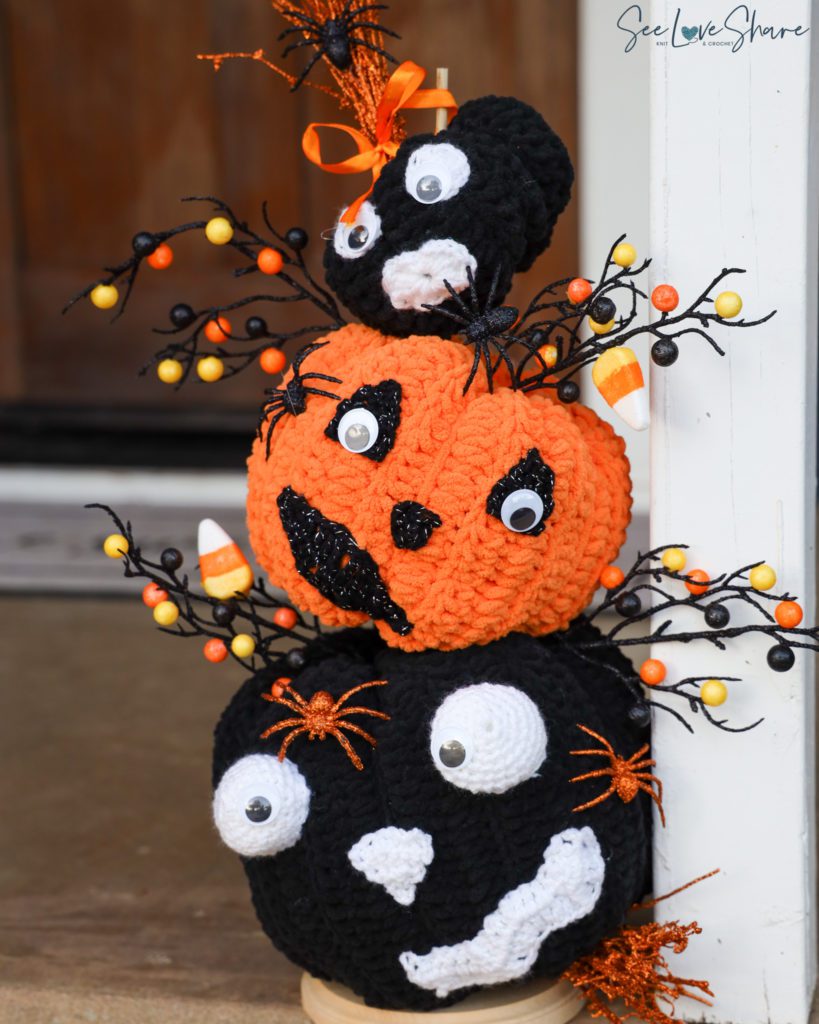
Jack-o-lantern crochet pattern Pumpkin Faces (make 3)
With black yarn, ch 14.
Row 1: Dc into the fourth chain from the hook (3 chs skipped counts as dc), *1 dc in each of the next 3ch, dc3tog over next 3ch, 1 dc in each of next 3ch**, 3dc in next ch; rep from * to end, ending last rep at **, 2dc in last ch, turn.
Row 2: Ch 3 (counts as dc), 1 dc in first dc, *1 dc in each of the next 3dc, dc3tog over next 3dc, 1 dc in each of next 3dc, 3dc in next dc; rep from * ending last rep with 2dc in top of ch 3 from previous round, turn.
Fasten off leaving a long tail for sewing. Sew face onto formed pumpkin, tucking in ends as you go. Glue googly eyes to crochet eye pieces.
Eyes (make 2 per pumpkin)
With black yarn: ch 4, sc in 2nd ch from hook to end. Fasten off leaving a tail for sewing. Sew onto pumpkin above the face. Glue a googly eye to each crochet piece.
Assembly – jack-o-lantern crochet pattern
Once your three pumpkins are complete and faces are attached, it’s time to build your topiary. There are no strict rules here — this is the fun part!
- Attach the dowel — glue the wooden dowel to the centre of the base (the large pumpkin). Pile on the glue generously — once the other pumpkins are stacked their weight will help keep everything in place.
- Stack the pumpkins — thread the medium and small pumpkins onto the dowel, large at the bottom. Offset them slightly for a quirky, organic look — or stack them straight for a more polished display.
- Add the decorations — use wire cutters to break Halloween floral sprays into smaller pieces and tuck them in along the sides between the pumpkins. Scatter spiders, bats, or any other Halloween embellishments around. Step back and rearrange until you’re happy.
- Display! — front porch, Halloween table, or entryway. Done! 🎃
Jack-o-Lantern Crochet Pattern Decorating Ideas
- 🕷️ Tuck plastic spiders into the gaps between pumpkins
- 🌿 Use Halloween floral picks with candy corn, leaves, and berries for a festive finishing touch
- 🦇 Add small bat embellishments to the dowel between pumpkins
- 🎃 Wrap the dowel in black ribbon or twine for a polished look
- 💀 Add a small skull or witch hat to the very top of the dowel
Frequently Asked Questions for jack-o-lantern crochet pattern
Is this suitable for beginners?
Yes — the pumpkins use simple half double crochet in the back loop only. If you can chain and hdc you can make all three pumpkins. The faces are slightly more involved but the pattern walks you through every step.
How long does it take to make?
Most makers complete all three pumpkins in a few hours — Bernat Blanket yarn is thick and works up fast. The assembly and decorating takes another hour or so depending on how elaborate you go with the embellishments.
Can I use different yarn colours?
Absolutely — classic orange and black is timeless but a white topiary with black faces has a gorgeous modern Halloween aesthetic. Purple pumpkins are also stunning and really stand out on a front porch.
More Halloween Crochet Patterns You’ll Love
 Baby’s First Pumpkin Jack-O-Lantern Crochet Beanie
- Crochet Witch Hat Ornament Pattern
- Halloween Skull Garland — free crochet pattern
- Halloween Ghost Garland — free crochet pattern
- Assorted Crochet Pumpkins with Curly Vines
- Browse all Halloween crochet patterns →