
Crochet All Holiday Patterns Free Patterns
November 5th, 2023
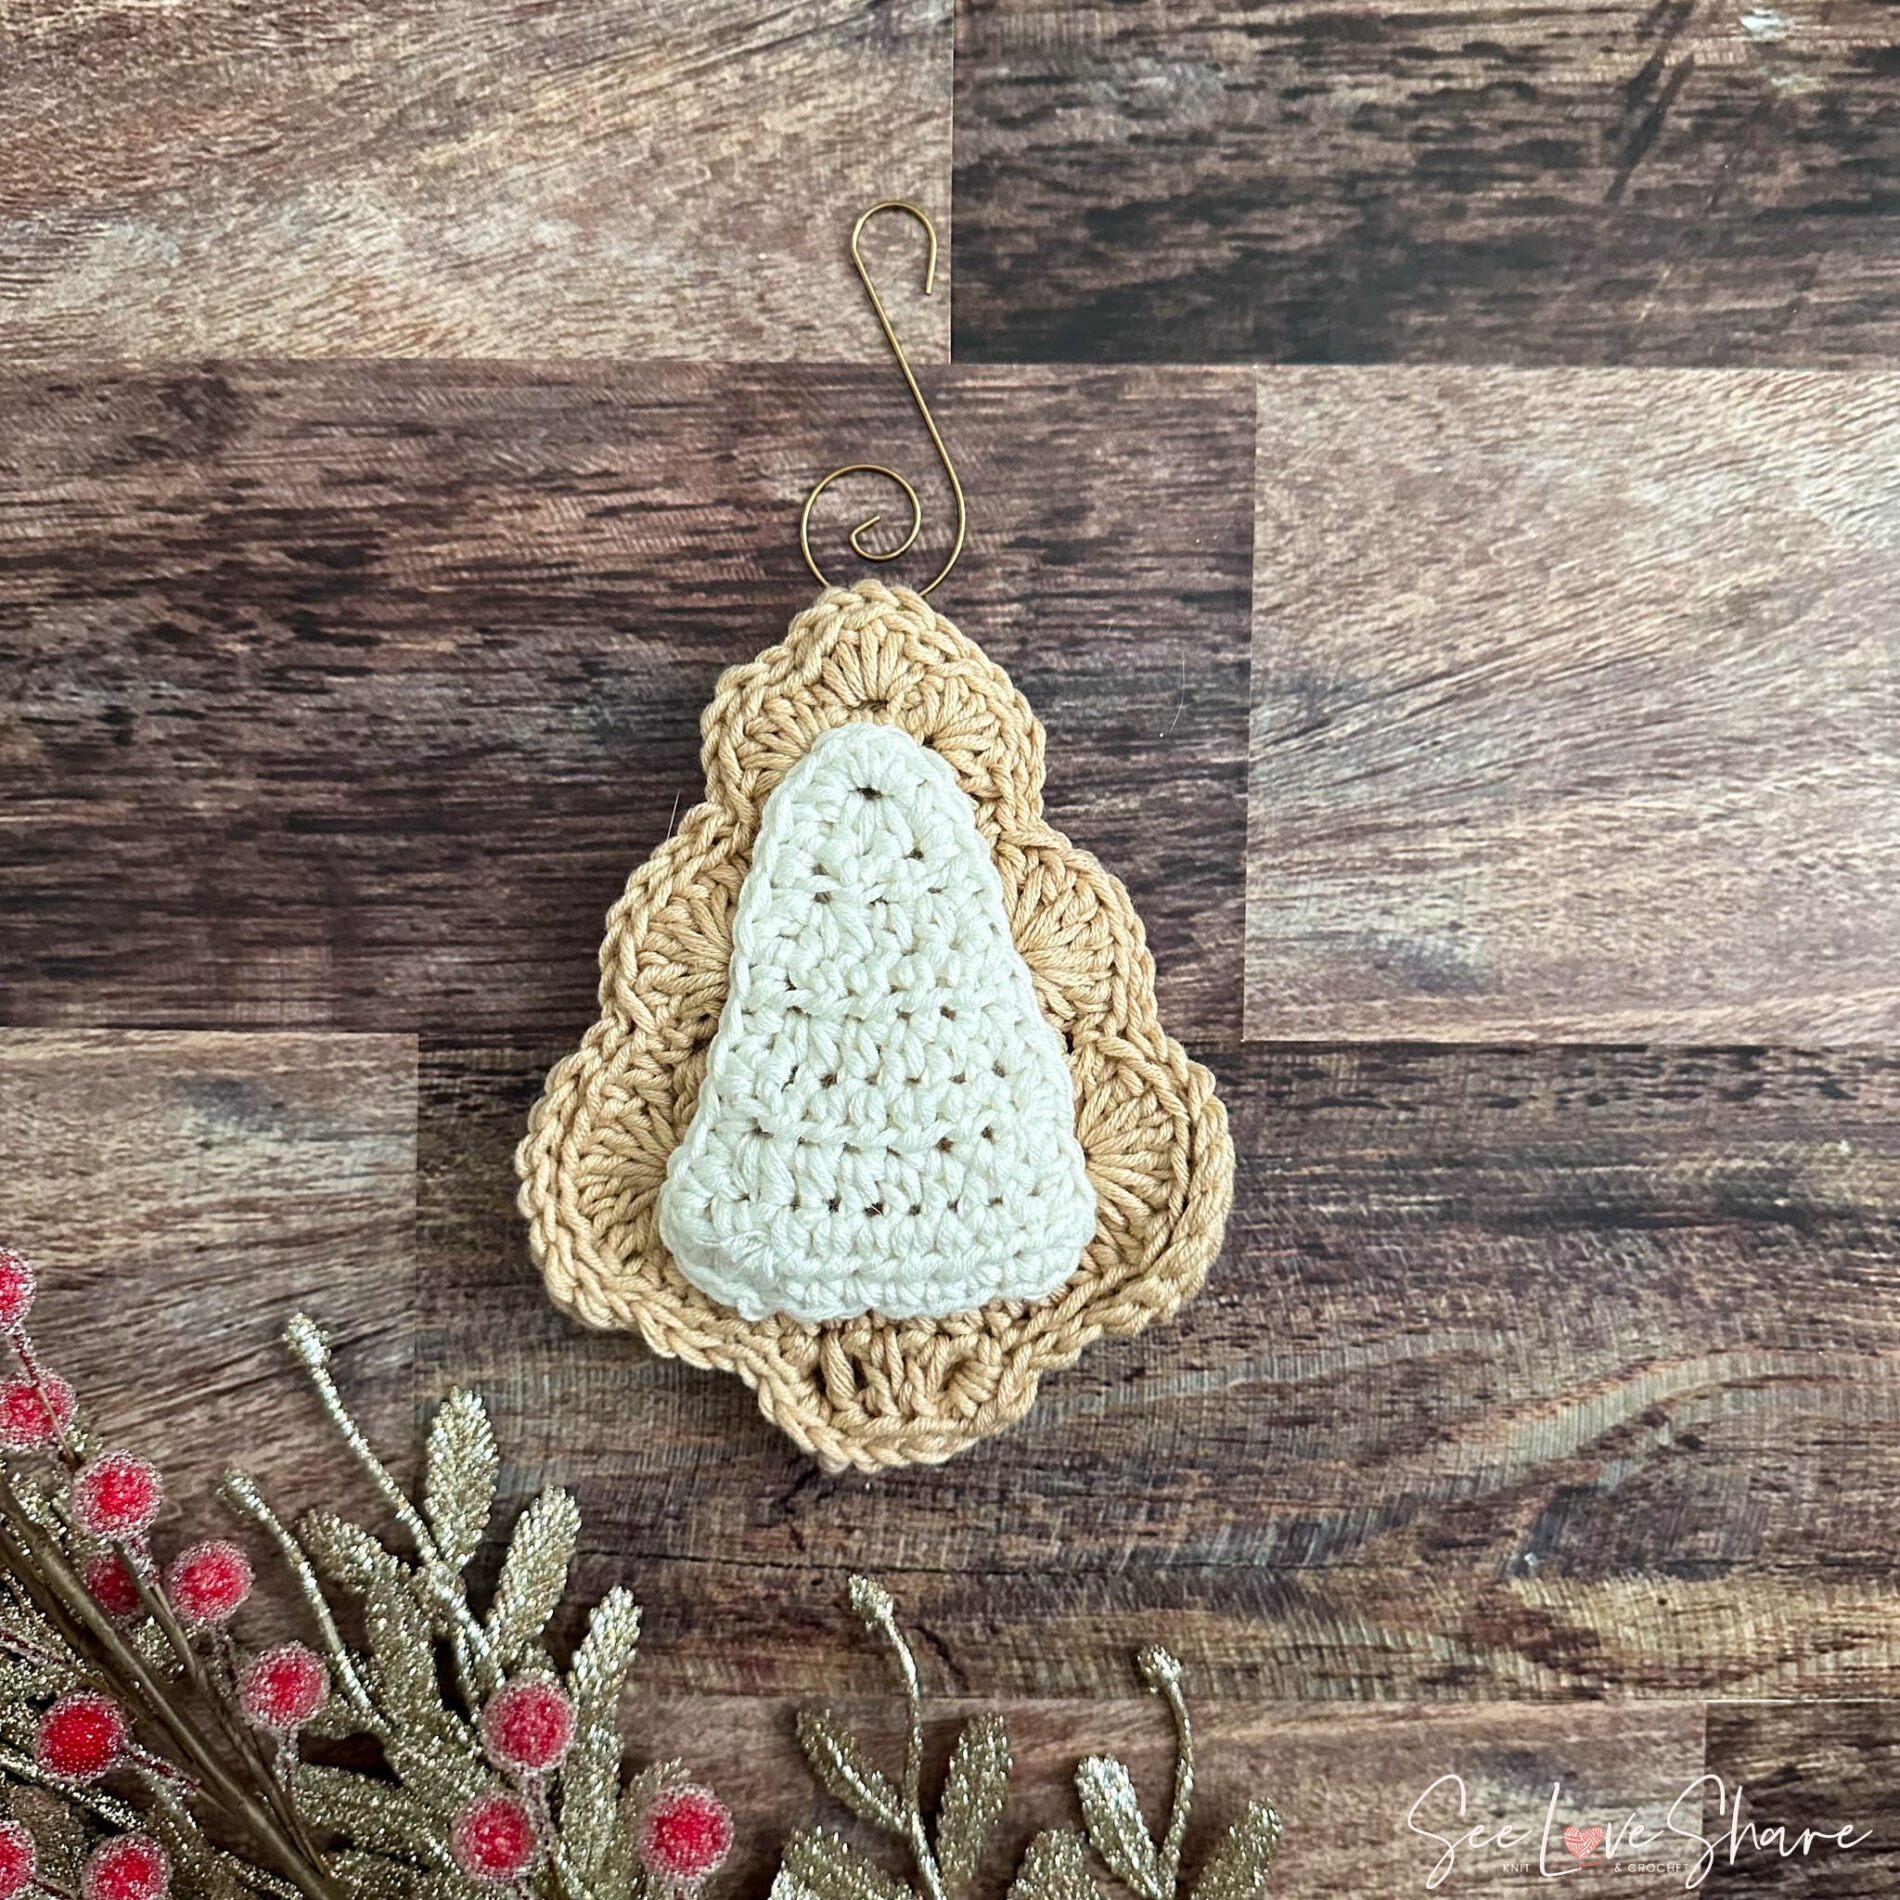
Christmas Tree Sugar Cookie Ornament — Free Crochet Pattern
This Christmas tree sugar cookie ornament is the sweetest little handmade addition to your holiday tree — a cozy, sweater-textured tree shape with creamy frosting that looks just like the iced cookies fresh from your kitchen. 🎄✨ Each ornament works up in about 30 minutes once you’ve got the rhythm, making this a perfect quick project for gifting, scrap yarn busting, or building a coordinated handmade Christmas display.
The construction is satisfying and simple: two cookie panels are crocheted in light brown, slip-stitched together for that double-thick “real cookie” feel, then a single layer of white frosting gets sewn on top. The result is a chunky, tactile ornament that hangs beautifully without curling — and looks gorgeous against any tree, garland, or styled mantel.

Why you’ll love this Christmas tree sugar cookie ornament
- Quick to make — finishes in about 30 minutes once you’ve got the rhythm
- No assembly headaches — two panels slip-stitched together hold their shape without curling
- Texture that pops — the chunky frosting layer adds dimension and reads instantly as a sugar cookie
- Stash-busting friendly — uses small amounts of #3 medium cotton yarn
- Photographs beautifully — the cream + brown color combo styles gorgeously on any tree
- Gift-ready — perfect for teacher gifts, coworker swaps, or year-after-year handmade tree decor
- Set-buildable — pairs with the rest of the Christmas Sugar Cookie Collection for a coordinated handmade tree
Christmas Tree Sugar Cookie Ornament — Pattern details
- Skill Level: Intermediate (uses chains, hdc, sc, dc, treble crochet, slip stitch)
- Finished Size: Approximately 3″ tall
- Time: About 30 minutes per ornament
- Construction: Two cookie panels worked flat, slip-stitched together. Single frosting layer sewn on top.
- Yarn Weight: #3 Medium (DK weight cotton)
Materials for Christmas Tree Sugar Cookie Ornament
- Cookie color (light brown): 1 ball Bernat Softee Baby Cotton in Sand — 120g/254m. One ball makes approximately 4 ornaments.
- Frosting color (white/off-white): 1 ball Bernat Softee Baby Cotton in Cotton — 120g/254m. One ball makes approximately 4 frosting layers.
- 4.0 mm (US G/6) crochet hook — find here
- Tapestry needle for assembly and weaving in ends
- Scissors
- Optional: Ornament hook for hanging
Note: Working the entire 10-ornament Sugar Cookie Collection? Plan on 2 balls each of cookie + frosting yarn.
Abbreviations
- ch — chain
- sc — single crochet
- hdc — half double crochet
- dc — double crochet
- tr — treble crochet
- sl st — slip stitch
- st(s) — stitch(es)
Christmas Tree Sugar Cookie Ornament Pattern
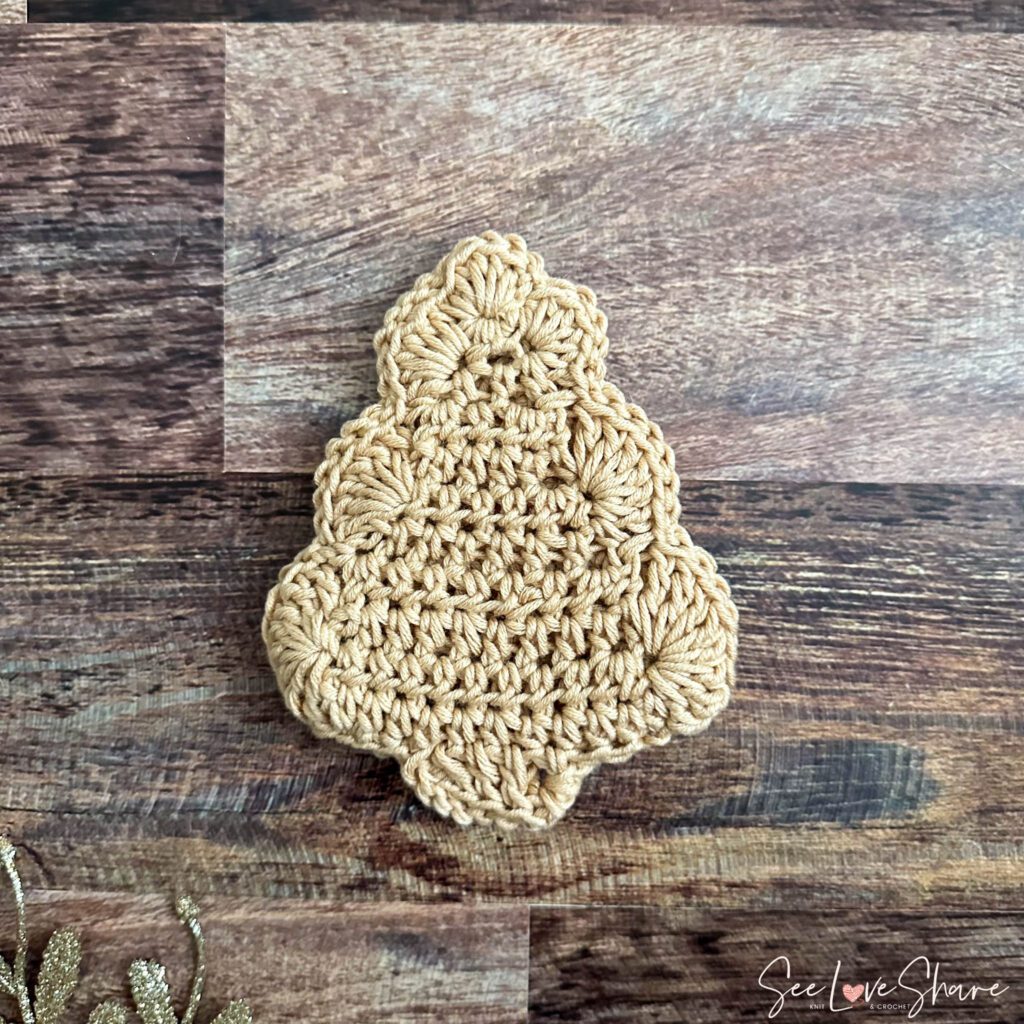
Cookie (make 2 — with light brown)
To start, ch 3, join with sl st to first ch to create a loop.
- Row 1: Ch 1, 3 hdc within loop, ch 1, turn. (3 hdc)
- Row 2: Hdc in each st across, ch 1, turn.
- Row 3: 2 hdc in first st, hdc in each st to last st, 2 hdc in last st, ch 1, turn. (5 hdc)
- Row 4: Hdc in each st across, ch 1, turn.
- Row 5: 2 hdc in first st, hdc in each st to last st, 2 hdc in last st, ch 1, turn. (7 hdc)
- Row 6: Hdc in each st across, ch 1, turn.
- Row 7: 2 hdc in first st, hdc in each st to last st, 2 hdc in last st, ch 1, turn. (9 hdc)
- Row 8: Hdc in each st across, ch 1, turn.
- Row 9: 2 hdc in first st, hdc in each st to last st, 2 hdc in last st, ch 1, turn. (11 hdc)
- Row 10: Hdc in each st across, ch 1, DO NOT TURN.
Edging & shaping (continues from Row 10):
Continue along the side edge of the tree:
- (2 tr, 4 dc, 2 tr) all within side of Row 9
- Sc in side of Row 7
- 6 dc in side of Row 5
- Sc in side of Row 3
- 6 hdc in side of Row 2
- (Sc, 4 hdc, sc) all within starting loop at top of tree
Continue along the other side edge:
- 6 hdc in side of Row 2
- Sc in side of Row 3
- 6 dc in side of Row 5
- Sc in side of Row 7
- (2 tr, 4 dc, 2 tr) all within side of Row 9
- Sc in first st of Row 11
- Sl st in next 3 sts
- Ch 2, dc in same st as ch 2, dc in next 3 sts (this creates the trunk)
Fasten off and weave in ends.
Frosting (make 1 — with white)
To start, ch 3, join with sl st to first ch to create a loop.
- Row 1: Ch 1, 3 hdc within loop, ch 1, turn. (3 hdc)
- Row 2: Hdc in each st across, ch 1, turn.
- Row 3: 2 hdc in first st, hdc in each st to last st, 2 hdc in last st, ch 1, turn. (5 hdc)
- Row 4: Hdc in each st across, ch 1, turn.
- Row 5: 2 hdc in first st, hdc in each st to last st, 2 hdc in last st, ch 1, turn. (7 hdc)
- Row 6: Hdc in each st across, ch 1, turn.
- Row 7: 2 hdc in first st, hdc in each st to last st, 2 hdc in last st, ch 1, turn. (9 hdc)
- Row 8: Hdc in each st across, ch 1, turn.
Frosting edging:
Sc in each st across to end, 3 sc in corner st, evenly space sc along the side edge, 5 sc at top in original starting loop, evenly space sc along remaining side edge, 3 sc in corner st. Fasten off, leaving a long tail to attach to the cookie.
Assembly
- Stack the two cookie panels with right sides facing outward, aligning corners and sides.
- Slip stitch them together: Starting at any corner, sl st in BLO (back loop only) through BOTH cookies, continuing with sl st in BLO in all sts in the edging around. Fasten off and weave in ends.
- Center the frosting on top of the cookie. You should see an even border of cookie all the way around the frosting.
- Sew the frosting down with the long tail and tapestry needle.
- Weave in all remaining ends.
- Add a hanging hook at the top of the tree and you’re ready to hang!
Tips for success on making the Christmas Tree Sugar Cookie Ornament
- Match your tension — keep your tension consistent across both cookie panels so they line up evenly when slip-stitched together
- Count carefully — the increases in odd rows (3, 5, 7, 9) are what give the tree its tapered shape, so don’t skip the (number) check at the end of each increase row
- Don’t skip the BLO — slip-stitching through back loops only when joining gives you a cleaner edge that resembles a piped cookie border
- Center the frosting — leave an even cookie border visible all the way around for that “real iced cookie” look
- Consider stiffening — for a crisper finished ornament, lightly spritz with a fabric stiffener or sugar-water mix and let dry flat
Customization you Christmas Tree Sugar Cookie Ornament ideas
- Classic cream & brown — Bernat Softee Baby Cotton in Sand + Cotton (as photographed)
- Gingerbread tree — deeper warm brown with white frosting for a gingerbread-cookie feel
- Pastel Christmas — cream cookie with sage green or dusty pink frosting
- Modern monochrome — all white cookie + frosting for an all-cream coordinated tree
- Embellished frosting — add tiny seed bead “sprinkles” to the frosting for extra detail
- Mini garland — make 6–8 trees and string together with twine for a coordinated mantel garland
🎄 Love this pattern? Get the whole collection.
This Christmas tree is just one of 10 sugar cookie ornament patterns in the SeeLoveShare collection — including stockings, stars, angels, snowflakes, mittens, and more. Get the printable PDF bundle on Etsy and build a coordinated handmade Christmas tree this year.
Get the Christmas Sugar Cookie Bundle on Etsy →Use code SEELOVE15 for 15% off your order

More free Christmas crochet patterns
- Winter Snowflake Sugar Cookie Ornament — the companion free pattern from the Sugar Cookie Collection
- Crochet Sugar Cookie Ornaments — Full Collection — see all 10 sugar cookie ornament designs
- Hand Knitting Tree Skirt Pattern — a no-needle hand-knit tree skirt to complete your tree
- The Easiest Crochet Snowflake — a quick beginner snowflake ornament
- Elf-ie Christmas Stocking — beginner-friendly seed stitch crochet stocking
- Browse all Crochet Christmas Patterns

Made one (or a whole tree-worth)? I’d love to see your handmade ornaments! Tag me on Instagram @seeloveshare or share your makes in our free Facebook community. Happy stitching! 🎄🍪