
June 16th, 2018
How to Tie a Magic Knot — 2 Easy Ways to Join Yarn (No Sewing!)
Have you ever wondered why there are so many ways to show us how to tie a magic knot? If you knit or crochet, you already know the worst part of finishing a project: weaving in all those yarn ends. Hours of stitching just to make tails disappear. The Magic Knot solves that problem completely.
The Magic Knot is a tiny, ultra-secure knot you tie right where you join two strands of yarn. It’s so small and so strong that you can keep working right over it — no weaving, no sewing, no extra steps. Once you learn it, you’ll never want to join yarn any other way.
How to Tie a Magic Knot

I’m sharing two different ways to tie the Magic Knot in this post. Both methods give you the exact same secure result — the difference is just which hand motion feels easier. Some people instantly get Method 1; others find Method 2 clicks faster for them. Try both and see which one your hands prefer!
What is the Magic Knot?
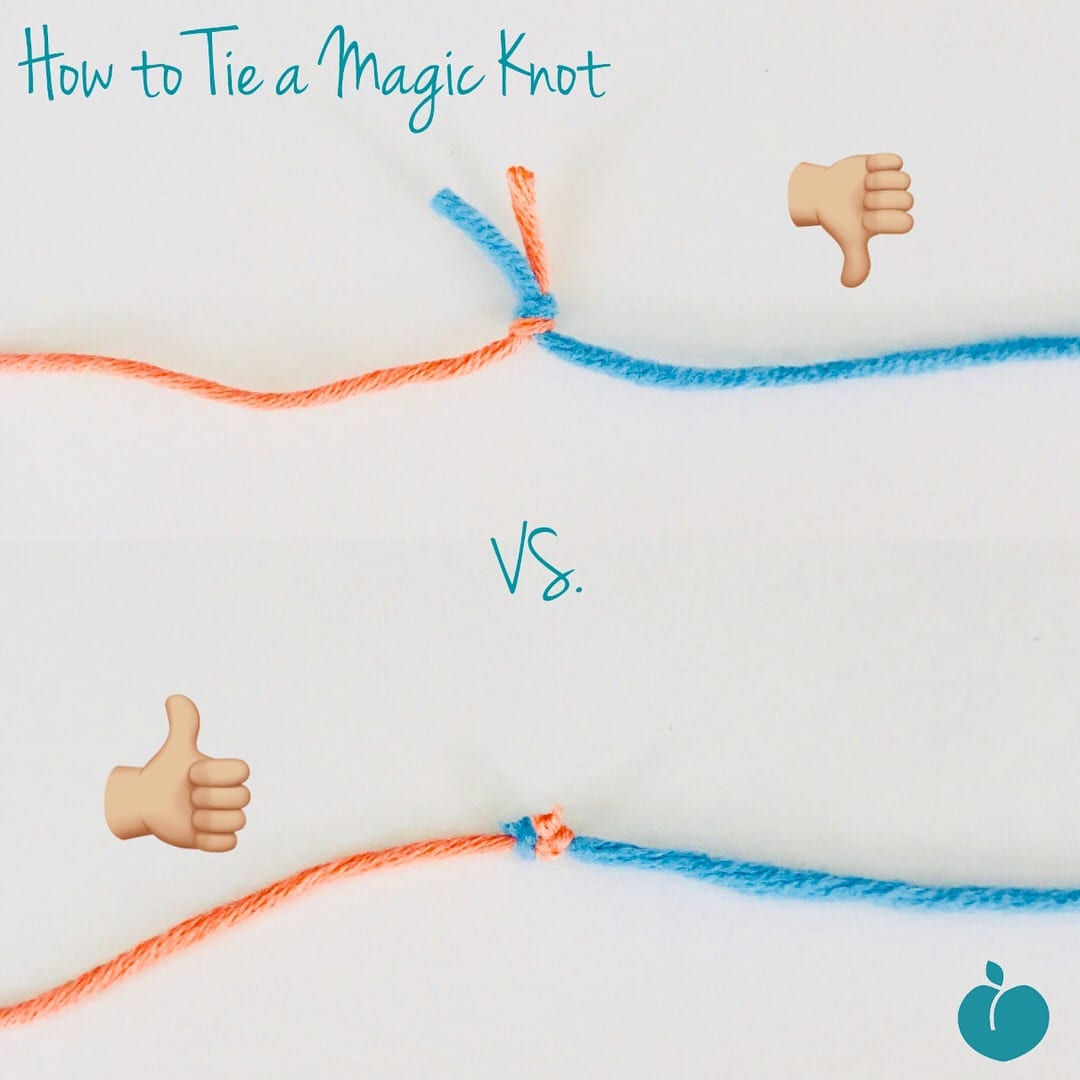
The Magic Knot is a yarn-joining technique that creates two small knots — one on each strand — that lock together when pulled tight. The result is a join so secure and so compact that it disappears into your stitches.
- Invisible: The knot is smaller than the yarn itself
- Secure: The harder you pull, the tighter it locks
- No weaving in ends: Snip the tails close to the knot and you’re done
- Works for both knit and crochet
- Works for color changes or just adding a new skein
Watch the tutorial — both methods in 90 seconds
I made a quick video walking through both methods so you can see the hand motions clearly. Watch it once, then try along with the written instructions below!
What you’ll need
- Two strands of yarn to join (your working yarn + your new yarn)
- Sharp scissors for trimming the tails
- That’s it! No needles, no hook, no special tools.

Pro tip: When you’re learning, use two different colors of yarn so you can clearly see which strand is doing what. Once you’ve got the motion down, it works exactly the same with two strands of the same color.
Method 1 — The Loop Method
This is the classic Magic Knot technique. You form a small loop in one strand, then thread the other strand through it. If you’re a visual thinker, this method tends to click first.
- Lay both strands of yarn parallel on a flat surface, pointing in opposite directions. The tail of your working yarn should be on the right; the tail of your new yarn should be on the left.
- Pick up the left tail (your new yarn) and form a small loop, crossing it over itself.
- Bring the tail through the loop, then pull it under the working yarn (the strand on the right).
- Tighten the loop by pulling the tail and the body of the new yarn in opposite directions. You should now have one small knot tied around the working yarn.
- Repeat with the other side: pick up the right tail (your working yarn) and form a small loop, threading it through and around the new yarn the same way.
- Tighten the second knot the same way as the first.
- Pull both yarn strands away from each other — not the tails, the long working sides. The two knots will slide together and lock into one tiny, secure Magic Knot.
- Trim the tails close to the knot. You’re done!
If your knot pulls apart when you tug it, you probably crossed the loop the wrong way on one side. Pull it out, lay everything flat again, and try once more — the direction matters.
Method 2 — The Wrap-Around Method
This method gets you to the same Magic Knot result but uses a different hand motion. Instead of forming loops, you wrap each tail around the opposing strand. A lot of makers find this version easier to do without looking — once you’ve practiced a few times, you can tie this one with your eyes closed.
- Lay both strands of yarn parallel on a flat surface, pointing in opposite directions, just like Method 1.
- Take the left tail (your new yarn) and wrap it once over the top of the working yarn, then back under itself.
- Continue wrapping the tail around its own body to form a simple overhand knot — but this knot is tied AROUND the working yarn, not in the air.
- Pull the tail and the new yarn body in opposite directions to tighten the knot snugly around the working yarn.
- Repeat on the other side: take the right tail (your working yarn), wrap it over and back under itself the same way, tying a simple overhand knot around the new yarn.
- Tighten this second knot just like the first.
- Now pull both yarn bodies away from each other. The two small knots will slide together and lock into one secure Magic Knot.
- Trim the tails close to the knot, and you’re ready to keep stitching.
The trick to this method is keeping each knot tight against its opposing strand. If your knots feel loose before you slide them together, give each one a firm tug before bringing them to meet in the middle.
Which method should you use?
Honestly? Whichever one feels easier for your hands. Both methods produce the exact same secure Magic Knot — they just take different paths to get there. I’d recommend trying both with scrap yarn a few times before using either one in a real project.
- Try Method 1 first if you’re a visual learner who likes seeing the loop form before threading anything through it.
- Try Method 2 first if you prefer continuous hand motions without stopping to position loops.
When NOT to use a Magic Knot
The Magic Knot is genuinely magical for most yarn — but it’s not the right choice for every project. Skip it if you’re working with:
- Slippery or shiny yarns like mercerized cotton, silk, bamboo, or anything that feels slick to the touch — these can wiggle loose over time
- Heirloom-quality projects where you’d rather not have any knot at all (consider a Russian Join or splice instead)
- Lace-weight or very fine yarn where even a tiny knot might be visible against a delicate stitch pattern
For everything else — worsted weight, chunky yarn, acrylic, wool, cotton blends — the Magic Knot will save you hours of weaving in ends.
Frequently asked questions
Will the Magic Knot really hold?
Yes — when tied correctly, the Magic Knot is one of the most secure yarn joins you can make. The harder you pull on the two yarn strands, the tighter the knot locks itself together. I’ve used it on hundreds of projects without a single one coming undone.
Can I use the Magic Knot mid-row?
Absolutely. That’s actually the best place to use it. Tie the knot a few inches before you reach the end of your working yarn, then keep stitching — the knot will hide right inside your stitches.
Does it work for color changes?
Yes! It works perfectly for color changes. Just tie the Magic Knot exactly where you want the color to switch in your work, then keep stitching with the new color. Use scissors to trim the tails close to the knot for the cleanest finish.
What’s the difference between the Magic Knot and the Russian Join?
The Russian Join uses a needle to weave one yarn end back through itself, creating a no-knot join. It’s invisible and great for slippery yarns, but it takes longer to do. The Magic Knot is faster, requires no needle, and works for most yarns — but it’s a knot, so it’s not the right choice for very slick fibers.
Get more knit & crochet tips straight to your inbox
Join the SeeLoveShare email list for free patterns, time-saving techniques, and beginner-friendly tutorials delivered straight to your inbox.
More knit & crochet tutorials you’ll love
If you found the Magic Knot helpful, here are a few other technique tutorials from the SeeLoveShare blog that will make your projects easier:
- The Ultimate Guide to Blocking Knit & Crochet — how to professionally finish your projects
- Standard Hat Sizing Chart — sizing reference for any knit or crochet hat pattern
- How to Crochet Corner to Corner (C2C) — beginner-friendly corner-to-corner technique
- How to Crochet Cables — Episode 1 — learn front post and back post double crochet
- How to Make the Puff Stitch Crochet Flower — pretty floral applique tutorial
Pin it for later
Save this tutorial to your Pinterest board so you can come back to it whenever you start a new project!
Tried the Magic Knot? Tag me on Instagram @seeloveshare and let me know which method clicked first for you! 💛
Happy making!
— Ashleigh