
February 3rd, 2019
Corner to Corner Crochet — Free C2C Tutorial for Beginners
The corner to corner crochet technique — known to most crocheters as C2C — is the secret behind some of the coolest pixel-style designs you’ve ever seen made from yarn. Worked diagonally from one corner to the other, the C2C stitch creates a fabric that’s perfect for “graphgans,” pillow covers, wall hangings, and any project where you want to translate a graph or pixel design into yarn.
This C2C tutorial walks you through the corner to corner crochet stitch from your very first square to confidently adding rows. Once you’ve got the rhythm down, you’ll be ready to follow any C2C graph pattern and create beautiful pixel art designs.
Why You’ll Love Corner to Corner Crochet
C2C is one of those techniques that opens up a whole new world of crochet possibilities:
✔ Lets you create pixel-art and graphgan designs from any image
✔ Worked diagonally — totally different rhythm from row-by-row crochet
✔ Builds beautifully textured blocks that look impressive
✔ Easy color-changes for designs and patterns
✔ Beginner-friendly once you’ve got the basics down
✔ Endlessly customizable — from baby blankets to wall art
The C2C technique is what turns yarn into modern, character-driven, design-forward pieces. If you’ve ever seen those gorgeous graphgan blankets with monograms, characters, or pixel art — that’s C2C doing the work.
Project Ideas for the C2C Stitch
- Graphgan blankets — pixel-art blankets featuring characters, scenes, or patterns
- Monogram throws — personalized blankets with initials or names
- Holiday wall hangings — Christmas, Halloween, Easter pixel designs
- Throw pillows — accent pillows with graphic designs
- Baby blankets — animals, letters, name blankets
- Solid afghans — even without a graph, C2C makes a beautiful textured solid blanket
- Wall art — framed pixel art pieces
- Bags and totes — character-printed crochet bags
Materials
- Worsted weight (#4) yarn in your colour(s) of choice (light, solid colours show the stitch definition best)
- 5mm (H/8) crochet hook — or what your yarn label recommends
- Tapestry needle for weaving in ends
- Scissors
- Optional: stitch markers to track edge blocks on multi-colour graphs
For learning corner to corner crochet, choose worsted weight yarn in light, solid colours. You’ll see each block clearly and have an easier time spotting where to insert your hook for the next row.
Abbreviations
ch = chain
st(s) = stitch(es)
dc = double crochet
slst = slip stitch
sk = skip
* = repeat instructions between asterisks as indicated
How to Crochet the C2C Stitch (Corner to Corner)
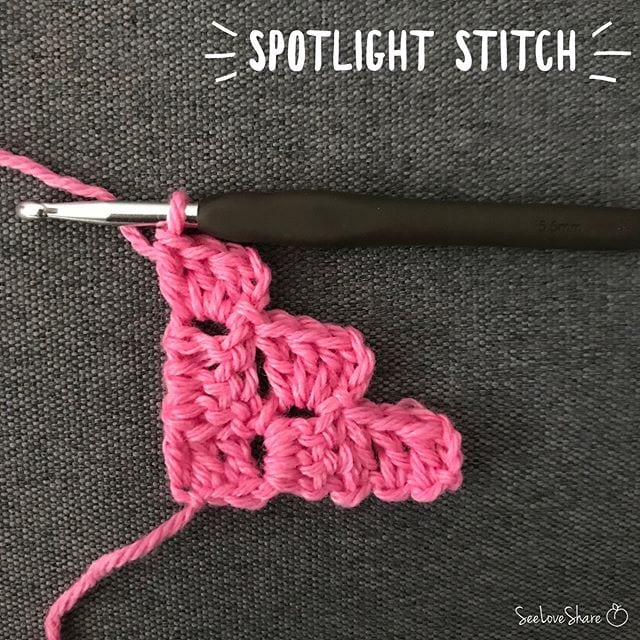
Corner to corner crochet is built one diagonal “block” at a time. Each block is a small unit of 3 double crochets and 3 chains, and you build the fabric by stacking blocks on top of each other diagonally — growing from a single corner, then increasing across the width, then decreasing back down to the opposite corner.
Row 1 (the very first block)
Ch 6. Work 1 dc in the 4th ch from your hook, then 1 dc in each of the next 2 ch. You now have your first C2C block — one single block that looks like a small rectangle made of 3 dc stitches with a chain-3 turning loop at one corner.

Row 2 (adding a block, increasing)
Ch 6, turn. Work 1 dc in the 4th ch from your hook and in each of the next 2 ch. This creates a new block. Now to join it to the first block: slst into the chain-3 space of the previous block. Ch 3, then work 3 dc into that same space.
You now have 2 blocks on Row 2.
Row 3 and onwards (continuing to increase)
Repeat the same pattern as Row 2:
Ch 6, turn. Dc in 4th ch from hook and next 2 ch (1 new block created). Slst into the next ch-3 space, ch 3, 3 dc into the same space (block joined). Repeat across the row until you reach the end.
Each row adds 1 new block on the increasing side. Continue increasing until your work is the desired width — for example, a baby blanket might be 40-50 blocks wide.

Decrease Rows (closing the corner)
Once your work reaches its maximum diagonal width, you’ll start decreasing on one side to bring the project back to a square or rectangle shape. To decrease at the start of a row:
Sl st across the top of the last 3 dc and into the ch-3 space (instead of working a new block on this side). Then ch 3, 3 dc into that ch-3 space, and continue the row in the usual increase pattern on the other side.
To decrease at the end of a row, simply stop before adding the last block — turn your work and start the next row from there.
Continue decreasing on both sides until you reach a single block — that single block is the opposite corner of your project, mirroring where you started.
How to Read a C2C Graph
One of the biggest reasons people learn corner to corner crochet is to make “graphgan” projects — blankets and wall hangings made from a pixel graph design. Here’s how to read one:
1. C2C graphs are read diagonally. Start at the BOTTOM RIGHT corner (this is your starting block).
2. Each square on the graph represents ONE C2C block.
3. You’ll work in diagonal rows, moving up and to the left of the graph as you go.
4. Each square’s colour tells you what yarn to use for that block. Change yarn colours at the end of one block by yarning over with the new colour as you complete the final stitch.
5. After you reach the widest diagonal row of the graph (corner to corner across), you’ll start decreasing — but you continue following the graph the same way, just with one fewer block per row.
Tips for the Corner to Corner Crochet Technique
Keep Your Tension Relaxed
C2C blocks need a bit of room to breathe. If your tension is too tight, the joining slip stitches get hard to work into. Stay relaxed and you’ll have a much easier time.
Count Blocks Every Few Rows
When following a C2C graph, count your blocks per row regularly. It’s much easier to catch a missed or extra block early than it is to rip out 5 rows later.
Use Bobbins for Colour Changes
For graphgan projects with multiple colour changes per row, wind small bobbins of yarn (or just little hand-wound balls) for each colour section. This keeps your yarn tangle-free and lets you work each colour without dragging it across the back of your work.
Block Your Finished Piece
C2C fabric can be a bit lumpy off the hook. Blocking smooths everything out, opens up the blocks, and makes the design pop. Wet block by misting with water, pin flat to a towel, and let dry.
Practice on a Small Square First
Before diving into a full graphgan, work a small 10×10 block C2C square. You’ll get the rhythm of the increases and decreases, learn the colour-change technique, and feel confident before committing 40+ hours to a big project.
Frequently Asked Questions
Is corner to corner crochet suitable for beginners? Yes — if you can chain, double crochet, and slip stitch, you can do C2C. The trickiest part is just getting the rhythm of the increase rows. Once you have that, the rest is repetition.
How big does each C2C block get? A C2C block worked in worsted weight yarn with a 5mm hook is roughly 1 inch square once blocked. To estimate your project size, multiply your block count by 1 inch — so a 40-block-wide piece will be roughly 40 inches across the diagonal.
Can I make a rectangle with C2C? Yes! For a rectangle, increase until you reach the desired width, then continue increasing on one side while decreasing on the other to grow it longer, then decrease both sides to close the corner.
How do I change colours in C2C? Change yarn at the end of one block by yarning over with the new colour as you complete the final stitch of that block. This places the new colour at the start of the next block.
Where can I find C2C graphs and patterns? Etsy is a great source for ready-to-use C2C graphs. You can also create your own by uploading an image to a pixel-art converter tool — search “stitch fiddle” for one popular free option.
More Crochet Tutorials
Loved learning C2C crochet? Here are more free crochet tutorials from SeeLoveShare to add to your skills:
 Textured Crochet Stitches Round-Up Guide — puff, bobble, popcorn and more
 Bean Stitch Crochet Tutorial
- Waffle Stitch Crochet Tutorial
- Crochet PLAY Sign — Free C2C Wall Decor Pattern



Save This Corner to Corner Crochet Tutorial
Want to come back to this corner to corner crochet tutorial later? Save it to Pinterest so you can find it whenever you need a refresher — and share it with your crocheting friends!