
Free Tutorials Free Holiday Free Knit
August 31st, 2021
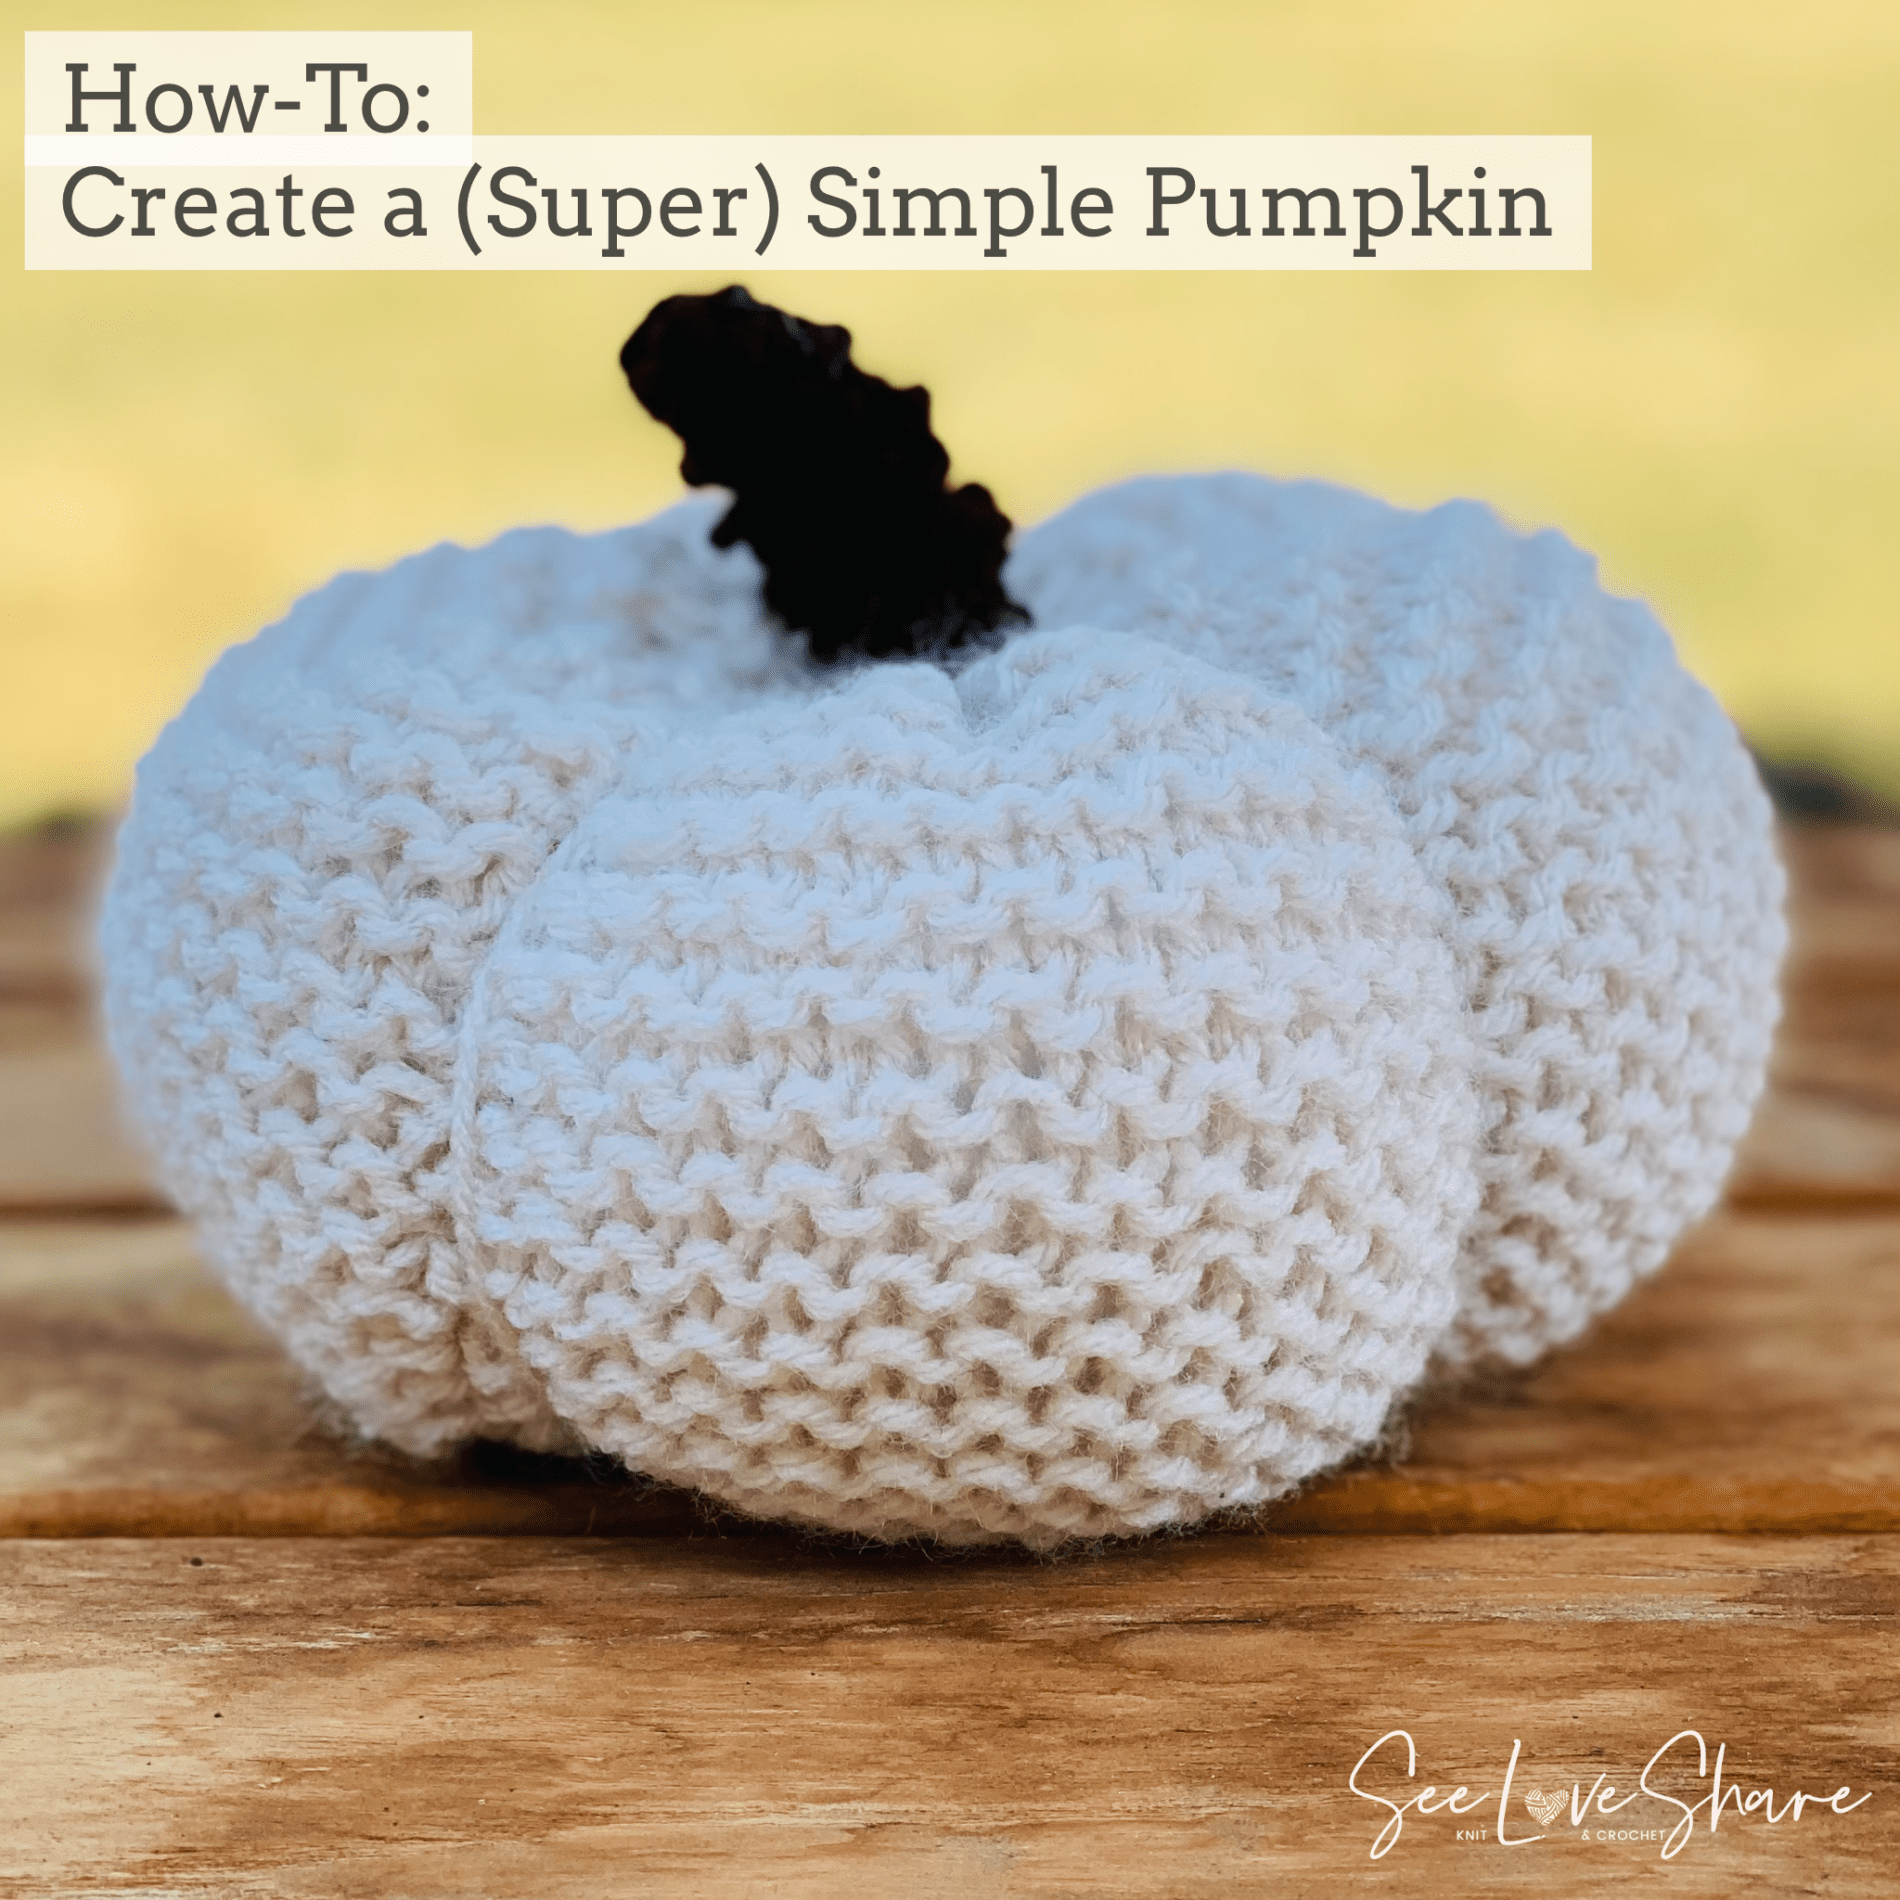
How-To: Make a Simple Pumpkin – Knit & Crochet Pattern and Tutorial
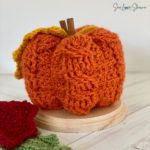
This simple crochet pumpkin pattern is the universal base I use for the entire Lil Monsters Pumpkin Patch series — and the foundation for any costumed pumpkin you want to make. The trick to this simple crochet pumpkin pattern? It starts as a flat rectangle that transforms into a plump round pumpkin with a few simple finishing steps. 🎃
Written for both knit and crochet — pick your craft. Once you’ve made one, every Lil Monster costume comes together easily because they all start from this same base. Beginner-friendly, works up in a single afternoon, and the technique is endlessly adaptable.
Happy Halloween!

Love Pumpkin Patterns?
Crochet Cable Pumpkin Pattern
Loved this simple crochet pumpkin pattern? Take your pumpkin makes up a notch with my Crochet Cable Pumpkin — one of my bestselling Etsy patterns with beautiful cabled texture. Use code SEELOVE15 for 15% off.
Why You’ll Love This Simple Crochet Pumpkin Pattern
- ✅ Beginner friendly — if you can crochet a rectangle, you can make this
- ✅ Both knit and crochet versions — pick your craft, same finished pumpkin
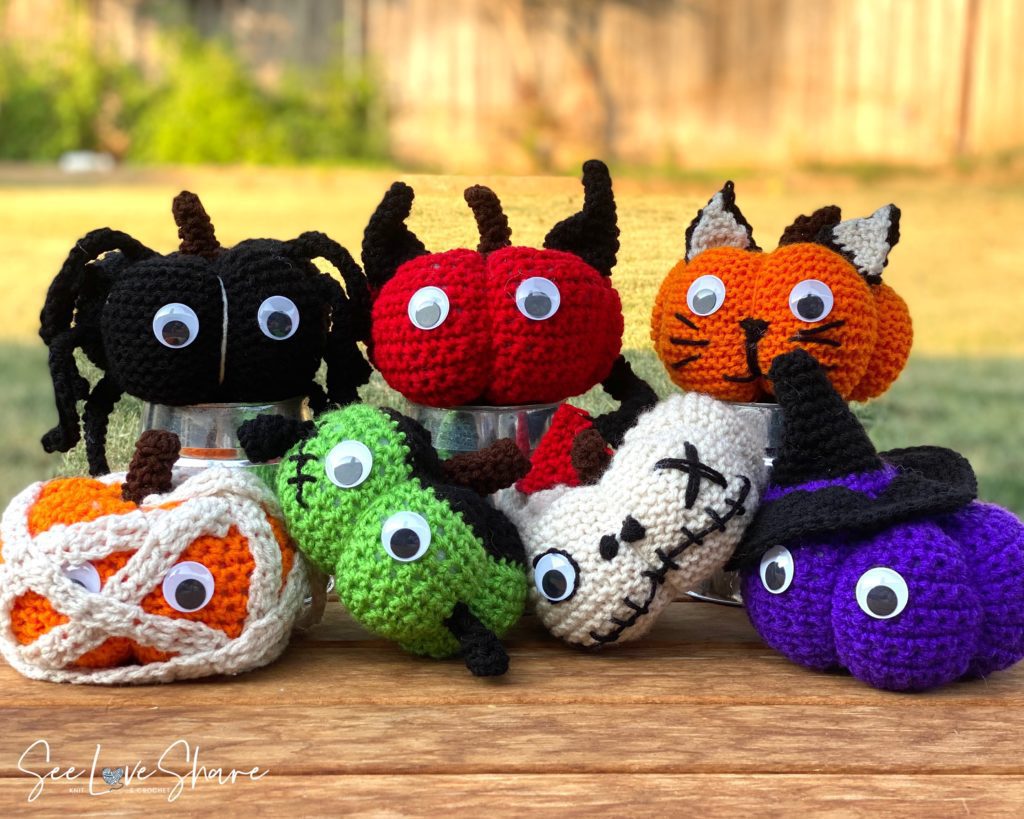
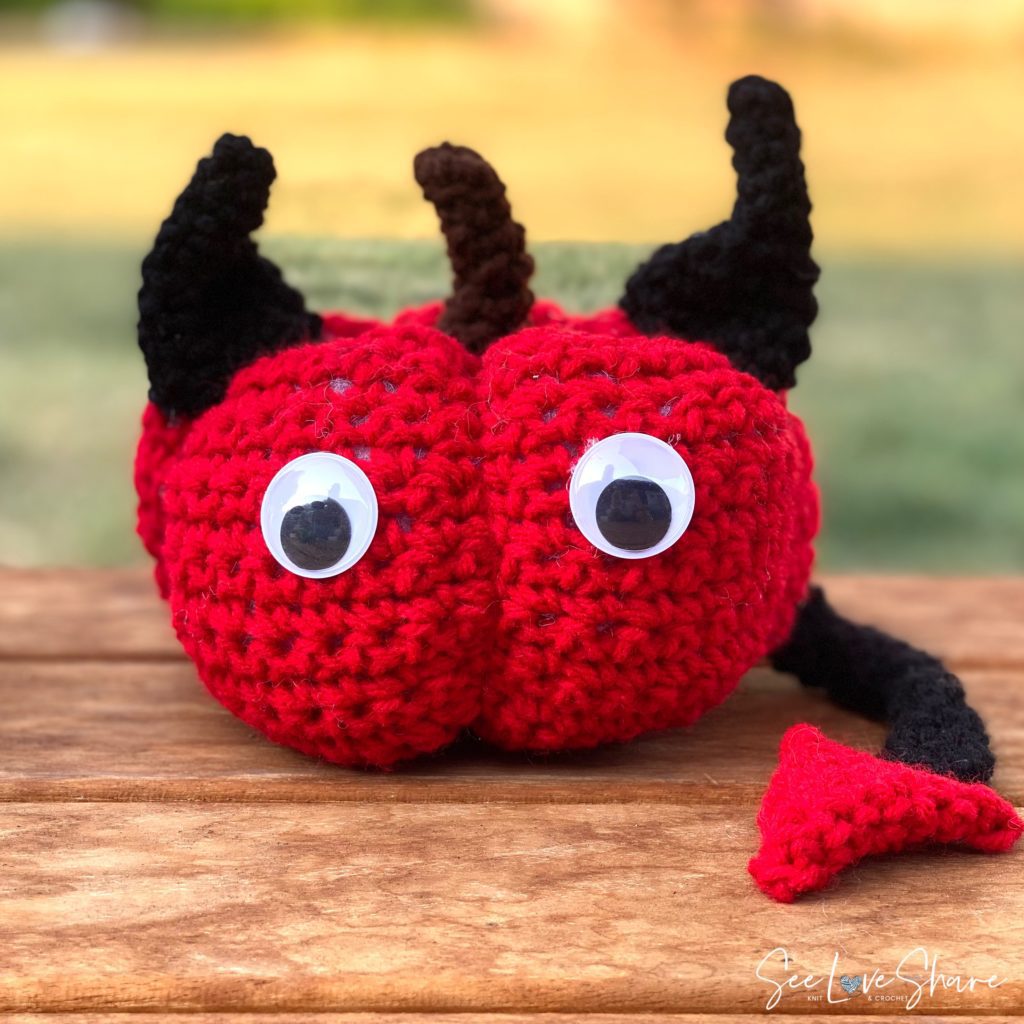
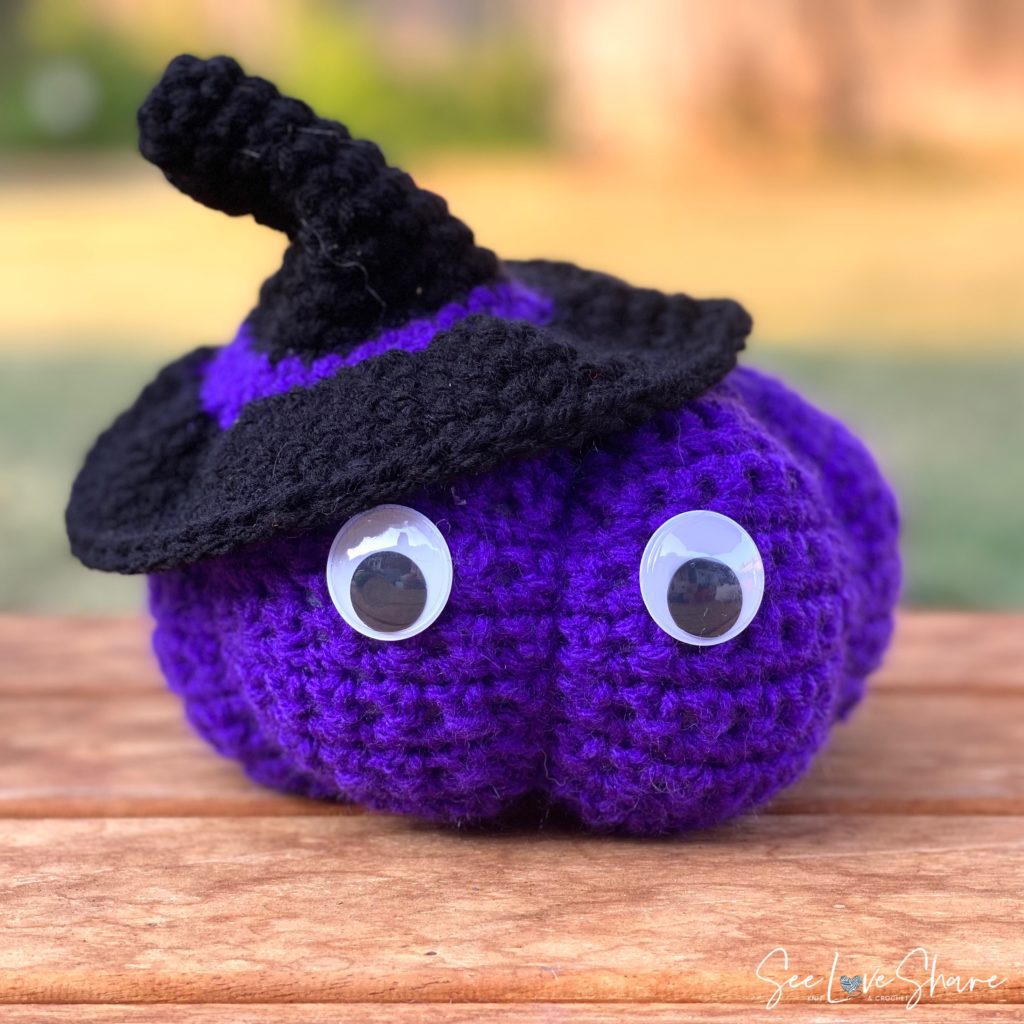
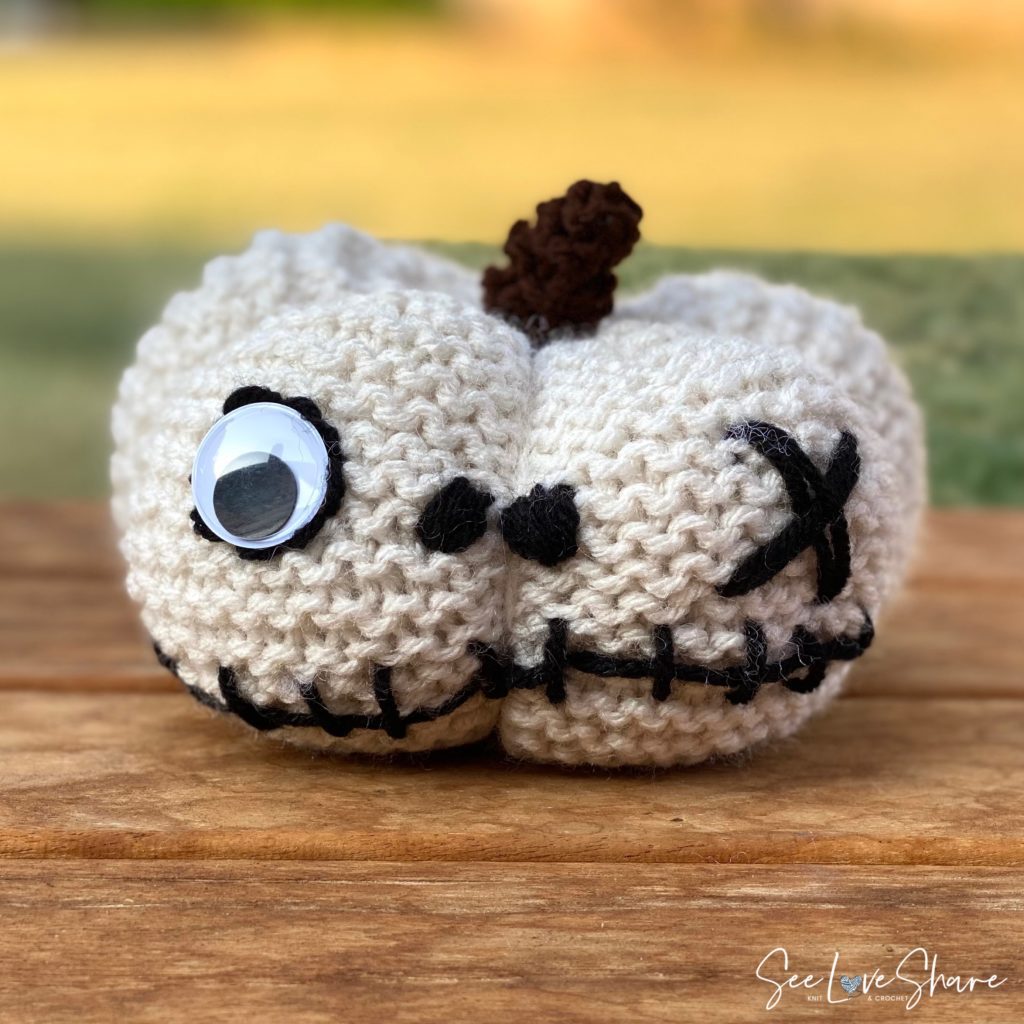
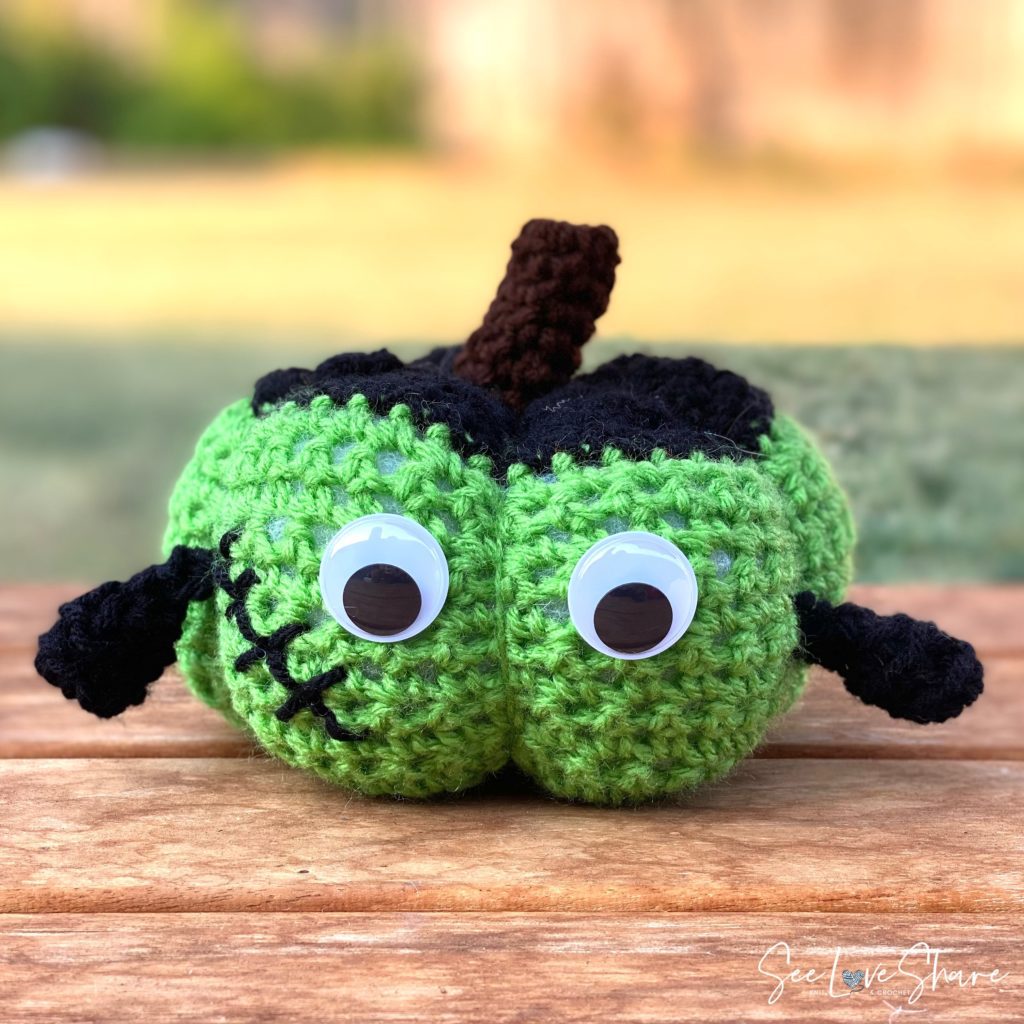
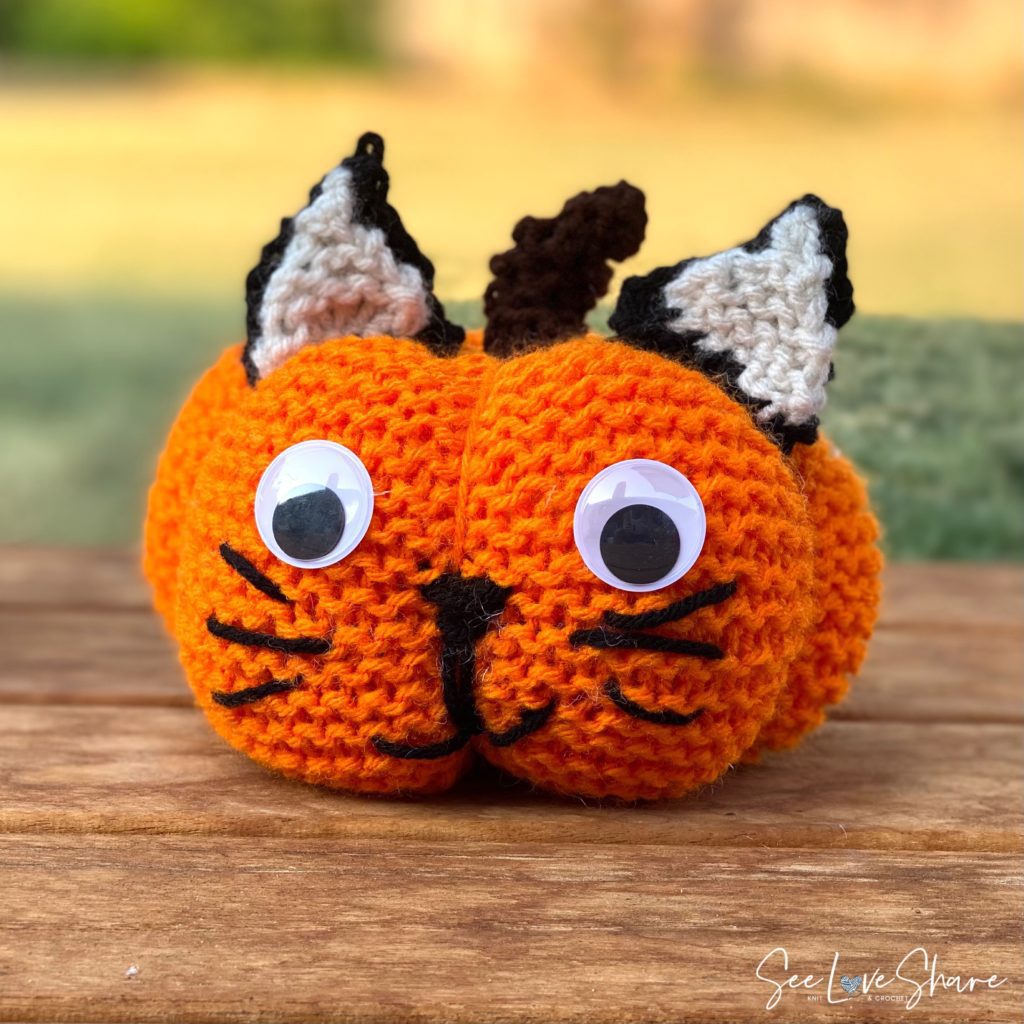
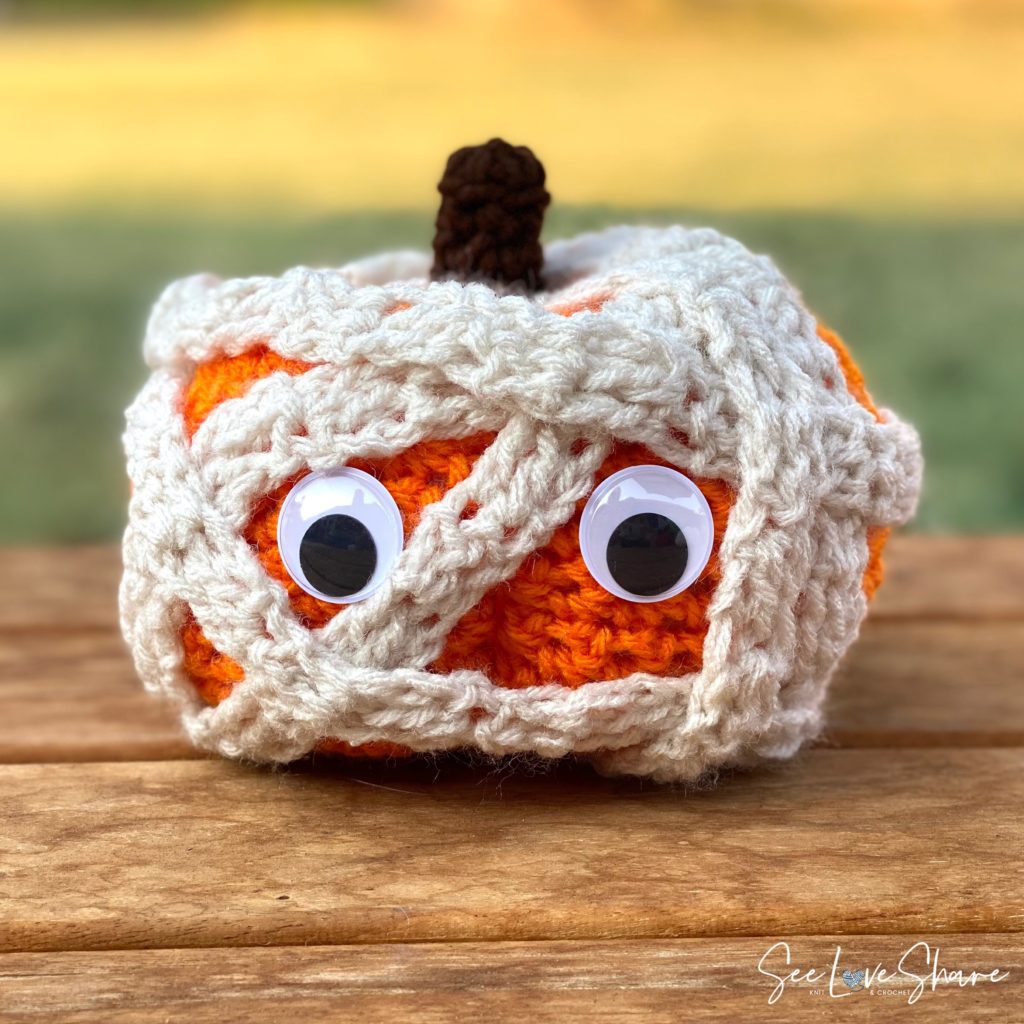
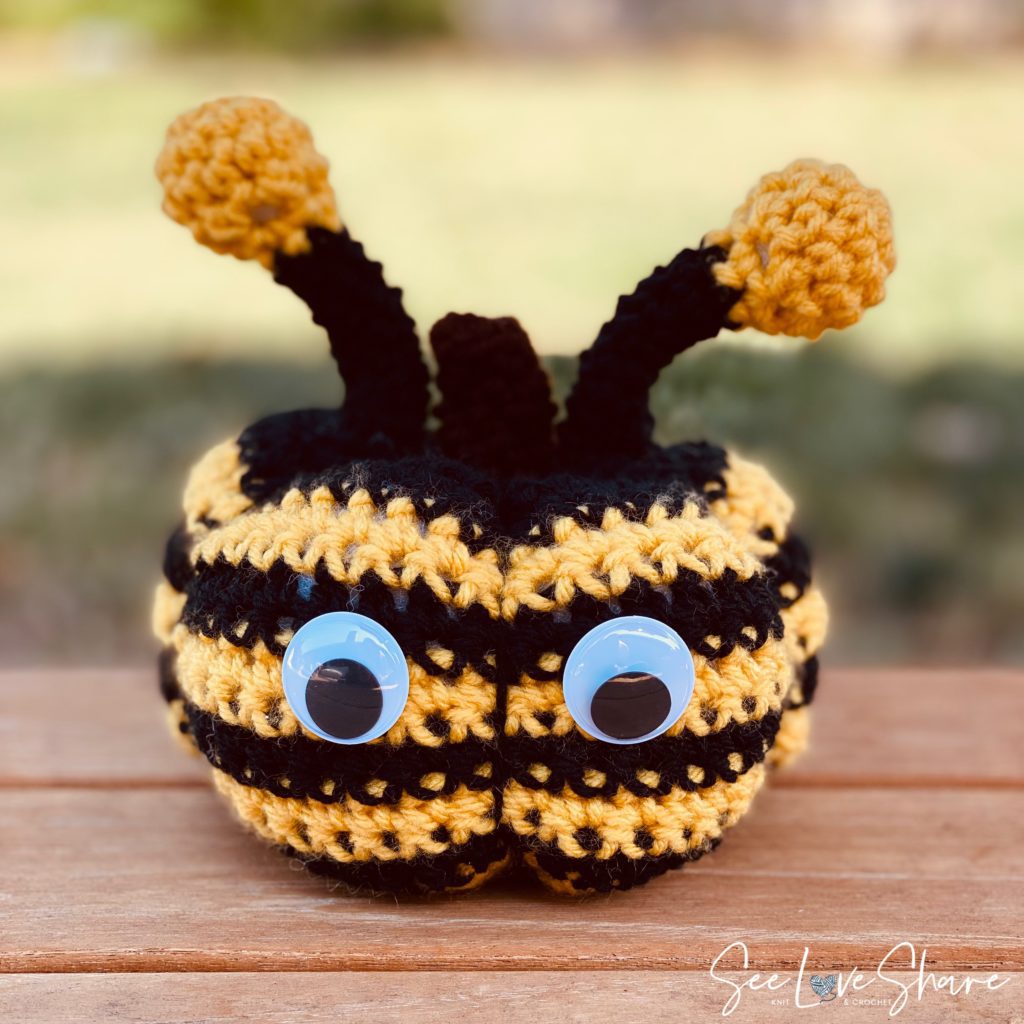
- ✅ The base for 8 costume variants — Devil, Witch, Spider, Skull, Frankenstein, Mummy, Bumble Bee, Kitty Cat
- ✅ Customizable size — adjust chain count for any finished dimension
- ✅ Stash-busting friendly — uses small amounts of worsted weight yarn
- ✅ Step-by-step photo and video tutorial — every part of the assembly is documented
Simple Crochet Pumpkin Pattern Details
| Skill Level | Beginner — basic crochet or knit stitches only |
| Construction | Flat rectangle, seamed and cinched into a round pumpkin |
| Finished Size | Approximately 15 in wide × 6 in tall (rectangle) — finished pumpkin size adjusts to chain count |
| Yarn Weight | Worsted (#4 medium) — Red Heart Super Saver recommended |
| Hook / Needles | 6.0 mm crochet hook OR 6.0 mm knitting needles |
| Gauge (Crochet) | 12 SC and 14 rows = 4 in |
| Gauge (Knit) | 17 sts and 23 rows = 4 in |
Here is a quick summary….
About this simple crochet pumpkin pattern:
Use this pumpkin base for all the costume patterns. See the specific costume pattern for the matching yarn to work up the pumpkin.
Measurements:
The pumpkin base should measure approx. 15in wide by 6 in tall.
Materials for the Simple Crochet Pumpkin Pattern
- Red Heart Super Saver yarn — comes in every color you’ll need across all 8 Lil Monsters costumes:
- Pumpkin (orange) — base color for several costumes including Mummy and Bumble Bee
- Black — for Spider, hat trims, ears, bolts, embroidery
- Aran (off-white) — for Skull and Mummy wraps
- Spring Green — for Frankenstein
- Cherry Red — for Devil
- Amethyst (purple) — for Witch
- Orchid (pink) — for Kitty Cat inner ears
- Coffee or Brown — for stumps
- Bright Yellow — for Bumble Bee
Shop the materials
- 6.0 mm crochet hook — crochet hook bundle here
- OR 6.0 mm knitting needles (for knit version)
- Polyfil stuffing
- Tapestry needle for seaming and assembly
- Scissors


Why this simple crochet pumpkin pattern works for any costume
The reason this pattern is so versatile is that it’s worked as a flat rectangle (about 15″ wide × 6″ tall) rather than in the round. That sounds counterintuitive — most amigurumi-style pumpkins are worked in continuous rounds with increases and decreases — but the flat rectangle method has some genuine advantages.
- It’s beginner-friendly. No counting decreases, no shaping anxiety. If you can crochet a simple rectangle, you can make this pumpkin.
- It’s customizable. Change the chain count to make a wider or narrower pumpkin. Add more rows for a taller one. The math is forgiving.
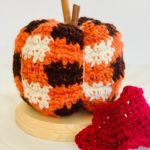
- It accepts color changes naturally. Want a Frankenstein with a green base and black hairline? Just switch yarn colors at the row of your choice. Want bumble bee stripes? Swap colors every two rows.
- It seams cleanly. The seam runs vertically up the back, completely hidden by the stump and any costume accessories.
Gauge:
Crochet: 12SC and 14 rows = 4in
Knit: 17sts and 23 rows = 4in
Abbreviations:
Crochet:
SC: Single crochet
DC: Double crochet
Ch: Chain
Sts : Stitches
Slst : Slip Stitch
Rnd: Round
Knit:
K: knit
K2tog : knit 2 together
PATTERN:
Crochet:
With pumpkin colour from the costume instructions, ch 43.
Row 1: SC in 2nd ch from hook to end, ch 1, turn (42 SCs)
Row 2-23: SC in 2nd SC from hook to end, ch 1, turn (42 SCs)
Bind off, leaving a long tail to sew up seam.
Stump: with Coffee, ch 4, join to first ch with a slst. Loop created.
Round 1: 6 SC within the loop created
Rnd 2: SC in back sts only (creating a ridge)
Rnd 3-7: SC around.
Bind off and attach to the top of the pumpkin.
Knit:
With pumpkin colour from the costume instructions, cast on 60 sts.
Work pattern in garter stitch.
Row 1-22: knit to end.
Bind off, leaving a long tail to sew up seam.
Stump: with Coffee, cast on 5 sts
Row 1-6: knit
Bind off and fold over and sew sides to create a tube. Attach to the top of the pumpkin.
Tips for the perfect pumpkin shape
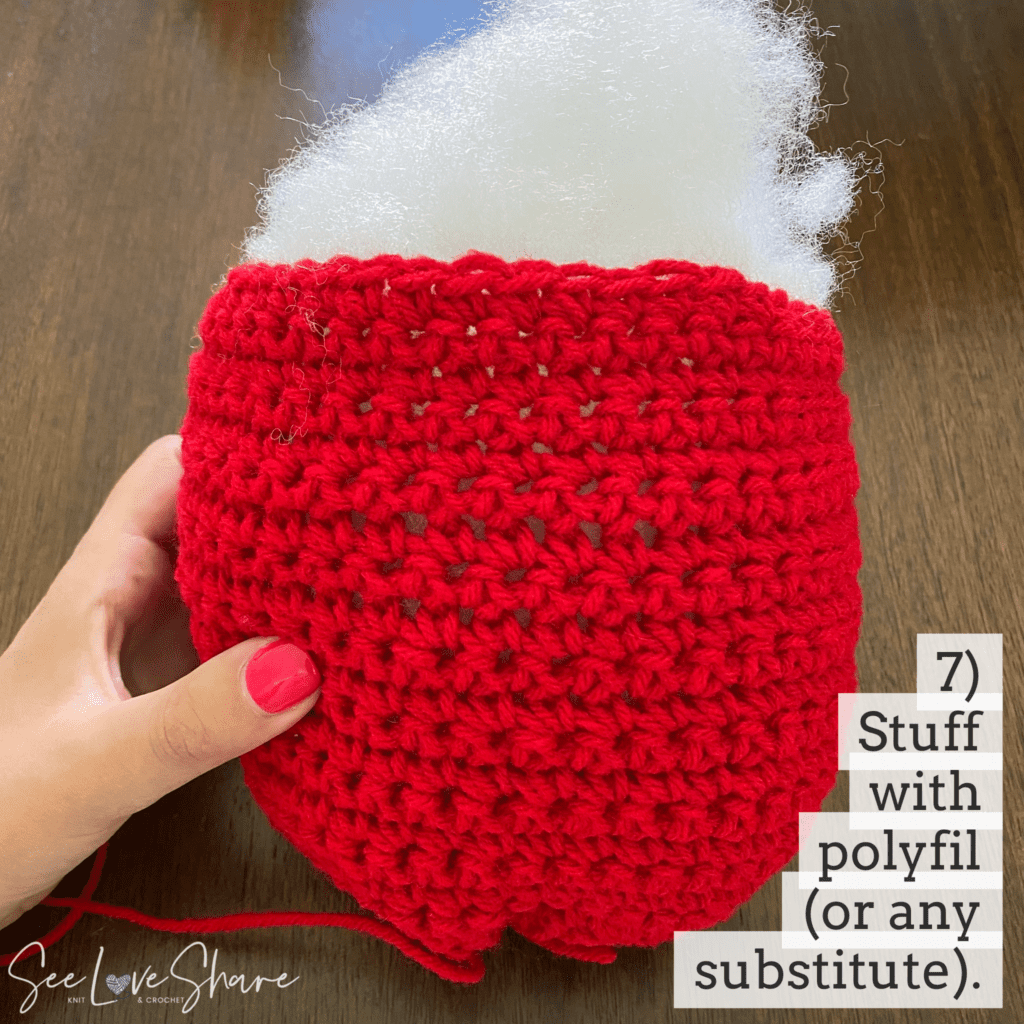
- Stuff firmly but not aggressively. Polyfil should fill the pumpkin completely without warping the stitches. Give it a gentle squish — it should bounce back, not stay compressed.
- Pull the gathering yarn snug. When you cinch the top to form the round shape, pull tightly enough that the gather sits flush against the stuffing. A loose gather will leave a flat-topped pumpkin.
- Add the segment lines for extra dimension. Many makers love wrapping a length of matching yarn around the pumpkin from top to bottom in 4–6 places to create the classic pumpkin “ribs.” This is optional but makes the finished piece look more polished.
- Match yarn weight to the costume. The instructions are written for worsted weight (#4) Red Heart Super Saver. If you swap to bulky or DK weight, your finished size will change — that’s fine, just adjust the chain count proportionally.
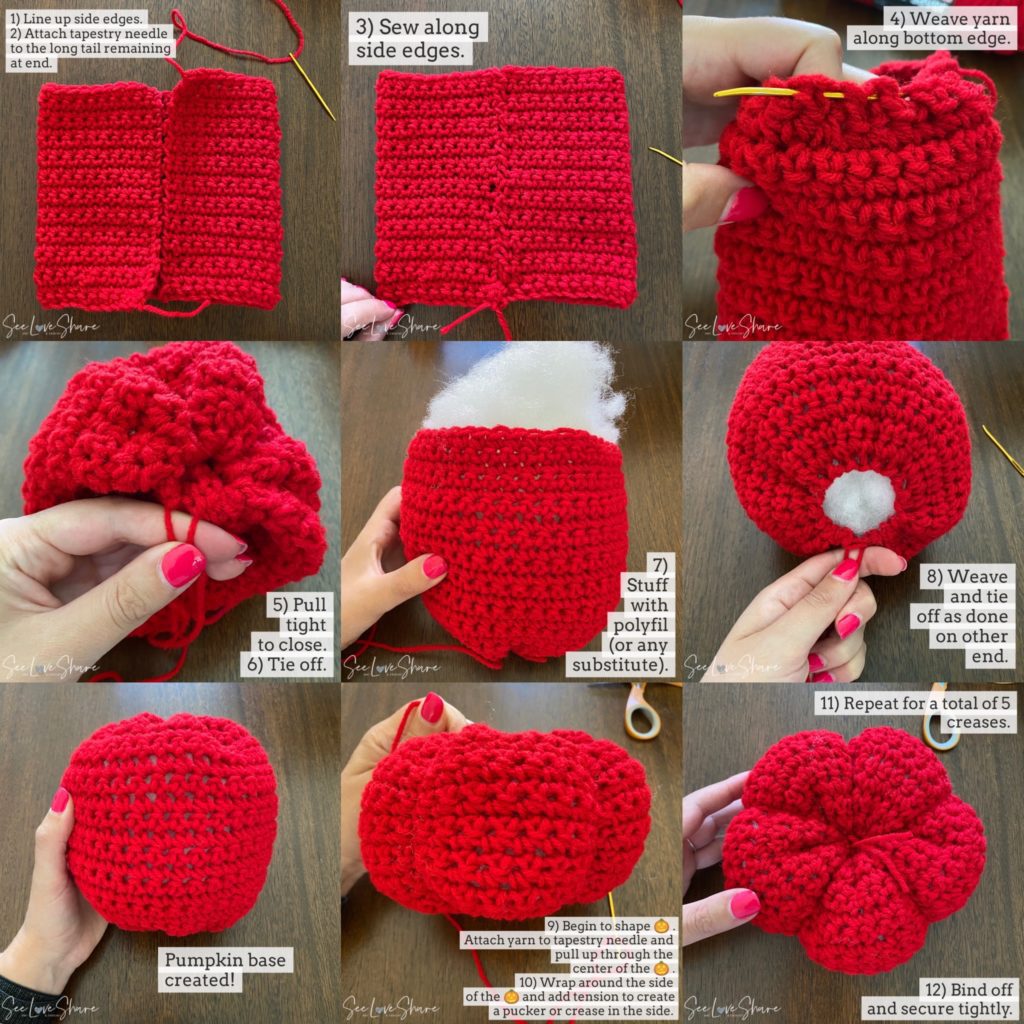
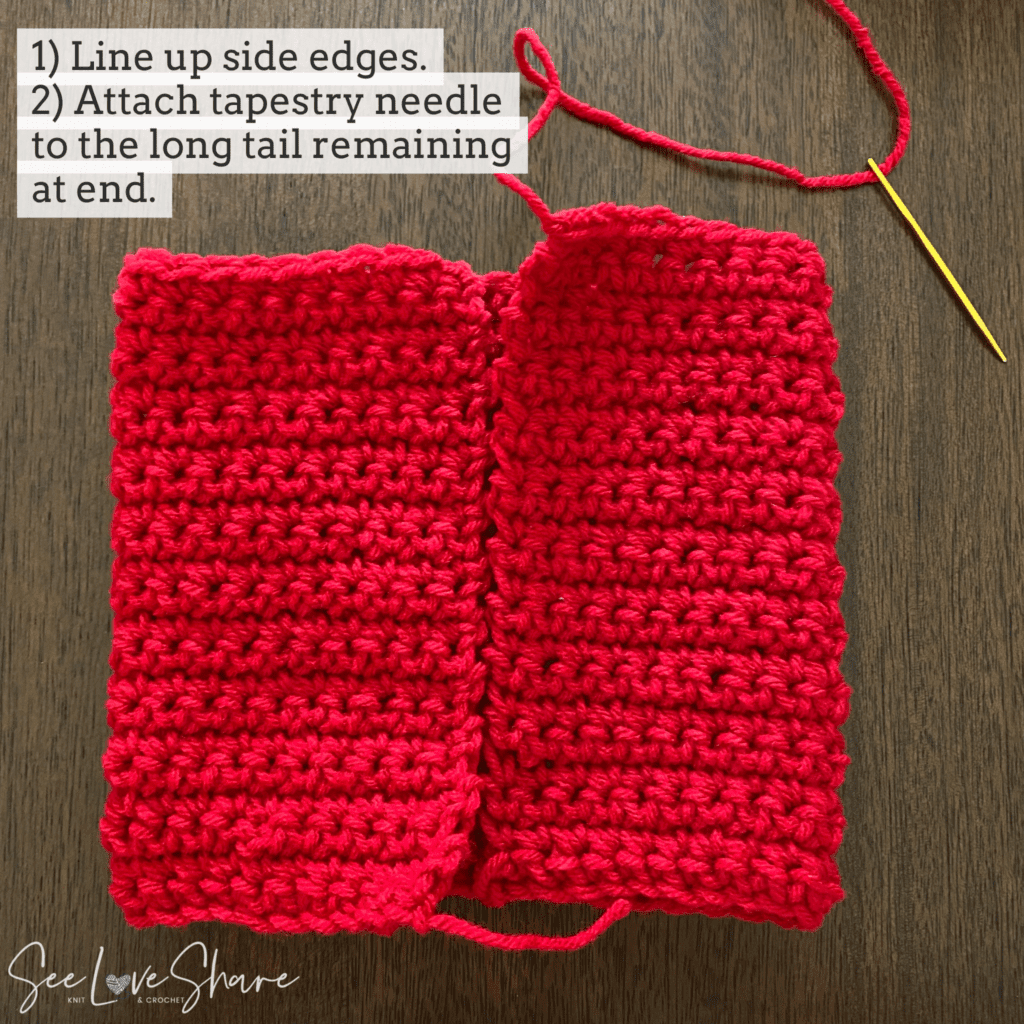
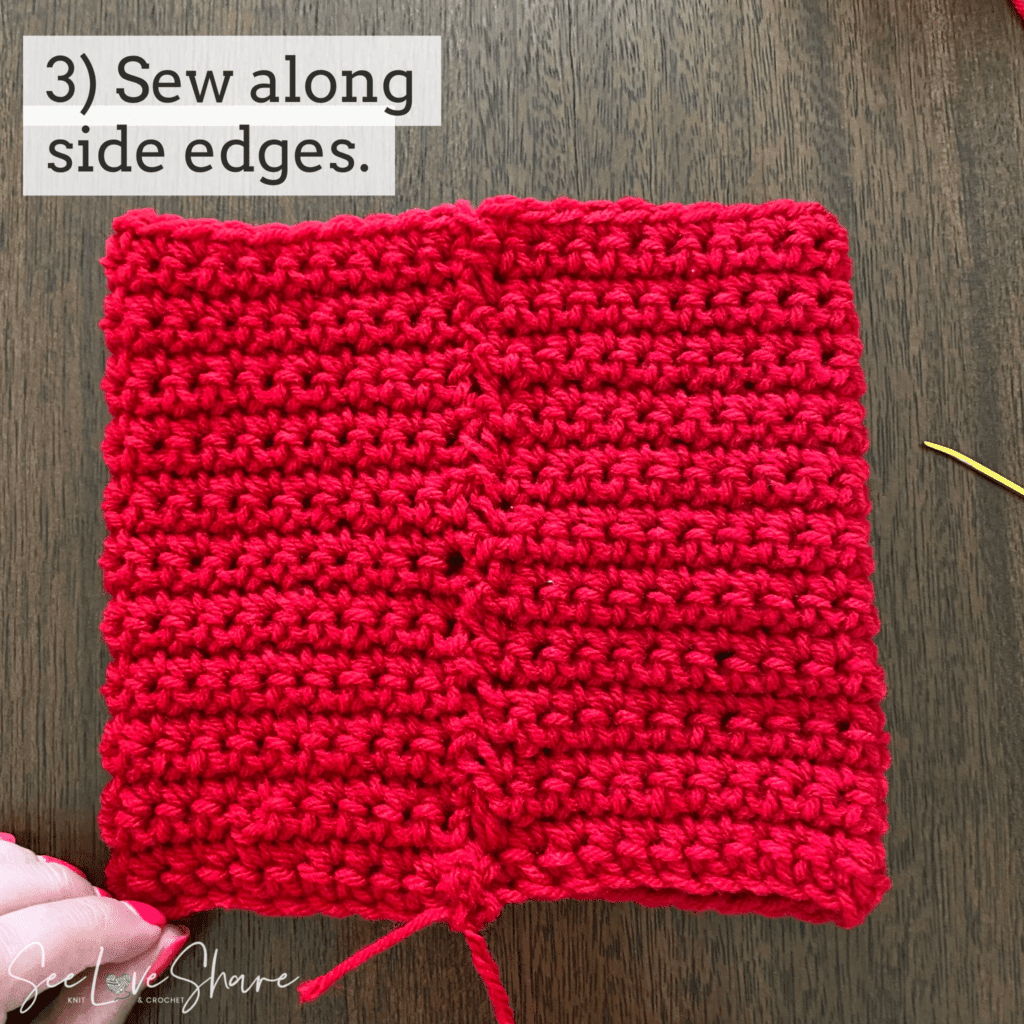
Simple Crochet Pumpkin Pattern Assembly
These instructions are used for both knit and crochet patterns. Here is how we get it going…!
STEP 1 & 2:
Step 3:
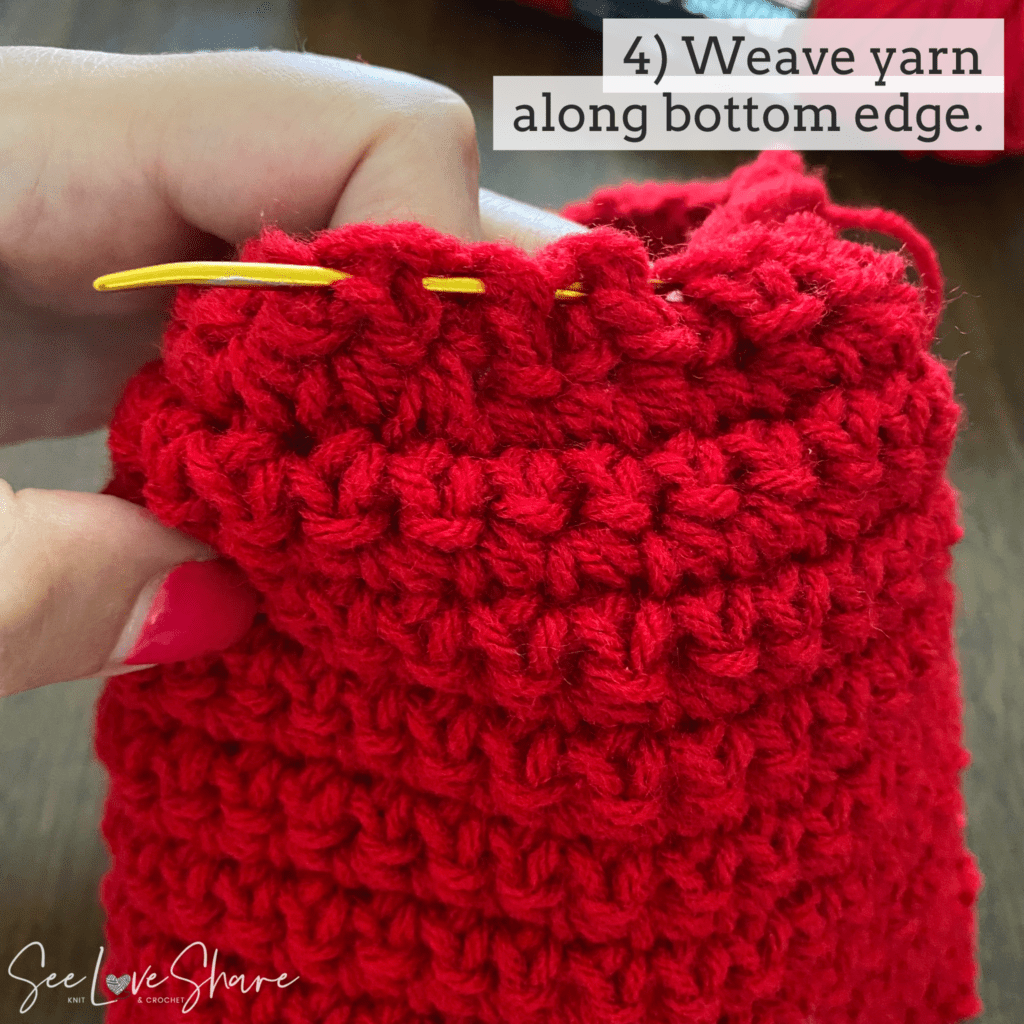
Step 4:
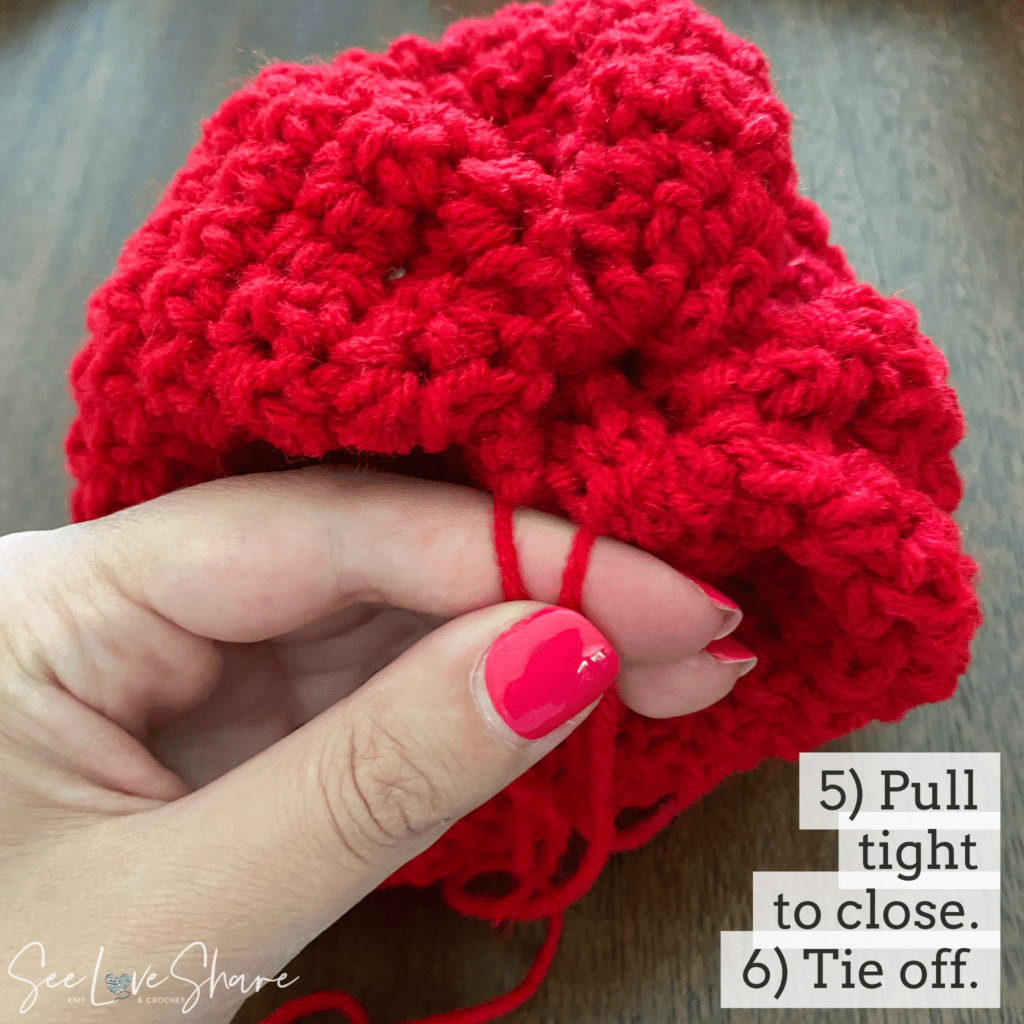
Step 5 & 6:
Step 7:
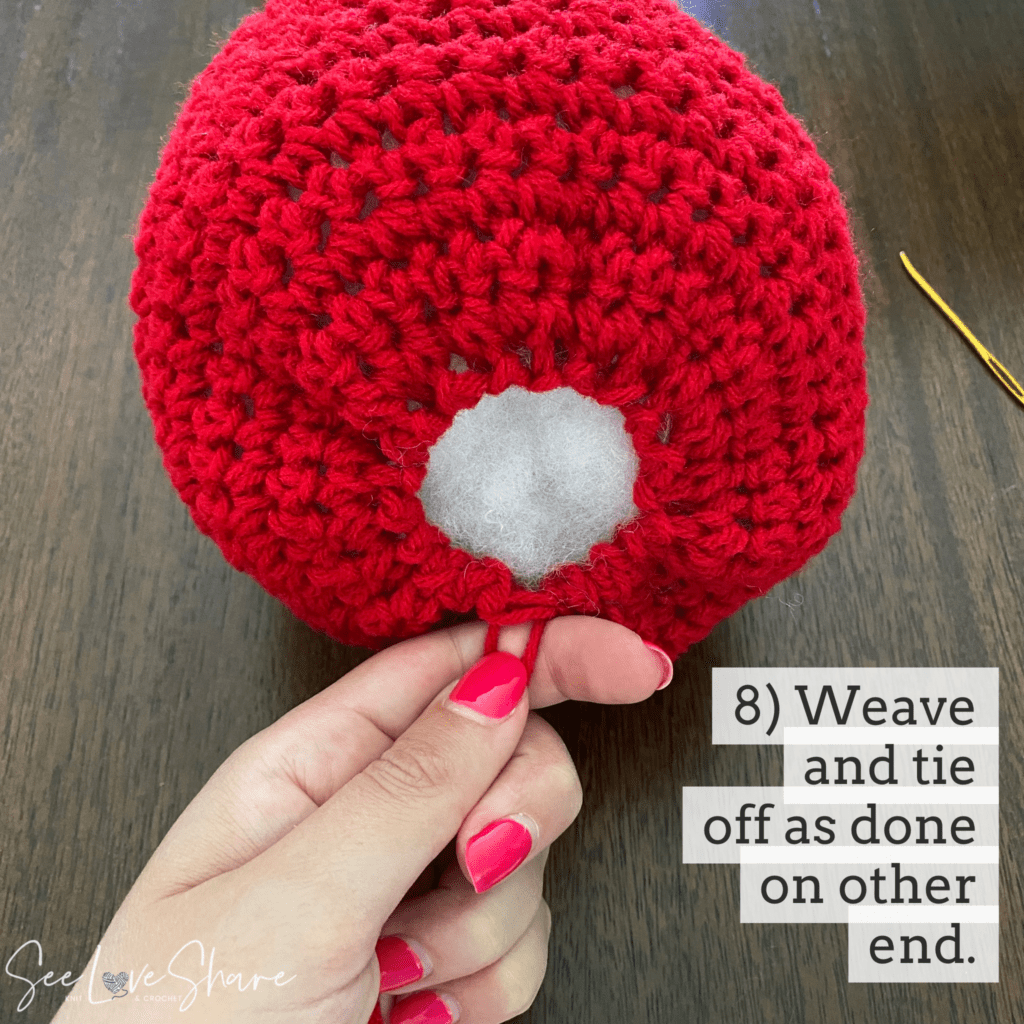
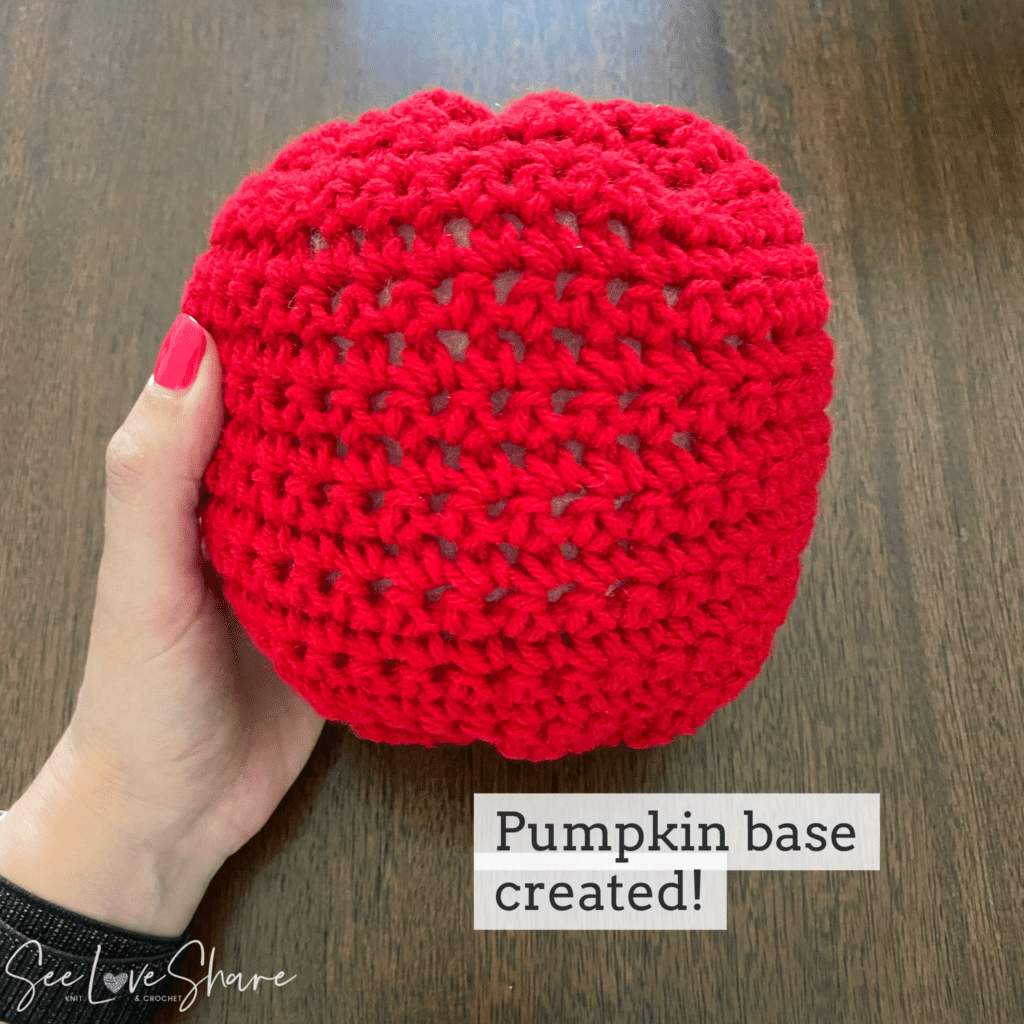
Step 8:
Almost there!
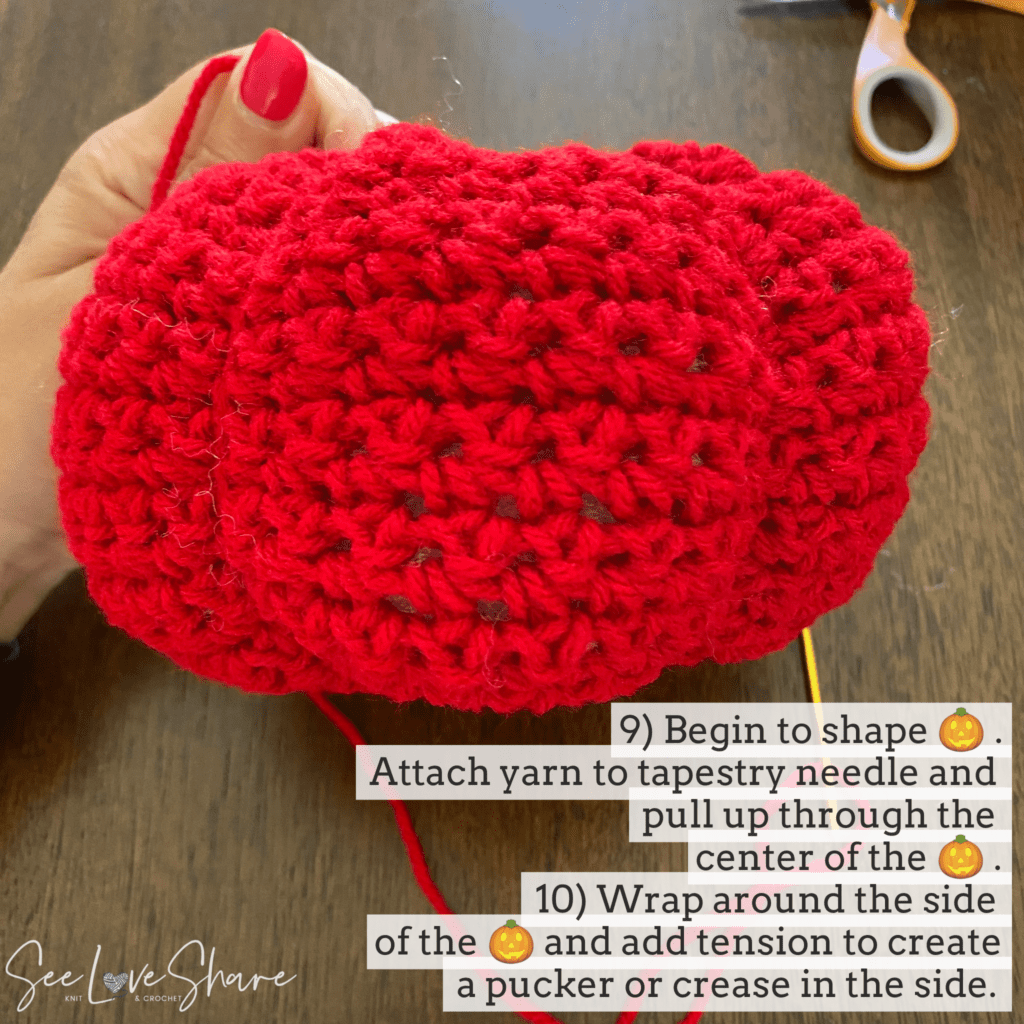
Step 9 & 10:
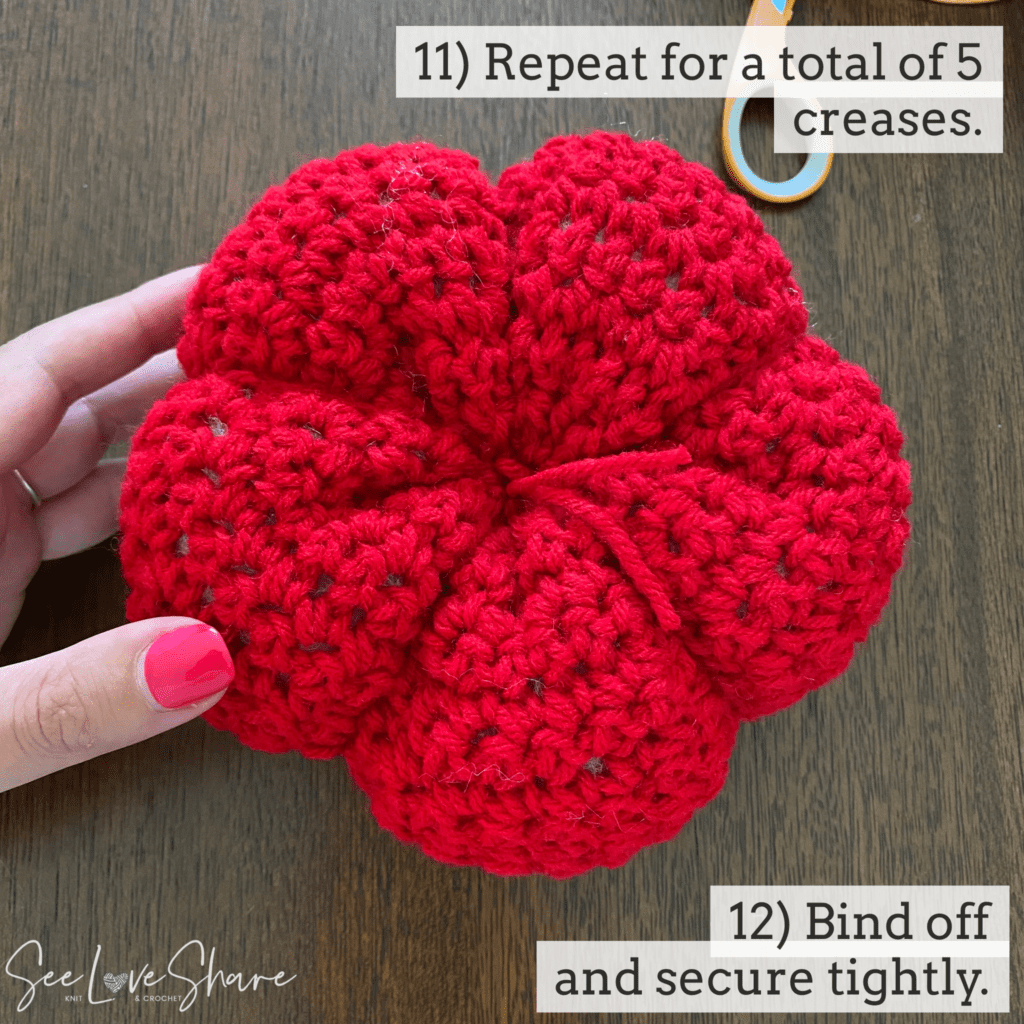
Step 11 & 12:
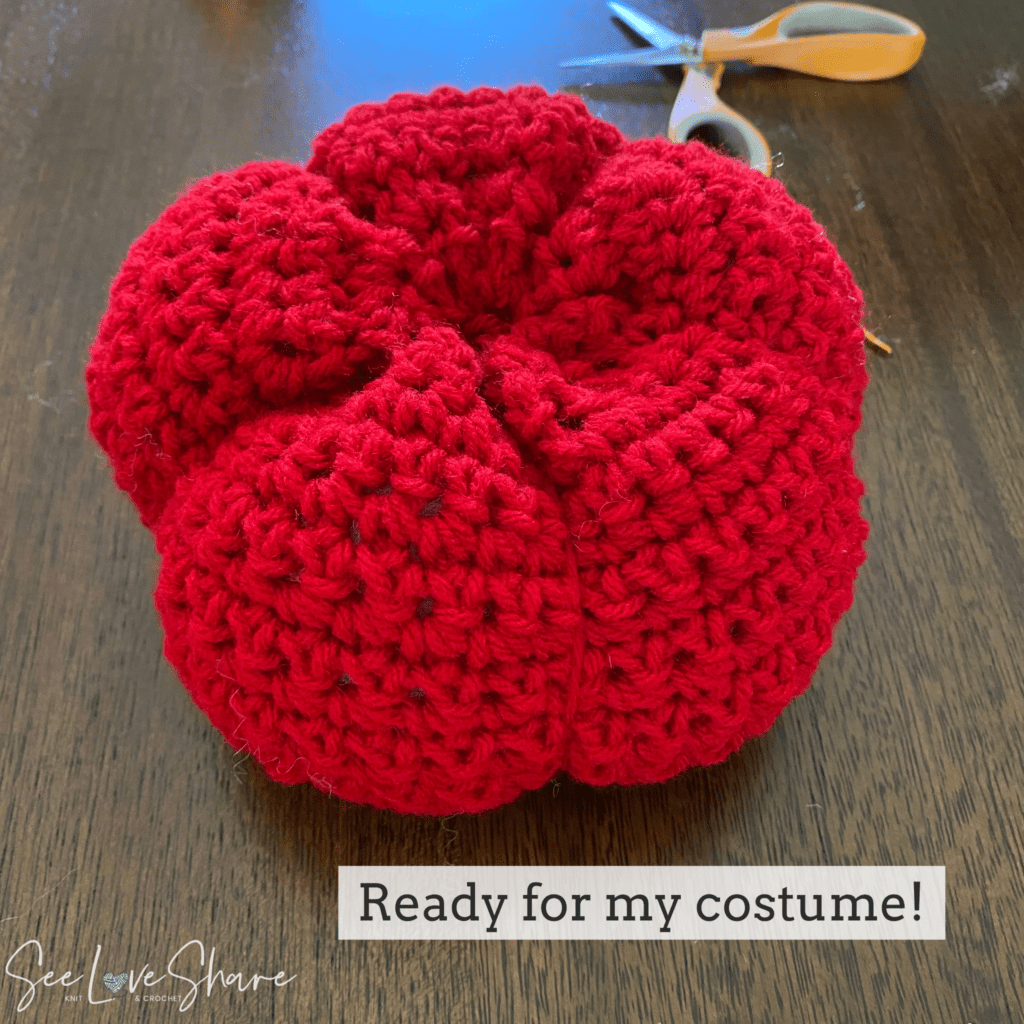
Voila!
Video Tutorial — Simple Crochet Pumpkin Pattern
Use This Simple Crochet Pumpkin Pattern for the Lil Monster Pumpkin Patch
Make a coordinated patch with the costume patterns
Once you have the simple pumpkin base technique down, every costume in the Lil Monsters Pumpkin Patch comes together quickly. Each costume uses this exact same base — what changes is the yarn color, the accessories (ears, hat, horns, etc.), and the embroidered face details. Make one costume to start, then come back and add to your patch over time.
Pumpkin Costumes Using This Simple Crochet Pumpkin Pattern
You have a bunch to choose from. Click on the photo below to route to the exact one you’re looking for!

Tips for the Perfect Simple Crochet Pumpkin Pattern
- Stuff firmly but not aggressively. Polyfil should fill the pumpkin completely without warping the stitches. Give it a gentle squish — it should bounce back, not stay compressed.
- Pull the gathering yarn snug. When you cinch the top to form the round shape, pull tightly enough that the gather sits flush against the stuffing. A loose gather leaves a flat-topped pumpkin.
- Add segment lines for extra dimension. Wrap a length of matching yarn around the pumpkin from top to bottom in 4–6 places to create the classic pumpkin “ribs.” Optional but makes the finished piece look more polished.
- Match your yarn weight to the costume. Instructions are written for worsted weight (#4). If you swap to bulky or DK, finished size changes — adjust chain count proportionally.
- Knit or crochet? Both versions create the same plump pumpkin. Pick whichever craft you’re more comfortable with — the costume add-ons work with either base.
- Make a whole patch. Once you’ve made one pumpkin base, the costume add-ons (hats, ears, embroidery) come together fast. Build your collection over multiple weekends.
Take Your Pumpkin Patch Further
Crochet Cable Pumpkin Pattern
Ready for a more textured pumpkin to round out your patch? My bestselling Crochet Cable Pumpkin pattern is the perfect companion piece — beautiful cabled texture, beginner-friendly, printable PDF. Use code SEELOVE15 for 15% off.
Simple Crochet Pumpkin Pattern FAQ
How long does it take to make this pumpkin?
Approximately 1–2 hours for the base rectangle plus assembly. Once you have the rhythm of this simple crochet pumpkin pattern, you can crochet the base in an afternoon and assemble the next morning.
Can I make this pumpkin bigger or smaller?
Yes — that’s the beauty of this method. To make a smaller pumpkin, reduce your starting chain (try 30 instead of 43). To make a bigger one, increase to 55 or 65. Just keep your row count proportional so the rectangle stays roughly 2:1 width to height.
What’s the best yarn for this pattern?
Red Heart Super Saver in worsted weight (#4) is the recommended yarn for this simple crochet pumpkin pattern. It’s affordable, holds its shape, comes in every color you’ll need across the 8 Lil Monster costumes, and is widely available.
Should I knit or crochet?
Both versions are included — pick whichever craft you prefer. The finished pumpkin looks slightly different (knit garter stitch has a softer texture; crochet single crochet is more structured) but both work beautifully as the base for any of the Lil Monster costumes.
Why is it made flat instead of in the round?
The flat rectangle method is much more beginner-friendly than working in the round with increases and decreases. It’s also much easier to add color changes (for bumble bee stripes or skull face details) when you’re working flat. Once seamed and cinched, you’d never know it didn’t start out round.
Can I sell finished pumpkins made from this pattern?
Yes — small batch sales of finished items made from this simple crochet pumpkin pattern are welcome. Please credit SeeLoveShare as the designer and don’t redistribute or resell the pattern itself.
Get Free Patterns by Email
More Crochet Pumpkin Patterns You’ll Love
 Crochet Cable Pumpkin — Beginner’s Guide — a textured cable-stitch pumpkin for grown-up fall decor
- Gingham Plaid Crochet Pumpkin — a charming plaid pumpkin in farmhouse style
- Rustic Ribbed Crochet Pumpkins — a farmhouse-style ribbed pumpkin pattern
- Browse all Crochet Halloween Patterns on the SeeLoveShare blog

Save This Simple Crochet Pumpkin Pattern for Later
Want to come back to this simple crochet pumpkin pattern later? Save it to Pinterest so you can find it when you’re ready to make your pumpkin patch. I’d love to see your finished pumpkins — tag @seeloveshare on Instagram! 🎃
This simple crochet pumpkin pattern, photos, video, and instructions are © SeeLoveShare LLC. For personal use only — please do not redistribute or resell the pattern. Small-batch sales of finished items are welcome with credit. Thank you for supporting an independent designer! 🎃